
What I learned by building static website with Bun, Elysia and JSX in 2024
For a couple of months I’ve wanted to create a self-hosted blog in addition to my Medium-based one. A few weeks ago, I read R. Mark Volkmann’s Server-Driven Web Apps with htmx, and it inspired me to try building my blog with a modern JS stack. I chose Bun, Elysia, and bare JSX and tried to create a static site MVP — you're looking at the result, actually, but there's also the source code.
In this article, I’ll discuss these tools and why I chose them: pros, cons, the challenges I met and how I solved them. We’ll come across development and publication of a tiny blog. We’ll also discuss the current state of the modern JS stack. Spoiler: the JS stack is still cursed, and using technologies above in commercial production is questionable. At the end, I’ll share my vision, how the site can be further developed.
This is the first part of a saga where I’m developing my own site with modern JS tools. You might be interested to check the second part as well, where I set up GitHub Actions and basic monitoring, write bash scripts and a few endpoints, enhance SEO and typography.
Static site
First, why did I decide to create a static site?
- It’s the most suitable format for a blog. The main goal is to display the content of the articles quickly and pretty. The pipeline seems easy: you write an article, it is once rendered into HTML and then served from the server. Search engines index you properly if everything is set up correctly. Articles are rarely updated, and in those cases, they can be
re-rendered and saved again. - In theory, static sites are simpler to develop and maintain. Articles can be written directly in Markdown format — which is already close to Medium or Notion. There are engines to render HTML from Markdown. Then you wrap this into a single page with a template engine and cache it for distribution. The server handles one request per asset, such as a font or image, including the page itself. And all requests except the initial page are initiated immediately. Since everything is rendered once, the approach is more like static site generation than server-side rendering.
- It doesn’t block partial dynamics. Interactive elements, such as comments or subscriptions, can be implemented with htmx or another framework or library.
- There’s no reason to make an SPA or use page parts on the corresponding frameworks for this task. Let the server render the HTML and the browser — display and route it. There is no need to put all this in client code if the server and browser can do this job better. And there’s no need for a spinner-fest just to display a tweet.
Now that SPA enthusiasts’ asses have been set a bit on fire, let me talk more about the chosen technologies to implement this approach.
Stack
Bun
Alternatives:
- Usually, for a JS server, everyone picks Node.js as the default runtime.
- There’s also Deno, which is promising since 2019, does the same things, and is a couple of times more performant.
And then I found out that enthusiasts created a full-fledged JS environment in the broad sense: runtime, package manager, test runner and bundler:
- No more dilemma while choosing between npm, pnpm, and yarn;
- Integrations with other familiar tools by default: no need to reinvent the wheel for every familiar thing like, dunno, in a Dart/Flutter stack;
- No need to separately pull in Vite, SWC or whatever is trendy;
- Couple of times faster than Deno as it is built with focus on performance and using Zig programming language. I believe that the usage of JavaScriptCore aka JSC instead of V8 doesn’t affect the speed that much, though generally speaking it is faster.
Sold! What’s in practice? Overall, expectations are met. It works and is quite fast. Package installation:
bash
laidrivm@Vladimirs-MacBook-Pro blog % bun add xss
[0.06ms] ".env"
bun add v1.1.21 (70ca2b76)

installed xss@1.0.15 with binaries:
 - xss

3 packages installed [514.00ms]
Bundling:
bash
laidrivm@Vladimirs-MacBook-Pro blog % bun run build
$ bun build --target=bun --outdir ./out src/index.ts && bun build --target=bun --outdir ./out src/generate.tsx && bun lightningcss --minify --bundle --targets '>= 0.25%' src/styles/main.css -o public/main.css

  ./index.js  439.28 KB

[28ms] bundle 238 modules

  ./generate.js  143.41 KB

[4ms] bundle 18 modules
Tests also run quickly. I was too lazy to conduct load testing, but I trust the benchmarking that others have already conducted.
Although I also revealed some shortcomings.
Bun fallbacks to Node when it mets some own limitations. For example, I’ve run into it when I tried to read all the files in a directory:
typescript
import {readdir} from 'node:fs/promises'

const files = await readdir(./articles)
Or here’s an example of deleting a file from the official guides:
typescript
import { unlinkSync } from "node:fs";

const path = "/path/to/file.txt";
unlinkSync(path);
Overall, it’s not that bad as the behaviour is predictable. Also this issue seems temporary as almost 90% of Node’s API has been already covered, improving performance but retaining the interface.
The authors don’t hide Node.js compatibility which is in fact and advantage if you try to move your project from Node to Bun. Although Bun API sometimes have has other calls interface, like with files, you can usually just write bun instead of node in your code and it will work. You’ll also need only to update typos dev dependencies.
Bun fallbacks to npm when it fails as a package manager. This is an uncommon scenario: popular packages are integrated, and for some, you can specify trustedDependencies in package.json. But ESLint, for example, is configured only via npm: npm init @eslint/config@latest.
Bun works unpredictably as a builder, which is the most serious issue. Here’s a component:
typescript
const ArticleList = ({ links }) => (
 <ul>
  {links.map(link => (
   <li>
    <a href={link}>{link}</a>
   </li>
  ))}
 </ul>
)

export default ArticleList
Here’s the build result in a local environment:
javascript
var ArticleList = ({ links }) => u3("ul", {
  children: links.map((link2) => u3("li", {
    children: u3("a", {
      href: link2,
      children: link2
    }, undefined, false, undefined, this)
  }, undefined, false, undefined, this))
}, undefined, false, undefined, this);
And here’s the build result inside a Docker container:
javascript
var hasAnyProps = function(obj) {
  for (let key in obj)
    return true;
  return false;
};
var mergeDefaultProps = function(props, defaultProps) {
  var result = __create(defaultProps, __descs(props));
  for (let key in defaultProps) {
    if (result[key] !== undefined)
      continue;
    result[key] = defaultProps[key];
  }
  return result;
};
var __create = Object.create;
var __descs = Object.getOwnPropertyDescriptors;
var __merge = (props, defaultProps) => {
  return !hasAnyProps(defaultProps) ? props : !hasAnyProps(props) ? defaultProps : mergeDefaultProps(props, defaultProps);
};
var $$typeof = Symbol.for("react.element");

var ArticleList = ({ links }) => ({
  $$typeof,
  type: "ul",
  key: null,
  ref: null,
  props: {
    children: links.map((link2) => ({
      $$typeof,
      type: "li",
      key: null,
      ref: null,
      props: {
        children: {
          $$typeof,
          type: "a",
          key: null,
          ref: null,
          props: {
            href: link2,
            children: link2
          },
          _owner: null
        }
      },
      _owner: null
    }))
  },
  _owner: null
});
Because of this, <ArticleList /> turns into <NoName />. Maybe it’s due to Preact, but I suspect the oven/bun:1.1.21 image. I opened an issue and will try to find the exact reason at least. After spending a couple of hours debugging and unsuccessfully trying to fix the build, I chose the shortest workaround: placing the local build in a Docker container 🗿. Kids, don’t repeat this without adult supervision, especially in your garage startups.
The promlem with destructuring import. Which is a bit unexpected as it is a part of ES6 or ECMAScript 2015. I mean, you can’t just import { gzipSync, gunzpiSync } from ‘zlib’. Generally you have to either
typescript
import zlib from 'zlib'

const { gzipSync, gunzipSync } = zlib
or set build target to bun: bun build --target=bun index.ts. Not a very big deal, but the authors don’t see this as an issuse and also “not to build ahead of time” or not to build at all to run the sources. Oh, well.
Build don’t work with CSS, which is a third problem with Bun as a bundler in a row. At best, it will just move files. At worst, it loses part of them if you use imports, which happened to me. Here, I was about to give up and use Vite, but decided not to overkill and chose LightningCSS — and I’m quite satisfied.
I’ve encountered non-working examples in the guides, but nothing critical or unfixable. The documentation suits me just fine.
Still, I think Bun is already suitable for production commercial projects, including large ones. It has clear fallbacks to Node and npm if needed, but it almost always works beyond expectations. Migrating from Node shouldn’t be quite resource-intensive. I haven’t integrated testing into the project yet, but I’ve tried it out — and it’s also fine. You write in a Jest-like style, and migrating from Jest is a common scenario.
As for the builder, I’m afraid you’ll have to bring in Vite or stick with what you already use in your project — it’s too early to trust the
Elysia
Alternatives that I spotted in a talk by Vsevolod Detkin aka kravetsone, RU and in Mark’s book. You can combine all of them with Bun:
- Express — the most well-known framework with a solid maturity and a huge ecosystem. However, it’s slow, offers only the middleware pattern (which some consider harmful, RU), and tooling like error logging, OpenAPI schemas, or typing needs to be added. The new major version has been in beta for two years already. I believe it’s better to take hyper-express right away because it’s fresh, express-compatible, and fastest among high-level server frameworks — as it uses uwebsocket.js under the hood.
- Koa — it’s also faster than express, although seems like anything is faster than express. It’s relatively slow comparing to the other frameworks on this list, don’t bring anything revolutionary and seems not that popular as it used to be, so I mentioned it more for completeness.
- Fastify — performs good, supports hooks, middleware, and decorators, provides its own optimised API, a plugin for migrating from express, and some ports of express libraries.
- Hono — also fast, multi-runtime, more popular than Elysia. It has different middlewares and zero dependencies — uses only the Web Standard API if we exclude dev-ones.
Now let’s go through some aspect with Elysia.
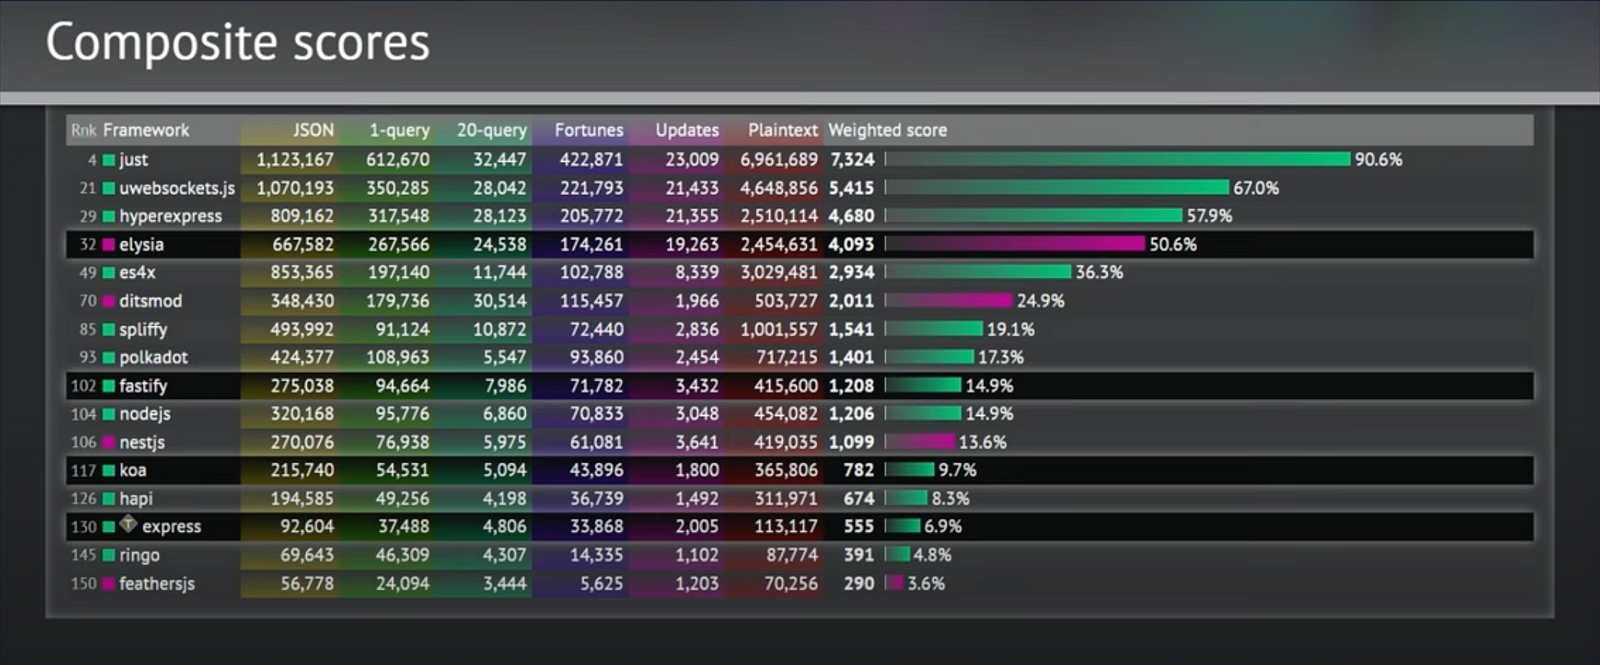
Performance. Elysia mostly outperforms everyone. Above it we see either some nonames, or hyper-express, which I already mentioned, or uwebsockets, which I also mentioned and consider too low-level.
Convenience. I appreciated Elysia’s minimalist syntax. That’s the server:
typescript
const app = new Elysia()
    .get('/', 'Hello World')
    .get('/json', {
        hello: 'world'
    })
    .get('/id/:id', ({ params: { id } }) => id)
.listen(3000)Plugins. First, this is a way you scale your codebase. For type checking to work correctly, in Elysia you have to chain everything to the main instance. But the main instance can be extended with its own plugin, which is also based on another Elysia instance:
typescript
const plugin = new Elysia()
    .state('plugin-version', 1)
    .get('/hi', () => 'hi')

new Elysia()
    .use(plugin)
    .get('/version', ({ store }) => store['plugin-version'])
    .listen(3000)
Secondly, there are already many useful plugins: CORS, JWT, OpenTelemetry, OpenAPI — and others. I used @elysiajs/static and tried to use @elysiajs/html, which I will discuss later.
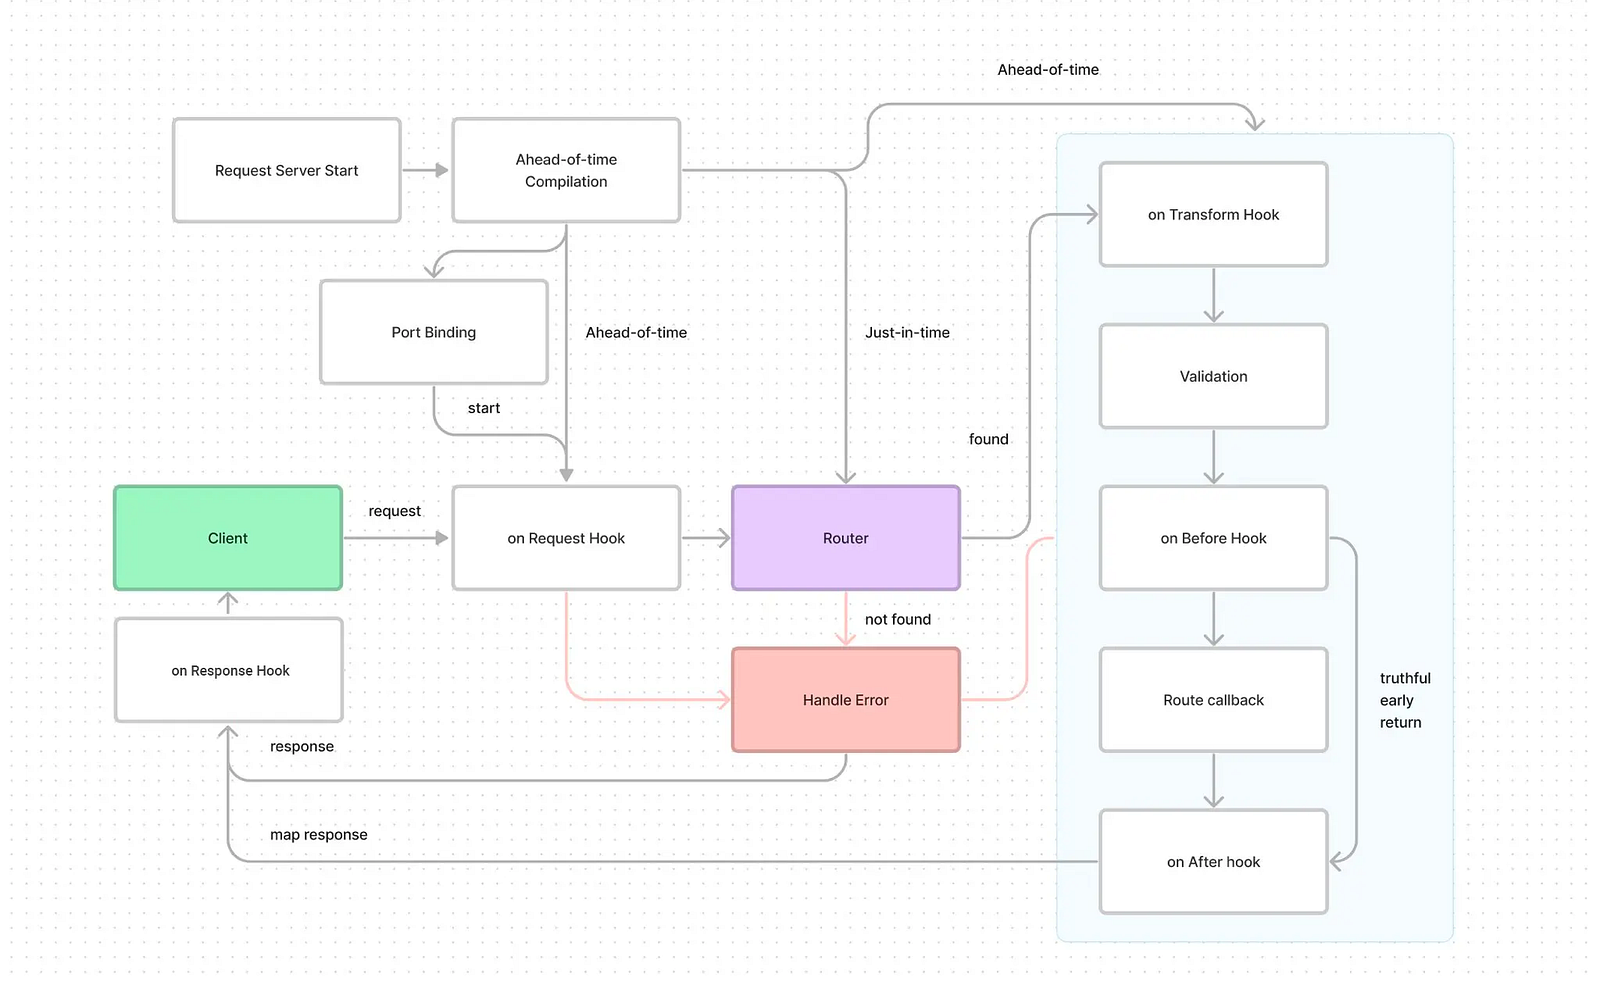
Hooks and LyfeCycle. A hook is a function that intercepts the request’s life cycle event. Fastify has the same approach, which is a modern replacement (or extension, if you wish) for Express middleware.
Here it is also worth mentioning the global context. It is enriched depending on the request stage and can include: path, body, query, params, headers, and a bunch of other things. Moreover, it can be patched with additional global variables and functions, or hooks from plugins can be made globally available.
WebAPI. It’s enough to use the classes described in the standard, like Response, without additional tooling. The code becomes more framework-agnostic. And you can mix it wih other WebAPI —compatible frameworks, like Hono. Don’t ask why, just know that you can.
Queues. Elysia’s life-cycle event is stored as a queue, aka
Instability. While I was working on the project, it turned out that the plugin serving static files stopped working. The workaround is to disable caches in it, which negates on of the pillars of serving statics. I launched the project this way. But in general, because of the disabled caches on static files, I will definitely put it behind some nginx. It will be useful for handling client requests too. Moreover, you can configure SSL much more flexibly on it, which is important for SEO.
The HTML plugin didn’t work even with the starter example — although I configured everything correctly. Some examples are also broken, although they show the init ideas.
There are issues that have been pending for so long, although approved by the author, that people are creating separate projects to close them. I’m not criticizing the author, just highlighting the reality that makes this library less suitable for commercial projects.
I chose Elysia due to my interest in experiments and the fact that it is slightly faster than Hono. But after trying it, it seems that Hono is much closer to commercial production as a library. Its community is also larger, and it’s more familiar for onboarding after express.
So, if you want to experiment, I would recommend Hono first. If not, put hyper-express on top of Bun or migrate your project to it. Although you may encounter some middlewares not working out of the box.
JSX
The idea of using bare JSX is straightforward. Why drag in a custom template engine when JSX essentially is one? You just need to render it into HTML on the server. And I’m clearly not the first to come up with this idea. The concept sounds promising because using bare JSX is much simpler and lighter than Next.js or even Gatsby. Popular JS template engines impose custom syntax and most are morally outdated. Sorry, Pug 💔 Here, you’re writing something very close to plain HTML.
Along with JSX, React often comes as the default runtime. In Bun, you can use JSX directly in the server response, but under the hood, it works on React. Fortunately, you can configure another runtime for JSX transform or JSX factory. In Elysia, JSX support is provided by the @elysia/html plugin, which in turn uses Kita’s JSX runtime. Under the hood, there's React and Kita’s own JSX factory. But it didn't work for me, even this basic example from the doc. Maybe Elysia only supports direct responses from handlers, but there's trouble with external components and their chaining — I didn't dig deep here.
I have nothing against React on the server — we’re not forcing the user to download and execute the code in the browser. However, I chose a more optimized and productive version — Preact. I had to tinker with the config a bit, though. Looking through the documentation for Bun, Elysia, TypeScript, and the bun-preact-ts project, I put it together in a tsconfig.json:
json
{
  "compilerOptions": {
    // Enable latest features
    "lib": ["ESNext", "DOM"],
    "target": "ESNext",
    "module": "ESNext",
    "moduleDetection": "force",
    "allowJs": true,
    "jsx": "react-jsx",

    // Setting up preact
    "jsxImportSource": "preact",
    "baseUrl": "./",
    "paths": {
      "react": ["node_modules/preact/compat"],
      "react-dom": ["./node_modules/preact/compat/"]
    },
    "typeRoots": ["src/types", "./node_modules/@types"],

    // Bundler mode
    "moduleResolution": "bundler",
    "allowImportingTsExtensions": true,
    "verbatimModuleSyntax": true,
    "noEmit": true,

    // Best practices
    "strict": true,
    "skipLibCheck": true,
    "noFallthroughCasesInSwitch": true,

    // Some stricter flags (disabled by default)
    "noUnusedLocals": false,
    "noUnusedParameters": false,
    "noPropertyAccessFromIndexSignature": false
  },
  "resolve": {
    "extensions": [".js", ".jsx", ".ts", ".tsx", ".json", ".svg", ".css"]
  },
  "include": ["src"]
}
As an alternative, I could have used SolidJS. Or even write something custom. Besides the factory or transform, you also need to use renderToStaticMarkup or its equivalents to actually get HTML. I used renderToString from Preact.
In the project, I built very simple pages, so I might not have encountered some limitations of the approach yet. Overall, I was more than satisfied. You write your components, pass properties to them, and they quickly render into pages. Aside from dealing with settings, engines, and all that — I’m very satisfied.
Other Tools
A few lines about what else ended up in the project dependencies:
- TypeScript. I won’t go into detail about the library itself and the pros and cons of static typing. I’ll just say that other tools work with it out of the box. TypeScript itself works with props in JSX. Bun allows you to execute .ts and .tsx files directly. Elysia uses TypeBox and inherits its capabilities. There’s also Eden aka end-to-end type safety, which wraps the type on the backend and it gets pulled into the frontend — guaranteeing data types stay consistent. Overall, it’s simpler to use in some way than not using it, although it will still work in runtime without any types.
- ESLint and Prettier. Basic linter and formatter in the JS stack. I didn’t spend much time choosing. I configured them quite loosely.
- Marked. Again, I didn’t spend much time — looked at the most popular Markdown to HTML engines in JS and chose the most popular one, which suited me perfectly.
js-xss . When you’re rendering HTML from user-generated content, it’s good to sanitise it. Even if the user is you. Initially tried DOMPurify because it’s recommended by the creators of Marked. More precisely, Isomorphic DOMPurify, because it works well on the server. Both have jsdom in their dependencies, which required it’s node modules even after a successful build:Cannot find module "usr/src/app/node_modules/jsdom/lib/jsdom/living/xhr/xhr-sync-worker.js" from "usr/src/app/out/generate/js". That’s cringe, I had to remove that dependency — so the choice fell onjs-xss . Although maybe the problem was with the Bun bundler.- LightningCSS. Didn’t spend much time choosing either — the landing page convinced me: this thing is fast because it’s on Rust and is modern compared to something like PostCSS. That was enough for me. I use it with the default config and so far, everything’s fine. Though it’s worth digging into the docs to see what else it can do.
- Docker. Of course, I could have set up pm2 or systemd on a virtual private server, but why? Docker also simplifies delivery and is quite predictable in maintenance, so I didn’t go for anything lower-level.
Creating blog
Alright, enough about the stack, let me tell you how I actually wrote a few lines of code that ended up in the repo. First, let’s install bun itself:
bash
curl -fsSL https://bun.sh/install | bash Create an Elysia application:
bash
bun create elysia appInstall the initial dependencies:
bash
bun installConfigure ESLint:
bash
npm init @eslint/configConfigure Prettier:
bash
bun add -d prettier
nano .prettierrc
Let’s add scripts to package.json that we will later call using bun run for our convenience. We can also configure tests right away:
json
"scripts": {
    "format": "prettier --write 'src/**/*.{css,html,ts,tsx}'",
    "lint": "eslint 'src/**/*.{css,html,ts,tsx}'",
    "test": "bun test --watch --timeout 1000 --rerun-each 2 --coverage",
    "generate_dev": "bun src/generate.tsx",
    "server_dev": "bun run --watch src/index.ts",
    "dev": "bun run generate_dev && bun run server_dev"
}
Let’s run the server that serves static pages on / path from the public/ directory. To do this, we use the static plugin. To add a dependency, we use bun add …. Had to disable caching because without this the plugin doesn’t work in the current version:
typescript
import {Elysia} from 'elysia'
import {staticPlugin} from '@elysiajs/static'

const app = new Elysia()
 .use(
  staticPlugin({
   prefix: '/',
   assets: 'public',
   indexHTML: true,
   noCache: true // temporary because of https://github.com/elysiajs/elysia/issues/739
  })
 )
 // place to add caching headers
 .listen(3000)

console.log(
 `Elysia is running at ${app.server?.hostname}:${app.server?.port} on Bun ${Bun.version} for ${Bun.nanoseconds() / 1000000000} seconds`
)
Now we can place in public/ a manually written index.html, run the server, and check that it displayed on http://localhost:3000. It’s worth putting a caching proxy like nginx in front of the server or setting caching headers manually to workaround that temporary noCache: true.
Next, I want to get environment variables from the .env file. I only added the port, but you can also put the path to the certificates there if you don’t want to place them in the project’s directory:
typescript
const dotEnv = await Bun.file('.env')

try {
 if (!(await dotEnv.exists())) throw new Error('No .env found')
} catch (error) {
 console.error(error)
}

...listen(port: process.env.PORT)
Now let’s move on to the page generation. You can make an endpoint, even under authorization, that will trigger generation. Yet I limited myself to a separate script. As the source content, we take .md from the articles/ directory. There’s no Bun API method to view a directory yet, so we use Node API. We know that the main page will be different as it will output a list of pages except the index, so we process index.md separately:
typescript
import {readdir} from 'node:fs/promises'

async function generateSite() {
  const articlesPath = './articles'
  const publicPath = './public'
  const links: string[] = []

  try {
    const files = await readdir(articlesPath)
    const mdFiles = files.filter(file => file.endsWith('.md'))

    for (const mdFile of mdFiles) {
      if (mdFile === 'index.md') continue
      const mdFilePath = `${articlesPath}/${mdFile}`
      const outputFileName = mdFile.replace('.md', '.html')
      const outputFilePath = `${publicPath}/${outputFileName}`
      await generatePage(mdFilePath, outputFilePath)
      links.push(outputFileName)
    }

    await gereateIndex(articlesPath, publicPath, links)
  } catch (error) {
    console.error(`Error reading articles directory: ${error}`)
  }
}

await generateSite()

console.log('Static site generated successfully.')
Okay, it’s finally time to write some JSX. Let’s start with a simple template: the page has a title, content, and might have a “back to main” arrow. The content will be rendered by a library that converts markdown to HTML; we just need to insert it into the page.
Also I want all headers except for h1 or # to have anchor links. This can be done manually when writing an article — but I wanted them to be set automatically. I created the corresponding component too.
typescript
const ArrowComponent = () => (
  <a href="/" className="arrow-container">
    <div className="arrow">←</div>
  </a>
)

const Page = ({
  title,
  content,
  includeArrow = false
}: {
  title: string
  content: string
  includeArrow: boolean
}) => {
  return (
    <html lang="en">
      <head>
        <meta charset="UTF-8" />
        <meta name="viewport" content="width=device-width, initial-scale=1.0" />
        <title>{title}</title>
        <link rel="stylesheet" href="/main.css" />
        <link rel="icon" type="image/png" href="/favicon.png" />
      </head>
      <body>
        {includeArrow && <ArrowComponent />}
        <div className="content" dangerouslySetInnerHTML={{__html: content}} />
      </body>
    </html>
  )
}

export default Page

const Heading = ({depth, text, id}) => {
  if (depth === 1) {
    return <h1>{text}</h1>
  }
  const Tag = `h${depth}` as keyof JSX.IntrinsicElements
  return (
    <Tag id={id}>
      <a href={`#${id}`}>{text}</a>
    </Tag>
  )
}

export default Heading
To use the template, we need to render content from Markdown to HTML using Marked engine. Itallows you to connect additional renderers — functions with custom logic for displaying elements. So, we describe custom rendering for headers and call the markdown to HTML render:
typescript
import {marked} from 'marked'

import Heading from './components/heading.tsx'

function generateId(text: string): string {
  return text
    .toLowerCase()
    .replace(/[^\w\s-]/g, '')
    .trim()
    .replace(/\s+/g, '-')
}

function convertMarkdownToHtml(markdown: string): string {
  const renderer = new marked.Renderer()

  renderer.heading = header => {
    return renderToString(
      <Heading
        depth={header.depth}
        text={header.text}
        id={generateId(header.text)}
      />
    )
  }

  return marked(markdown, {renderer})
}
Now we can render the pages. After we got the HTML, we sanitise it. The title is taken directly from the page — what is specified in h1 or #. Insert all this into the template. Render from JSX to HTML using Preact’s renderToString. Then save the result to the corresponding HTML file:
typescript
import xss from 'xss'

import Page from './components/page.tsx'

function extractTitle(markdown: string): string {
  const lines = markdown.split('\n')
  const untitled = 'Untitled'

  for (const line of lines) {
    if (line.startsWith('# ')) {
      return line.replace('# ', '')
    }
  }

  return untitled
}

async function generatePage(mdPath: string, outputPath: string) {
  try {
    const markdown = await Bun.file(mdPath).text()
    const contentHtml = xss(convertMarkdownToHtml(markdown))
    const title = extractTitle(markdown)
    const fullJsx = (
      <Page title={title} content={contentHtml} includeArrow={true} />
    )
    const html = '<!DOCTYPE html>\n' + renderToString(fullJsx)
    await Bun.write(outputPath, html)
    console.log(`Static page generated successfully at ${outputPath}`)
  } catch (error) {
    console.error(`Error generating HTML from Markdown: ${error}`)
  }
}
There’s nothing special in the CSS. However, I recommend using normalize.css — a template that removes browser rendering side effects. Besides I described simple rules, following the advice from Matthew Butterick’s Practical Typography:
css
@import './normalize.css';

@font-face {
  font-family: 'SourceSerif4';
  src: url('/SourceSerif4-Regular.ttf.woff2') format('woff2');
  font-weight: normal;
  font-style: normal;
}

body {
  font-family: 'SourceSerif4', sans-serif;
  font-size: 22px;
  line-height: 1.3;
  margin-left: auto;
  margin-right: auto;
  width: 100%;
  max-width: 1000px;
  min-height: 100%;
  -webkit-font-smoothing: subpixel-antialiased;
  text-rendering: optimizeLegibility;
  font-kerning: normal;
  hyphens: auto;
}

...
For the main page, I created another component with a list of links and wrote a function generateIndex, similar to generatePage:
typescript
const ArticleList = ({links: string[]}) => (
  <ul>
    {links.map(link => (
      <li>
        <a href={link}>{link}</a>
      </li>
    ))}
  </ul>
)

export default ArticleList
Now we can call bun run dev, which will render the corresponding pages for all .md files in articles/, the index page, and start the server on localhost. We can move on to publication.
Shipping blog
CSS bundling. To bundle CSS files, I used Lightning CSS for minification, compression, and optimisation. Since Bun does not support this natively, I followed the quickstart guide from Lightning CSS, and it worked perfectly:
bash
bun lightningcss --minify --bundle --targets '>= 0.25%' src/styles/main.css -o public/main.css”Bundling scripts. Although the Bun authors recommend running scripts
bash
bun build --target=bun --outdir ./out src/index.ts && bun build --target=bun --outdir ./out src/generate.tsxLet’s add scripts to run the build and the builded code:
json
{
  "scripts": {
    "build": "bun build --target=bun --outdir ./out src/index.ts && bun build --target=bun --outdir ./out src/generate.tsx && bun lightningcss --minify --bundle --targets '>= 0.25%' src/styles/main.css -o public/main.css",
    "generate": "NODE_ENV=production bun out/generate.js",
    "server": "NODE_ENV=production PORT=3000 bun out/index.js",
    "prod": "bun run generate && bun run server"
  }
}
Local certificates. Modern websites use SSL connections, which require TLS setup. In Elysia, this is done similarly to Bun:
typescript
const key = await Bun.file('certs/key.pem').text()
const cert = await Bun.file('certs/cert.pem').text()

const app = new Elysia()
 ...
 .listen({
    port: process.env.PORT,
    tls: {
      key,
      cert
    }
  })
To make this work locally, we’ll set up certificates for local HTTPS. I used a guide from the Chrome team:
bash
brew install mkcert
brew install nss # if you use Firefox
mkcert -install
mkcert localhost
Copy the certificates to the project file and check that everything works. Don’t forget to update .gitignore and consider this in the next step with .dockerignore.
Docker build. Bun also has a guide to to containerise the app. Unfortunately, the guide didn’t work due to differences in building Docker locally and in the cloud, which break JSX — as I descibed in the article’s Stack/Bun. So, here’s the dirty hack:
docker
FROM oven/bun:latest AS base

RUN addgroup --system appgroup && adduser --system --ingroup appgroup appuser

WORKDIR /usr/src/app

COPY package.json bun.lockb ./
COPY articles ./articles
COPY public ./public
COPY out ./out

RUN mkdir -p certs && chown -R appuser:appgroup certs
RUN chown -R appuser:appgroup /usr/src/app

USER appuser

EXPOSE 3000

ENTRYPOINT [ "bun", "run", "prod" ]

Run `docker build --pull -t blog .` to build the image.
Running in Docker. Nothing special here, except we need to explicitly pass the certificates:
bash
docker run -d \
-p 3000:3000 \
--name blog \
-v ./certs/cert.pem:/usr/src/app/certs/cert.pem:ro \
-v ./certs/key.pem:/usr/src/app/certs/key.pem:ro \
-e PORT=3000 \
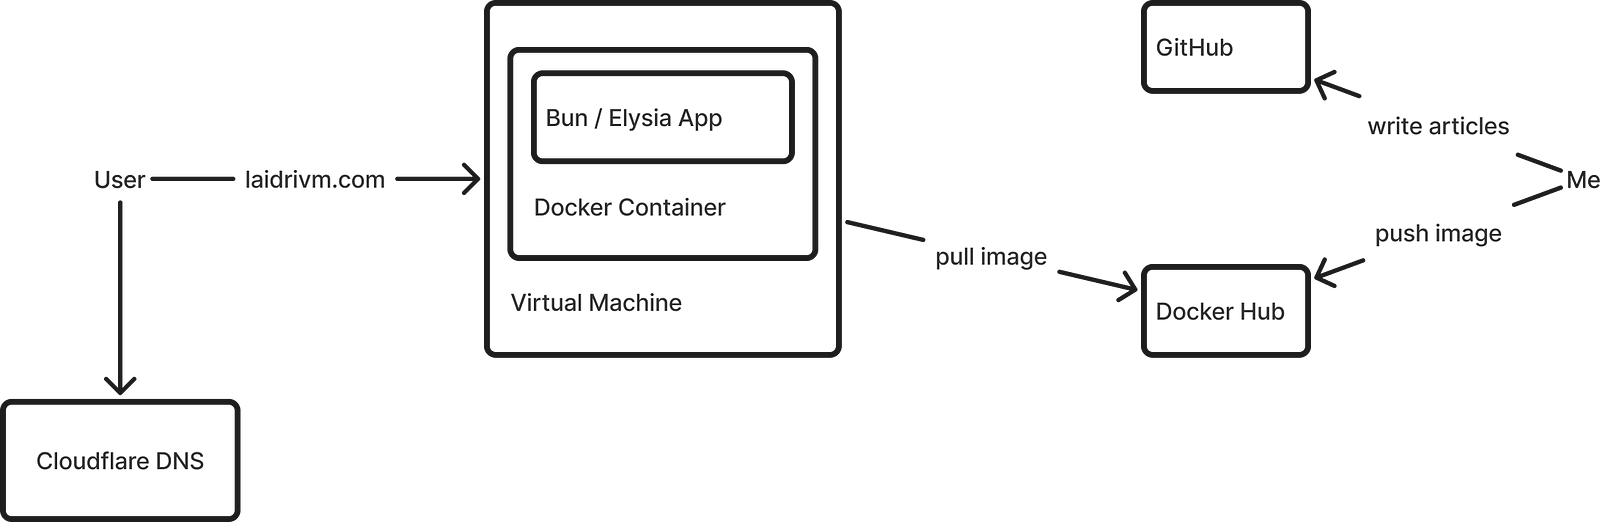
blogBuilding Docker for a VM. The architecture of your local machine and the hosting virtual machine may differ. It’s better to specify the platform explicitly in the build for the VM. After, label the image and push it to the registry using Docker Hub:
bash
docker build --pull --platform linux/amd64 -t blog .
docker tag blog laidrivm/blog:latest
docker push laidrivm/blog:latest
Preparing your domain and VM. I chose a minimal Hetzner VM, registered laidrivm.com on namecheap.com, and updated the DNS record to the server’s IP. The process is straightforward, but I recommend:
- For security reasons, change the default SSH port and restrict VM ports. The guide is for SSH, but remember to leave port 443 and others you’ll use. You can also tweak the firewall: ufw on the machine, or in Hetzner’s panel.
- Move DNS from Namecheap elsewhere. I often encountered DNS_PROBE_POSSIBLE even after everything was set up and pages were accessible. I moved mine to Cloudflare. Follow the instructions in Dashboard → Domain → Transfer. After this, errors like ERR_SSL_VERSION_OR_CIPHER_MISMATCH may arise because Cloudflare’s default settings mismatch with your certificates. So, I removed Proxy DNS in Website → DNS → Records and set full encryption in Website → SSL/TLS → Overview.
Let’s Encrypt. Local certificates are not suitable for hosting on a VPS. Let’s Encrypt offers free trusted certificates, to which I donate and encourage you to as well. To set up the certificates on the VM, follow the instructions:
bash
sudo apt install certbot
sudo certbot certonly --standalone -d laidrivm.com
I also explicitly set permissions, just in case:
bash
chmod 644 /etc/letsencrypt/live/laidrivm.com/fullchain.pem
chmod 644 /etc/letsencrypt/live/laidrivm.com/privkey.pem
Running on the VM. This is also straightforward. Install Docker, pull the image, and run the container, passing the Let’s Encrypt certificates. Remember to override the port:
bash
sudo apt install docker.io
sudo systemctl start docker
sudo systemctl enable docker
docker pull laidrivm/blog:latest
docker run -d \
  --name blog \
  -p 443:3000 \
  -v /etc/letsencrypt/live/laidrivm.com/fullchain.pem:/usr/src/app/certs/cert.pem:ro \
  -v /etc/letsencrypt/live/laidrivm.com/privkey.pem:/usr/src/app/certs/key.pem:ro \
  -e PORT=443 \
  laidrivm/blog:latest
My impressions
Testing new JS frameworks, libraries and tools often leads to dead ends, requiring you to backtrack and try different routes. Sometimes it’s a
Perhaps I was slowed down by skipping tests and not setting up extra debugging logs. Often, something didn’t work as expected, and I was like: “Amazing! I have zero ideas why this is happeing”.
It’s unclear how everything will age, break, and be maintained over time. Elysia, despite its 9k GitHub stars, has only one main contributor. Some things work well together, like Bun with Elysia, but others, like Kita with Elysia or Bun with Docker required more investment than I wanted.
Subjectively, the overal tooling seems flicky even for a startup. Before the Bun/Elysia server, I still want to add something more reliable like nginx. As I wrote, it’s better to use Bun/Hyper-express and a third-party builder.
Nether the less, Elysia looks promising and leaves a pleasant impression. JSX as a templating engine is great. The stack itself is incredibly fast: everything installs, runs, and builds in milliseconds, making it easy to do this with every small change.
An unexpected downside is not being able to rely heavily on ChatGPT, even 4o. The tools are very fresh, and the code generated by AI contains many glitches, which you have to debug. Sometimes it suggests things that are not in the framework way or should be written completely differently.
I can’t yet fully evaluate how the project will scale with a growing codebase and multiple maintainers. I plan to continue developing this project in the same stack and share new thoughts.
Next steps
In a perfect world, for static sites, I’m into a scheme I described in the article on Tilda optimisation: serving static files from a CDN. For this project, I see it like this:
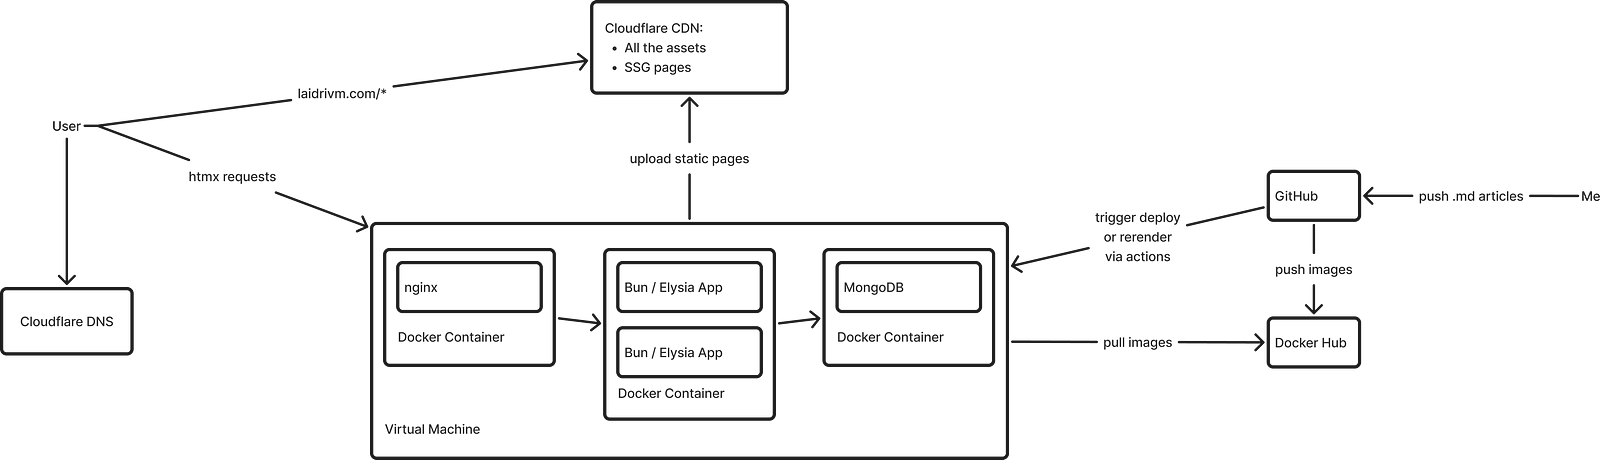
Yet I’m far from a reliable setup,
- Handle the caching;
- Enable multi-instance and set up work in multiple containers;
- Set up monitoring, alerting, and error handlers;
- Set up GitHub Actions for deployment and pulling articles from a separate repository;
- Try different types of tests;
- Revise routing to display page addresses, not .html’s.
From the blog project perspective, there is also much to improve:
- Create a chronological feed of articles with cover loading and more. Generally, add the simple business logic of a tiny media;
- Add interactivity with htmx: simple like copying code snippets or more complex like subscription forms or comments;
- Advance typography: captions for images, lead paragraphs, stricter rules for hanging lines and breaks;
- Enhance SEO: all these meta tags, markups, and web-vitals metrics.
There is something yet to do, huh. Comment with your discoveries in the modern JS stack or critics of the decisions and views I shared!
If you found this article helpful, please show your support by sharing it with your friends or colleagues.
If you want to talk on managing engineering teams, designing systems, or improving your tech product, send an email or message me.
Feel free to connect with me on LinkedIn.
Peace!
Share:
Updated: