
What I learned by building blog further: Marked, Typograf and SEO
For this update, I set up GitHub Actions and put some bash scripts to trigger on the VM. I also set up basic monitoring, added a few endpoints and tuned SEO. Finally, I got obsessed with typography which and ended up publishing a tiny related plugin. I’m here to reveal you the details!
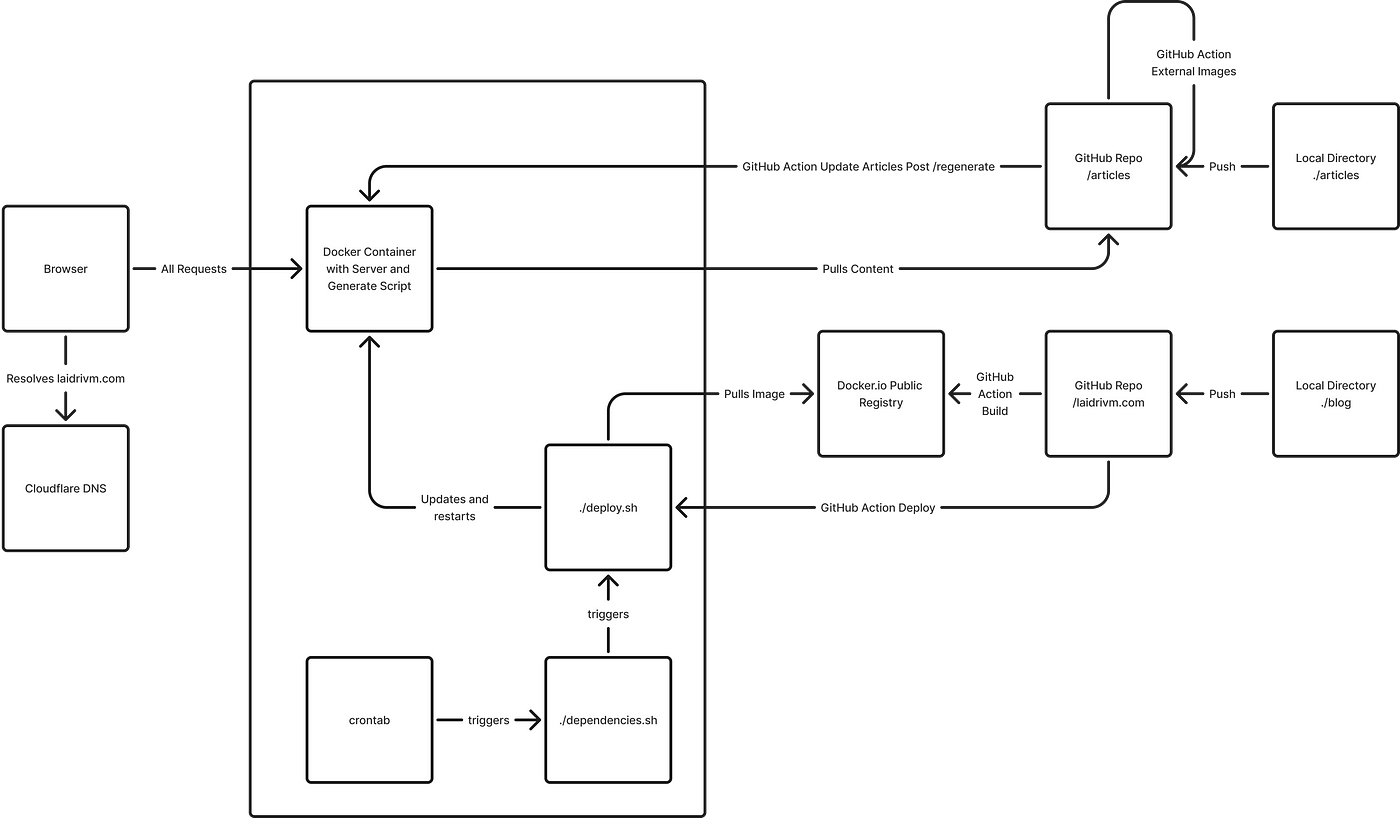
The article is huge, so I’d recommend to read the most interesting for you topics. I’ve split all the work into categories: bash scripts, GitHub actions, server-side code, media features, SEO enhancements, and loads of typography stuff. It will be helpful, if you’re developing any digital media, your personal site, using the same stack or yet making a research before a decision.
You may check the results while reading this article or look at the source code on GitHub.
This is the second part of a saga where I’m developing my own site with modern JS tools. You might be interested to check the first part as well, where I kick off the project with Bun, Elysia, JSX and Preact, while also setting up the environment using ESLint, ESBuild, Docker and a Hetzner VM.
Bash scripts
I left a single VM running Docker as a main infrastructure instance. There I made a regular dependency update:
bash
apt update
apt upgrade -y
reboot
That’s a good practice to keep less vulnerabilities. As it requires a reboot, I added a script to raise the container back:
bash
docker stop blog
docker remove blog
docker pull laidrivm/blog:latest
docker run -d \\
  --name blog \\
  -p 443:3000 \\
  -v /etc/letsencrypt/live/laidrivm.com/fullchain.pem:/usr/src/app/certs/cert.p>
  -v /etc/letsencrypt/live/laidrivm.com/privkey.pem:/usr/src/app/certs/key.pem:>
  -v ./.env:/usr/src/app/.env \\
  laidrivm/blog:latest
Container is already stopped after a reboot, but I might reuse the script in a deploy case — to be triggered from GitHub Actions later.
Finally, I set up local triggers to run the scripts. Put crontab -e in terminal and added:
plaintext
@reboot sh /root/docker.sh

0 5 * * 1 sh /root/dependencies.sh
Crontab is a tool to schedule programms execution. Syntax above means dependencies will be renewed each Monday at 5 a.m. GMT. From man crontab:
plaintext
The time and date fields are:
              field          allowed values
              -----          --------------
              minute         0-59
              hour           0-23
              day of month   1-31
              month          1-12 (or names, see below)
              day of week    0-7 (0 or 7 is Sunday, or use names)
GitHub Actions
Update articles
Let’s continue with automations. I created a separate repository for the articles to be used as a content management system. Besides, I wanted to host the pictures as well — to control their resizes and optimisation later. I added a
The script also changes addresses in the original .md files. Let’s say we have an index.md with [!image](<https://external.link/image.jpg>). The script will turn it to [!image](/index/image.jpg) and save the image at the mentioned path. Nothing special in the script’s code itself, though.
Let’s move on to the workflow, which run the script on each merge into the main branch and updates the repository accordingly:
yaml
name: Download Markdown Images
on:
push:
branches:
- main
jobs:
download-markdown-images:
runs-on: ubuntu-latest
steps:
- name: Checkout repository
uses: actions/checkout@v4
with:
ref: ${{ github.head_ref }}
- name: Install Bun
uses: oven-sh/setup-bun@v2
with:
bun-version: latest
- name: Install dependencies
run: |
bun init -y
bun add @octokit/rest
- name: Download Images and Update Markdown
run: bun run process-markdown-images.js
- name: Commit Changes
run: |
if [[ -n "$(git status --porcelain)" ]]; then
git config user.name "github-actions[bot]"
git config user.email "{@users.noreply.github.com">user.id}+{user.login}@users.noreply.github.com"
git add .
git commit -m "update image links from external to local"
git push
else
echo "No changes to commit"
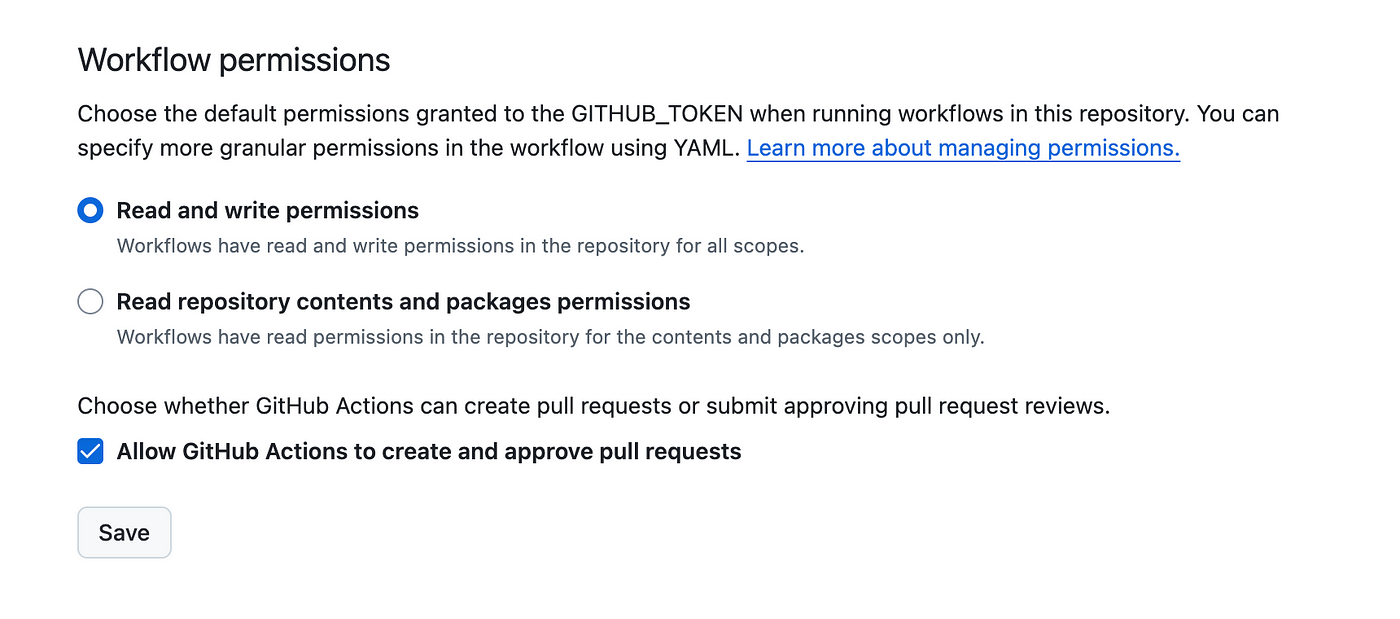
fiAs articles isn’t a JS project, there’s no package.json. So, I had to initialise Bun right inside the runner and install dependencies using bun add. To update the repo, I simply execute terminal commands using environmental variables. To make it work, it’s required to add write rights to the token.
At this point, I could set up a trigger to regenerate site pages on updates. First, a strait-forward solution restarting Docker container:
yaml
name: Update Website

on:
  workflow_run:
    workflows: ["Download Markdown Images"]
    types:
      - completed
    branches:
      - main
jobs:
  deploy:
    runs-on: ubuntu-latest
    environment: prod
    steps:
      - name: Update via SSH
        uses: appleboy/ssh-action@v1.2.2
        with:
          host: ${{ secrets.VM_HOST }}
          port: ${{ secrets.VM_PORT }}
          username: ${{ secrets.VM_USERNAME }}
          key: ${{ secrets.VM_SSH_KEY }}
          passphrase: ${{ secrets.VM_SSH_PHRASE }}
          script: |
            sudo ./deploy.sh
These variables are stored as Secrets in a GitHub environment. They won’t be revealed in logs or elsewhere. It’s not a perfect solution, but enough for a pet project. There’s no point in wasting time installing Hashicorp Vault.
Update code
Move on to the main repository. The basic checks like linting are blazingly fast, so I avoided using matrices to parallel anything:
yaml
name: Basic Checks
on:
  push:
    branches:
      - main
jobs:
  basic-checks:
    runs-on: ubuntu-latest
    steps:
      - uses: actions/checkout@v4
      - name: Install Bun
        uses: oven-sh/setup-bun@v2
        with:
          bun-version: latest
      - name: Install dependencies
        run: |
          bun install
      - name: Format
        run: |
          bun run format
      - name: Lint
        run: |
          bun run lint
If checks are passed, we can build the image and upload it to the public registry. I expose no secrets there, so it should be fine. And after that — trigger the VM again as well:
yaml
name: Docker CI

on:
  workflow_run:
    workflows: ["Basic Checks"]
    types:
      - completed
    branches:
      - main
jobs:
  build:
    runs-on: ubuntu-latest
    if: ${{ github.event.workflow_run.conclusion == 'success' }}
    environment: prod
    steps:
    - uses: actions/checkout@v4
    - name: Docker Setup Buildx
      uses: docker/setup-buildx-action@v3.10.0
    - name: Docker login
      uses: docker/login-action@v3.3.0
      with:
        username: ${{ secrets.DOCKER_USERNAME }}
        password: ${{ secrets.DOCKER_PASSWORD }}
        logout: true
    - name: Build and push the Docker image
      uses: docker/build-push-action@v6.15.0
      with:
        cache-from: type=gha
        cache-to: type=gha,mode=max
        context: .
        platforms: linux/amd64
        pull: true
        push: true
        tags: laidrivm/blog:latest
  deploy:
    needs: build
    runs-on: ubuntu-latest
    environment: prod
    steps:
      - name: Execute remote commands via SSH to deploy
        uses: appleboy/ssh-action@v1.2.2
        with:
          host: ${{ secrets.VM_HOST }}
          port: ${{ secrets.VM_PORT }}
          username: ${{ secrets.VM_USERNAME }}
          key: ${{ secrets.VM_SSH_KEY }}
          password: ${{ secrets.VM_PASS }}
          script: |
            sudo ./deploy.sh
Official GitHub documentation is quite useful to write your own Actions. For instance, they explain how to push an image to the registry. I modified it with a ready to use workflows, available on the internal marketplace.
Server
Enable monitoring
Now with all these automations, we have to think about basic monitoring. We can’t afford to check manually if the site’s alive after yet another update. I like Uptime Robot and the free tier is enough to deal with it.
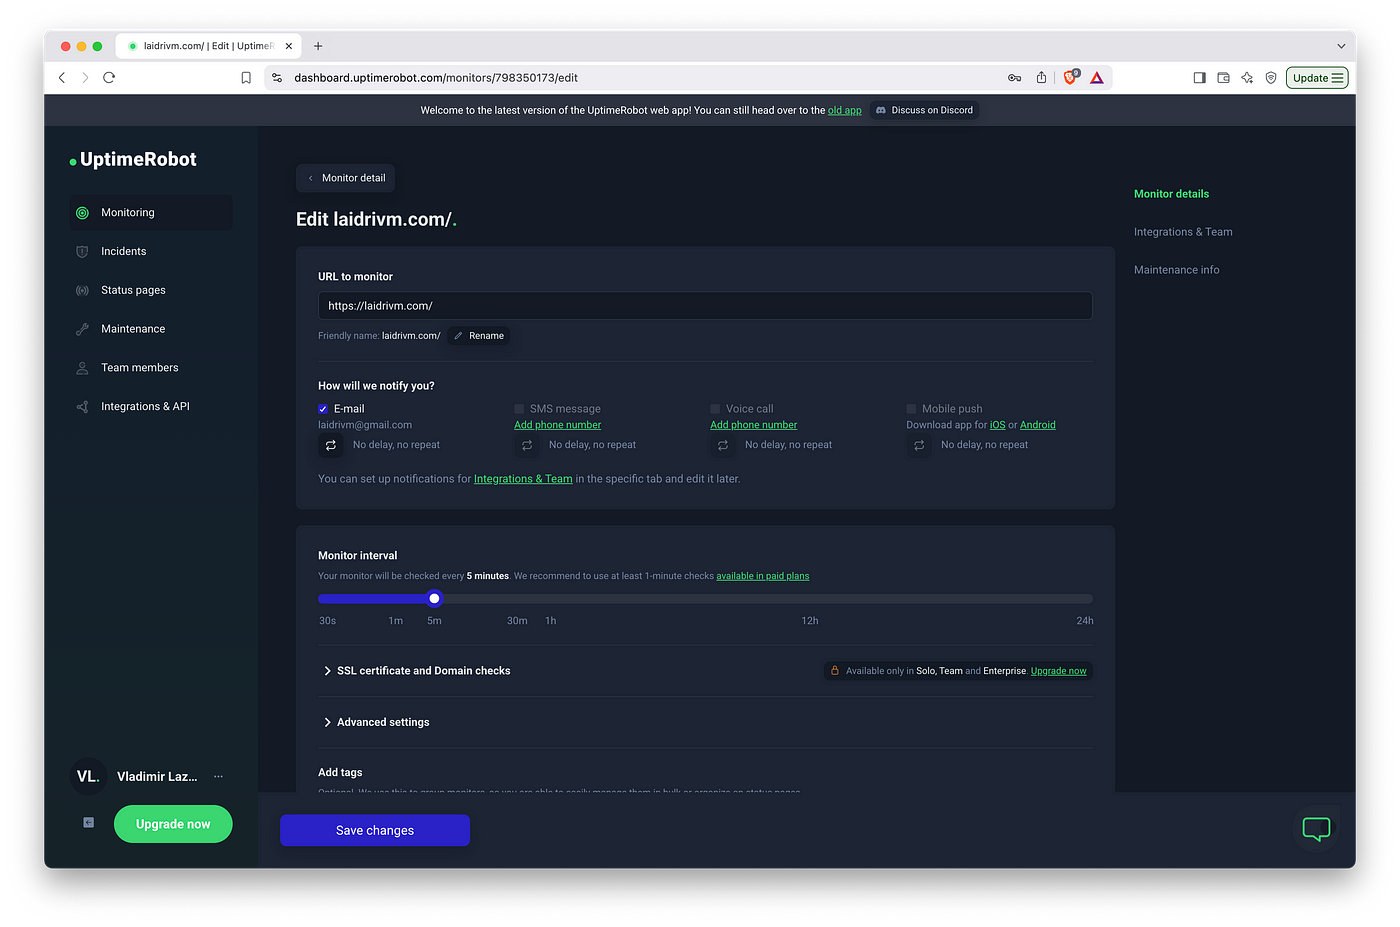
The only problem, this free tier only allows to check the availability using the HEAD HTTP —header. So I had to support it:
typescript
async function startServer(): Promise<void> {
  ...
  const app = new Elysia()
    .route('HEAD', '/', '')
    ...
}
Sometimes Elysia’s elegance still surprises me.
Regenerate articles
At this point, on each update the script reboots the container and all the pages are regenerated. Well, it’s not a disaster as there’s a few pages and they are rendered fairly fast. Yet, while the container is being restarted, while all the assets are being pulled — it’s a guaranteed minute of downtime. Something’s worth improving.
I added an endpoint to be called from the pipeline. I hid it behind a basic auth token — the endpoint expects it in the request headers.
typescript
import {regenerate} from './regenerate.ts'

function isValidToken(authHeader: string | undefined): boolean {
  if (!authHeader || !authHeader.startsWith('Bearer ')) {
    return false
  }
  const token = authHeader.split(' ')[1]
  return token === process.env.REGENERATE_TOKEN
}
async function startServer(): Promise<void> {
  ...
  const app = new Elysia()
   .post('/regenerate', async ({headers, set}) => {
      if (!isValidToken(headers.authorization)) {
        set.status = 401
        return {
          success: false,
          message: 'Unauthorized: Invalid or missing token'
        }
      }
      try {
        await regenerate()
        set.status = 200
        return 'Ok'
      } catch (error) {
        set.status = 500
        return {
          success: false,
          message: `Regeneration failed: ${error.message}`
        }
      }
    })
    ...
}
I added the token in GitHub environment secrets as well and tuned the Action accordingly. I just googled github action post method and used the very first workflow.
yaml
jobs:
  deploy:
    runs-on: ubuntu-latest
    environment: prod
    steps:
      - name: Update via request
        uses: fjogeleit/http-request-action@v1
        with:
          url: '<https://laidrivm.com/regenerate>'
          method: 'POST'
          headers: '{"Authorization": "${{ secrets.AUTH_TOKEN }}"}'
          preventFailureOnNoResponse: 'false'
          timeout: 60000

      - name: Check response
        if: ${{ success() }}
        run: echo "Regeneration triggered successfully"
Redirect legacy links
Last thing I needed to fix was routing. All the pages links were ending with .html. It’s easy to change updating the static directory structure: /article.html → /article/index.html. I implemented it as a part of page generation. I also implemented redirects not to break all the previously published links.
typescript
async function startServer(): Promise<void> {
 ...
  const app = new Elysia()
    .onRequest(({path, redirect}) => {
      if (path.includes('.html')) {
        return redirect(path.replace('.html', ''), 302)
      }
    })
    ...
}
Break down declarations
To make startServer() code cleaner, I used Everything is a component principe to achieve something like:
typescript
const redirectHTML = new Elysia()
 .onRequest(({path, redirect}) => {
      if (path.includes('.html')) {
        return redirect(path.replace('.html', ''), 302)
    }
  })
const app = new Elysia()
 .use(redirectHTML)
 .use(postRegenerate)
 ...
 .listen({
    port: Number(config.PORT),
    tls: {
      key,
      cert
    }
  })
Media
Process external source
For the development purpose it’s convenient to use some stored locally articles. But in case of a server setup, I planned to pull them from GitHub as from main source.
To split the scenarios, I added SOURCE environment variable. If it’s set to local, the server looks for the content locally. Otherwise, it expects a repository address to pull the articles from.
Articles repository is available in public. It means, it’s accessible via API without authorisation. But for the testing purpose I planned to use articles from a private repository. Besides, an unauthorised access means lower rate-limits.
For an authorised access a token is required. It’s created automatically in a runner environment. For my backend, I created it manually and stored as a GITHUB_TOKEN environment variable. Yet it’s still possible to use unauth value for an anonymous access.
The whole source processing pipeline started to look like:
- Download content from a remote source to the articles directory.
- Render HTML pages from markdown files and save them into the public directory.
- Copy images there as well.
- Delete the articles directory.
The first step is split depending on the source. The second and the third are universal. The forth is used only for an external source. In the repo root there are English articles, and in the /ru subdirectory — Russian ones. This is something to consider while processing.
typescript
async function generateSite(): Promise<void> {
  const config = EnvUtils.getConfig()
  const articlesPath = config.ARTICLES
  const publicPath = config.PUBLIC
  const source = config.SOURCE

  try {
    // Retrieve articles directory structure
    // In case of external source, download content first
    const nodes = await processSource()
    // Generate HTML pages. From /articles/1-1s.md to /public/1-1s/index.md
    await processPages(articlesPath, publicPath, nodes)
    // Copy images from content to public directory
    await FileUtils.copyImagesRecursively(articlesPath, publicPath)
    // Clean up temporary files if using remote source
    if (source !== 'local') {
      await SourceProcessor.cleanupArticlesDirectory()
    }
    console.log('Static site generation completed successfully.')
  } catch (error) {
    console.error(`Site generation error: ${error}`)
    throw error
  }
}
There’s nothing magical in content download. I just used the official library and recursively follow the directories from the root.
Copy heading links
I believe there should be an option to share link on an exact header if the page is long enough. When browser opens such a link, it should scroll the page accordingly. So, I renewed the heading component:
typescript
export const Heading = ({depth, text, id}: HeadingProps): JSX.Element => {
  // Validate the depth value
  const validDepth = (depth >= 1 && depth <= 6 ? depth : 2) as
    | 1
    | 2
    | 3
    | 4
    | 5
    | 6

  // for h1, don't include the anchor link
  if (validDepth === 1) {
    return <h1>{text}</h1>
  }
  // Create the appropriate heading tag
  const Tag = `h${validDepth}` as keyof JSX.IntrinsicElements
  return (
    <Tag id={safeId}>
      <div className="heading-content">
        <a href={`#${safeId}`}>{text}</a>
        <button className="copy-heading">🔗</button>
      </div>
    </Tag>
  )
}
I use Marked to render markdown files to HTML. It splits the file into tokens. Token display logic is captured into renderer. It’s possible to define default display logic with your own. To customise heading display, I modified the heading renderer:
typescript
marked.use({
  renderer: {
    heading({tokens, depth}) {
      // Parse the inline tokens to get the text
      const text = this.parser.parseInline(tokens)
      const id = generateId(text)
      return renderToString(<Heading depth={depth} text={text} id={id} />)
    },...
  }
})
Yet this realisation has a major issue, which I missed developing previous site version. Preact renderToString() ignores any JS function related to the component. It means, I cant just use something like:
typescript
function App() {
  const clicked = () => {
    console.log('hi')
  }

  return (
    <div>
      <p class="count">Count:</p>
      <button onClick={clicked}>Click Me!</button>
    </div>
  )
}
… because it’s rendered to string as:
html
<div>
  <p class="count">Count:</p>
  <button>Click Me!</button>
</div>
… instead of a button with an attached handler function and an active click event listner. Or at least an inline-script:
html
<script>
  function clicked() {
    console.log('hi')
  }
</script>

<div>
  <p class="count">Count:</p>
  <button onClick="clicked">Click Me!</button>
</div>
Meanwhile, I expected to use a handler to copy the link to the clipboard. And it’s not possible to return JSX components inside Marked renderer methods — as it expects only HTML in a string type. I had to bypass it in a very not frontend way I feel ashame to show:
typescript
function createCopyScript(lang: SupportedLanguage): string {
  const copiedText = getLocalizedText('copied', lang)
  return `
    document.addEventListener('DOMContentLoaded', () => {
    // Copy heading anchor links
      const headings = document.querySelectorAll('.heading-content');
      headings.forEach(headingContent => {
          const button = headingContent.querySelector('.copy-heading');
          if (!button) return;

          button.addEventListener('click', () => {
            const link = headingContent.querySelector('a').href;
            navigator.clipboard.writeText(link || '');
            button.textContent = '👍';
            setTimeout(() => {
              button.textContent = '🔗';
            }, 2000);
          });
      });
    });
  `

const Page = ({...}: PageProps): JSX.Element => {
return (
    <html lang={validLang}>
    <head>
    ...
        <script dangerouslySetInnerHTML={{__html: copyScript}} />
      </body>
    </html>
  )
}
That’s an absolute cringe. That’s how a mistake in components rendering scheme might affect the project. I left it as it is for now, but I’ll have to focus on a new rendering scheme with a single renderToString() call and a proper component’s code handling. Maybe it means I’ll be forced to drop Marked, we’ll see.
But let’s scroll the page down and implement it in a simple function:
javascript
function scrollToAnchor() {
  const hash = window.location.hash;
  if (!hash) return;

  const targetLink = document.querySelector('a[href="' + hash + '"]');
  if (targetLink) {
    targetLink.scrollIntoView({ behavior: 'smooth', block: 'start' });
  }
}

window.addEventListener('load', scrollToAnchor);
window.addEventListener('hashchange', scrollToAnchor);
I also wrote related styles:
css
a:hover {
  text-decoration: underline;
  background: #f6f6f6;
  transition-property: background;
  transition-duration: 0.2s;
  border-radius: 8px;
}
.heading-content {
  white-space: nowrap;
}
.heading-content a {
  white-space: normal;
  position: relative;
  z-index: 2;
}
.heading-content:hover > .copy-heading {
  opacity: 1;
}
.copy-heading {
  opacity: 0;
  background: #ffffff;
  border: 0;
  font-size: 32px;
  font-family: 'SourceSerif4', sans-serif;
  transition: opacity 0.2s;
  margin-left: 8px;
  padding-bottom: 4px;
  padding-top: 4px;
  display: inline;
  margin-right: -2em;
}
.copy-heading:hover {
  background: #f6f6f6;
  transition-property: background;
  transition-duration: 0.2s;
  border-radius: 8px;
}
@media (max-width: 480px) {
  .copy-heading {
    font-size: 24px;
    margin-right: -1em;
  }
}
Something notable here:
- I had to increase header’s
z-index, otherwise the button background overlapped the background from the header’s hover. - I used
display: inlineandmargin-rightto keep the button at the same line even if it’s crosses the content block border. Otherwise, on some breakpoints it created a gap between the header and the following content. - To display a button when a header is hovered,
opacityis transitioned from 0 to 1. It allows to animate the display smoothly withtransition: opacity 0.2s.
Localise UI
As I have pages with both English and Russian content, it’s a good manner to synchronise the language used in the UI with the content.
typescript
const LOCALIZED_TEXT = {
  en: {
    updated: 'Updated: ',
    copyCode: 'Copy code',
    copied: 'Copied!',
    telegram: 'Share on Telegram',
    reddit: 'Share on Reddit',
    bluesky: 'Share on Bluesky',
    minds: 'Share to Minds'
  },
  ru: {
    updated: 'Обновлено: ',
    copyCode: 'Копировать код',
    copied: 'Скопировано!',
    telegram: 'Поделиться в Телеграме',
    reddit: 'Поделиться на Реддите',
    bluesky: 'Поделиться в Блюскае',
    minds: 'Поделиться в Майндс'
  }
}

export function getLocalizedText(
  key: keyof typeof LOCALIZED_TEXT.en,
  lang: SupportedLanguage
): string {
  return LOCALIZED_TEXT[lang][key]
}
I found an interesting side-effect: the anchor links were not working in Russian articles. It turned out that their ids are gone — cyrrilics from the header were transformed into ``. Not to reinvent the wheel, I used unidecode to transliterate anything into latin.
typescript
export function generateId(text: string): string {
  const transliterated = unidecode(text)

  return transliterated
    .toLowerCase()
    .replace(/[^\\w\\s-]/g, '')
    .trim()
    .replace(/\\s+/g, '-')
}
Share to social networks
To increase the virality and ease distribution, I added buttons to share a page to social networks. I’m not into social network on my own, so I added those I do use or those relatively popular I respect for a decentralisation attempt. That means Telegram, Reddit, Bluesky and Minds.
The algorithm for all of them is the same:
- Take the related sharing endpoint.
- Add the related query-param.
- Use as a value an encoded url of a shared page.
typescript
const SHARE_CONFIGS: Record<string, ShareButtonConfig> = {
  telegram: {
    baseUrl: '<https://t.me/share/url>',
    urlParam: 'url',
    textParam: 'text'
  },
  reddit: {
    baseUrl: '<https://reddit.com/submit>',
    urlParam: 'url',
    textParam: 'title'
  },
  bluesky: {
    baseUrl: '<https://bsky.app/intent/compose>',
    urlParam: 'text'
  },
  minds: {
    baseUrl: '<https://www.minds.com/newsfeed/subscriptions/latest>',
    urlParam: 'intentUrl'
  }
}

const SocialShareLink = ({platform, lang, url, text = ''}): JSX.Element => {
  const config = SHARE_CONFIGS[platform]
  const shareText = getLocalizedText(platform, lang)

  const params = new URLSearchParams()
  params.append(config.urlParam, url)
  const shareUrl = `${config.baseUrl}?${params.toString()}`
  return (
    <a
      href={shareUrl}
      target="_blank"
      rel="noopener noreferrer"
      className={`social-share-link ${platform}-share-link`}
      aria-label={shareText}
    >
      <img src={`/${platform}.svg`} alt={shareText} width="32" height="32" />
    </a>
  )
}

export const SharingLinks = ({lang, url, text}: SocialShareProps): JSX.Element => {
  const platforms = ['telegram', 'reddit', 'bluesky', 'minds']
  return (
    <div className="sharing-links">
      {platforms.map(platform => (
        <SocialShareLink
          platform={platform}
          lang={lang}
          url={url}
          text={text}
        />
      ))}
    </div>
  )
}
I was also considering:
- LinkedIn, but that trash bin requires to login user on your site using their account and call a POST method from your backend — just to create a share link. ¡Adiós, payasos!
- Mastodon, but it’s not that easy because of the fediverse.
- Discord, but they don’t have such an API.
Zoom images on tap or click
Some images are interested enough to take a closer look. Especially if I’ll make some of them thinner than the content width. I decided to zoom images, if user clicks or taps them, and unzoom on a second click or tap.
There was a transparent background on some pictures. Yet I wanted to shade the screen around the zoomed picture to highlight it’s not a new window. So I wrapped images into one more div to create a solid background beneath them, and darken it around.
typescript
const Image = ({src, alt}: ImageProps): JSX.Element => {
  return (
    <div className="image-zoom-wrapper">
      <img src={src} alt={alt} />
    </div>
  )
}

marked.use({
  renderer: {
    image({text, href, title}) {
      return renderToString(<Image src={href} alt={text || title || ''} />)
    }
  }
})
function createZoomScript(): string {
  return `
    document.addEventListener('DOMContentLoaded', () => {
      const images = document.querySelectorAll('.image-zoom-wrapper');

      images.forEach(img => {
        img.addEventListener('click', function() {
          // Toggle zoomed state
          this.classList.toggle('zoomed');

          // Prevent page scrolling when zoomed
          if (this.classList.contains('zoomed')) {
            document.body.style.overflow = 'hidden';
          } else {
            document.body.style.overflow = 'auto';
          }
        });
      });
    });
  `
}
css
img {
  max-height: 100%;
  max-width: 100%;
  background: #ffffff;
}

.image-zoom-wrapper {
  max-width: 100%;
  height: auto;
  cursor: zoom-in;
  transition: transform 0.2s ease;
}
.image-zoom-wrapper.zoomed {
  position: fixed;
  top: 0;
  left: 0;
  width: 100%;
  height: 100%;
  object-fit: contain;
  background: rgba(0, 0, 0, 0.7);
  z-index: 1000;
  margin: 0;
  cursor: zoom-out;
  display: flex;
  justify-content: center;
  align-items: center;
}
SEO
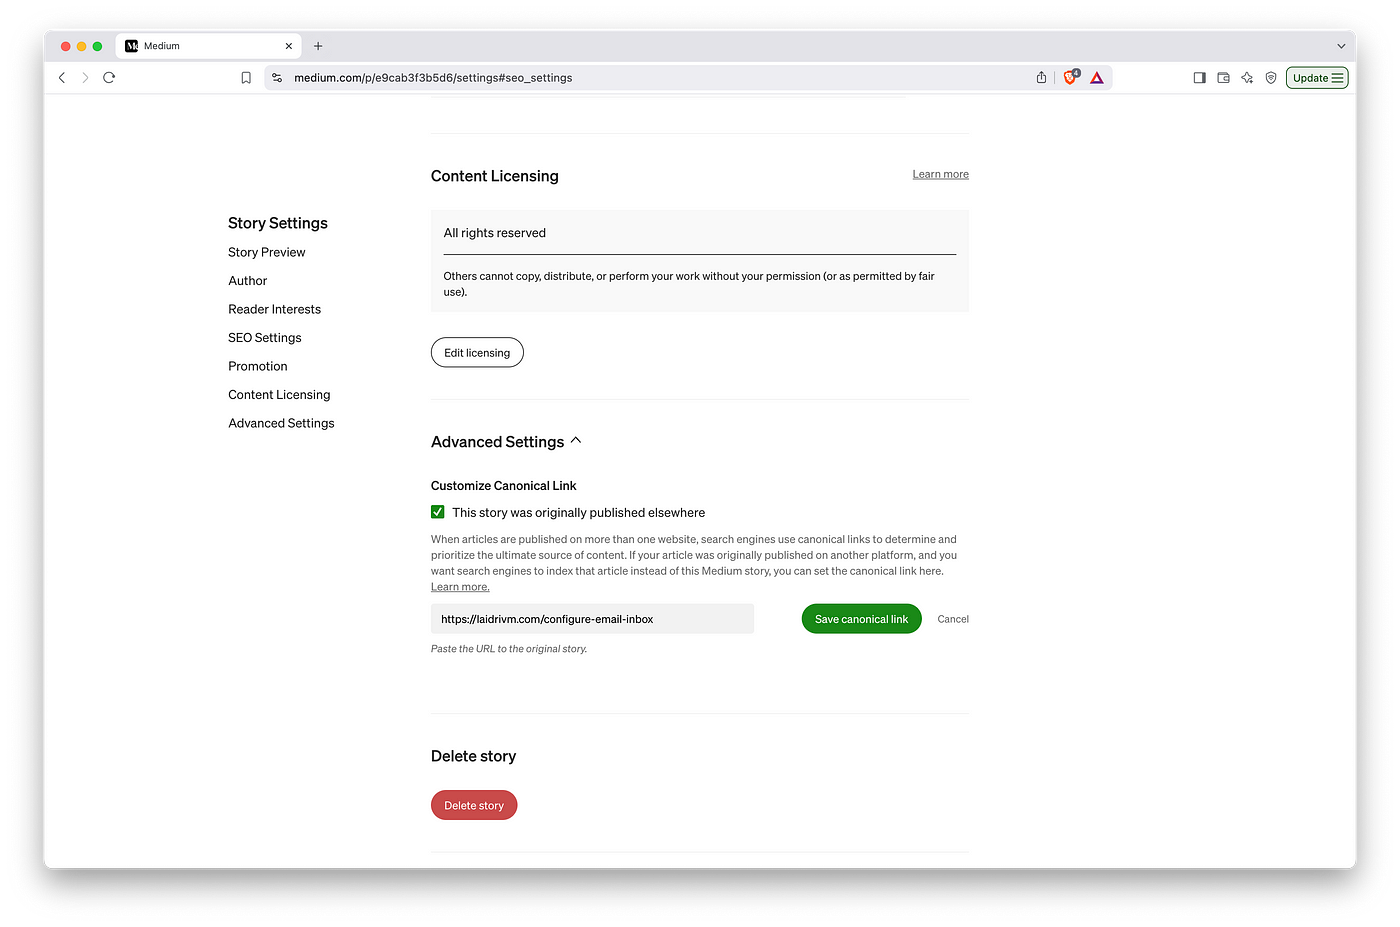
Sort out canonical URLs
Briefly, it’s a tag that on any page of your site should be equal to the address of this page. It should be placed inside the <head>, something like <link rel="canonical" href="<https://domain.com/blog/slug-of-your-post>" />.
If you’re cross-posting your content somewhere else, like on blog platforms, it’s useful to set canonicals to the original page on your site.
Set meta tags
Here’s couple of other tags considered high-rated for SEO and a bunch more which affect the display of the link to your page in social networks and search engines.
Author. <meta name="author" content="Vladimir Lazarev" />. Usually it’s considered to reveal the author of the page’s content. I’ve just hardcoded my name for now.
Description. <meta name="description" content={description} />. It’s the text usually displayed below the page’s title. Many systems use only 155 chars and cut the remaining with ellipsis. I use the content of the first <p> paragraph here.
OG image. <meta property="og:image" content= "<https://domain.com/blog/images/cover1.jpg>" />. Open Graph itself is a protocol that sets rules on how to describe some parameters of your page to enrich it’s functionality and display on other sites working with this protocol. Image tag is used to display a cover to your link. The default size is 1200 x 630 px but some sites crop it differently, so mind the content at the edges.
On my site, the code looks for the first image of the page and uses it as an og:image. Otherwise, a default image is used.
OG title. <meta property="og:title" content="Hello, World!" />. I use the content of the <h1> header here, same as <title>.
OG description. <meta property="og:description" content="Some text here" />. Same as the description meta tag.
OG url. <meta property="og:url" content="<https://domain.com/blog/slug-of-your-post>" />. Same as the canonical tag.
OG sitename. <meta property="og:sitename" content="Vladimir Lazarev's Blog" />. I didn’t really make up anything bright here.
OG type. <meta property="og:type" content="website" />. As I know, Schema.org types are used here.
Generate sitemap
A sitemap file is a way to tell search engines which pages and files are important on your site, and provides information like when the page was last updated or alternate language versions of the page. Among everything, it’s recommended to have one if the site is new and has few external links to it. That’s exactly my situation.
There are several options how to build one: XML, RSS and text. I prefer separate XML sitemap because it’s expressive enough and I’d better create an RSS feed as a subscription channel. It should be available at https://example.com/my_sitemap.xml. Here’s a sample:
xml
<?xml version="1.0" encoding="UTF-8"?>

<urlset xmlns="<http://www.sitemaps.org/schemas/sitemap/0.9>">
   <url>
      <loc><http://www.example.com/></loc>
      <lastmod>2005-01-01</lastmod>
      <changefreq>monthly</changefreq>
      <priority>0.8</priority>
   </url>
</urlset>
The protocol itself is described on a related site. The most meaningful for now is the template above, the priority range from 1.0 to 0 and the lastmod format.
I considered using a specific tool like this to generate one, but didn’t find any profit to do so. Looks like an integration is at best as easy as to generate the XML myself. The code just goes through all the generated pages to get the data and fills in the template from the root:
typescript
function getSiteMapURLs(
  nodes: FileNode,
  priority: number,
  relativePath: string
): string {
  if (!nodes.children) return ''

  const baseUrl = EnvUtils.getBaseUrl()
  let result = ''
  for (const node of nodes.children) {
    switch (node.type) {
      case 'folder': {
        result += getSiteMapURLs(
          node,
          priority - 0.1,
          join(relativePath, node.name)
        )
        break
      }
      case 'article': {
        const lang = PathUtils.getLanguageFromPath(relativePath)
        const address = PathUtils.generatePageAddress(lang, node.name, baseUrl)
        const nodePriority = node.name === 'index' ? priority : priority - 0.2
        result += `<url>
  <loc>${address}</loc>
  <lastmod>${node.edited.replace(/\\.\\d{3}Z$/, '+00:00')}</lastmod>
  <priority>${nodePriority.toFixed(2)}</priority>
</url>\\n`
        break
      }
    }
  }
  return result
}

async function generateSitemap(
  publicPath: string,
  nodes: FileNode
): Promise<void> {
  const sitemapContent = `<?xml version="1.0" encoding="UTF-8"?>
<urlset
  xmlns="<http://www.sitemaps.org/schemas/sitemap/0.9>"
  xmlns:xsi="<http://www.w3.org/2001/XMLSchema-instance>"
  xsi:schemaLocation="<http://www.sitemaps.org/schemas/sitemap/0.9>
    <http://www.sitemaps.org/schemas/sitemap/0.9/sitemap.xsd>">
${getSiteMapURLs(nodes, 1.0, '/')}
</urlset>`
  await Bun.write(join(publicPath, 'sitemap.xml'), sitemapContent)
  console.log('Sitemap generated successfully.')
}
I don’t include any media files for now, but maybe I’ll think it over later.
It wouldn’t hurt to compare the resulting file against other tools like xml-sitemaps.com — maybe they will give some adjustment ideas.
Specify the update time
In the sitemap we’ve mentioned last modified date. For a content site, I believe it should be the date the content has been modified. In case of a local content source, info from the filesystem is available. In case of an external source, the Github-as-a-CSM approach there’s also a last modified date — the date of the last commit affected corresponding content.
I modified files processing to fill in the nodes structure with the date:
typescript
/**
 * External source case
 */
async function getLastCommitDate(
  octokit: Octokit,
  owner: string,
  repo: string,
  repoPath: string
): Promise<string> {
  const {data} = await octokit.rest.repos.listCommits({
    owner,
    repo,
    path: repoPath,
    per_page: 1
  })

  return (
    data[0]?.commit?.committer?.date ||
    data[0]?.commit?.author?.date ||
    new Date().toISOString()
  )
}

async function downloadFile(
  octokit: Octokit,
  owner: string,
  repo: string,
  path: string,
  name: string,
  articlesDir: string
): Promise<FileNode> {
  const latestCommitDate = await getLastCommitDate(octokit, owner, repo, path)
  ...
  return {
    name: getBaseName(name).replace(/\\.md$/, ''),
    type: name.endsWith('.md') ? 'article' : 'misc',
    edited: latestCommitDate,
    created: firstCommitDate
  }
}

async function processRepoContents(
  octokit: Octokit,
  config: RepoConfig,
  repoPath: string,
  articlesPath: string
): Promise<FileNode> {
 ...
  const contents = await getRepoContents(octokit, owner, repo, repoPath)
  const latestCommitDate = await getLastCommitDate(
    octokit,
    owner,
    repo,
    repoPath
  )

  for (const item of Array.isArray(contents) ? contents : [contents]) {
   ...
   if (item.type === 'file') {
      const file = await downloadFile(
        octokit,
        owner,
        repo,
        item.path,
        item.name,
        articlesPath
      )
      if (file.type === 'article') {
        children.push(file)
      }
    }
  }
  return {
    name: getBaseName(repoPath) || 'root',
    type: 'folder',
    edited: latestCommitDate,
    created: firstCommitDate,
    children
  }
}

/**
 * Local source case
 */
async function processLocalSource(
  directoryPath: string
): Promise<FileNode> {
 const dirStat = await stat(directoryPath)
  const edited = dirStat.mtime.toISOString()
  ...
  const entries = await readdir(directoryPath, {withFileTypes: true})

  for (const entry of entries) {
   ...
   if (entry.isFile() && entry.name.endsWith('.md')) {
      const fileStat = await stat(entryPath)
      const fileEdited = fileStat.mtime.toISOString()
      const fileCreated = fileStat.birthtime.toISOString()
      const articleName = entry.name.replace(/\\.md$/, '')
      children.push({
        name: articleName,
        type: 'article',
        edited: fileEdited,
        created: fileCreated
      })
    }
  }

  return {
    name: getBaseName(directoryPath),
    type: 'folder',
    edited,
    created,
    children
  }
}
To boost SEO, they also recommend to mention last modified date as a meta tag: <meta name="last-modified" content="2025-03-16T12:00:00Z"> or even on the page itself: <p>Last updated: <time datetime="2025-03-16">March 16, 2025</time></p>.
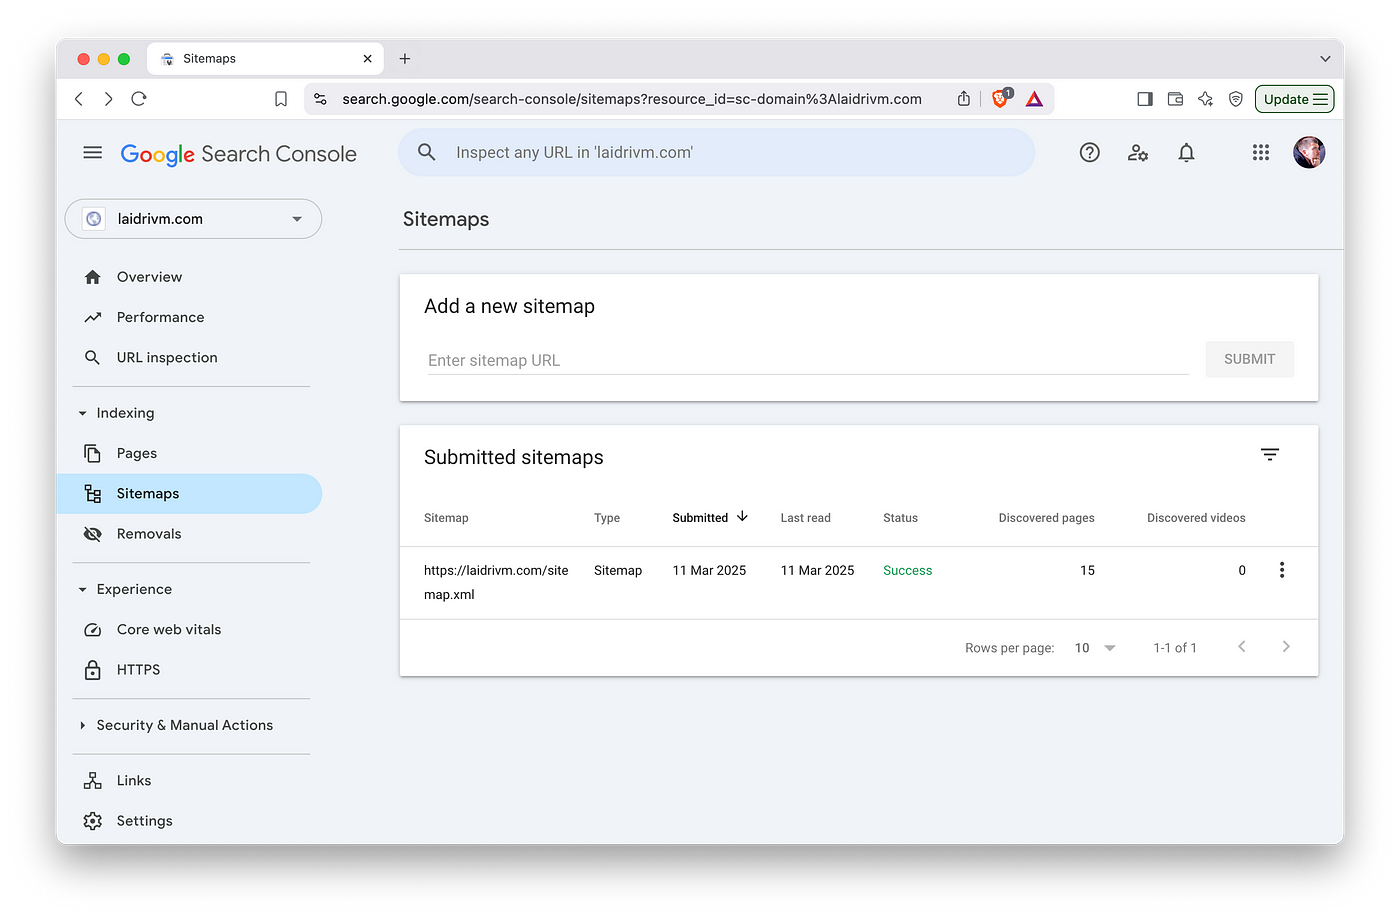
Submit sitemap to Google Search Console
Google will occasionally crawl your site for new content by itself, but it never hurts to submit your sitemap manually. You can do it in the “Sitemaps” section of GSC. The tool is also useful as it shows the requests people type when visit your site — without setting up Google Analytics.
Leave robots.txt
Robots.txt is a file with rules to search engine crawlers and other bots. Seems like it’s more a tradition, rather than a useful tool. It won’t protect your site against unwilled scrapping as effectively, as a labyrinth does. For sure it’s a bad idea to use robots.txt to protect private pages like an admin panel.
Still, I just explicitly allow everyone visit everything and provide a sitemap for their comfort. I also ask to load my site with no more than a one request per second.
plaintext
User-agent: *
Allow: /
Crawl-delay: 1
Sitemap: <https://laidrivm.com/sitemap.xml>
There are more detailed guides by Google or Cloudflare.
Check web vitals metrics
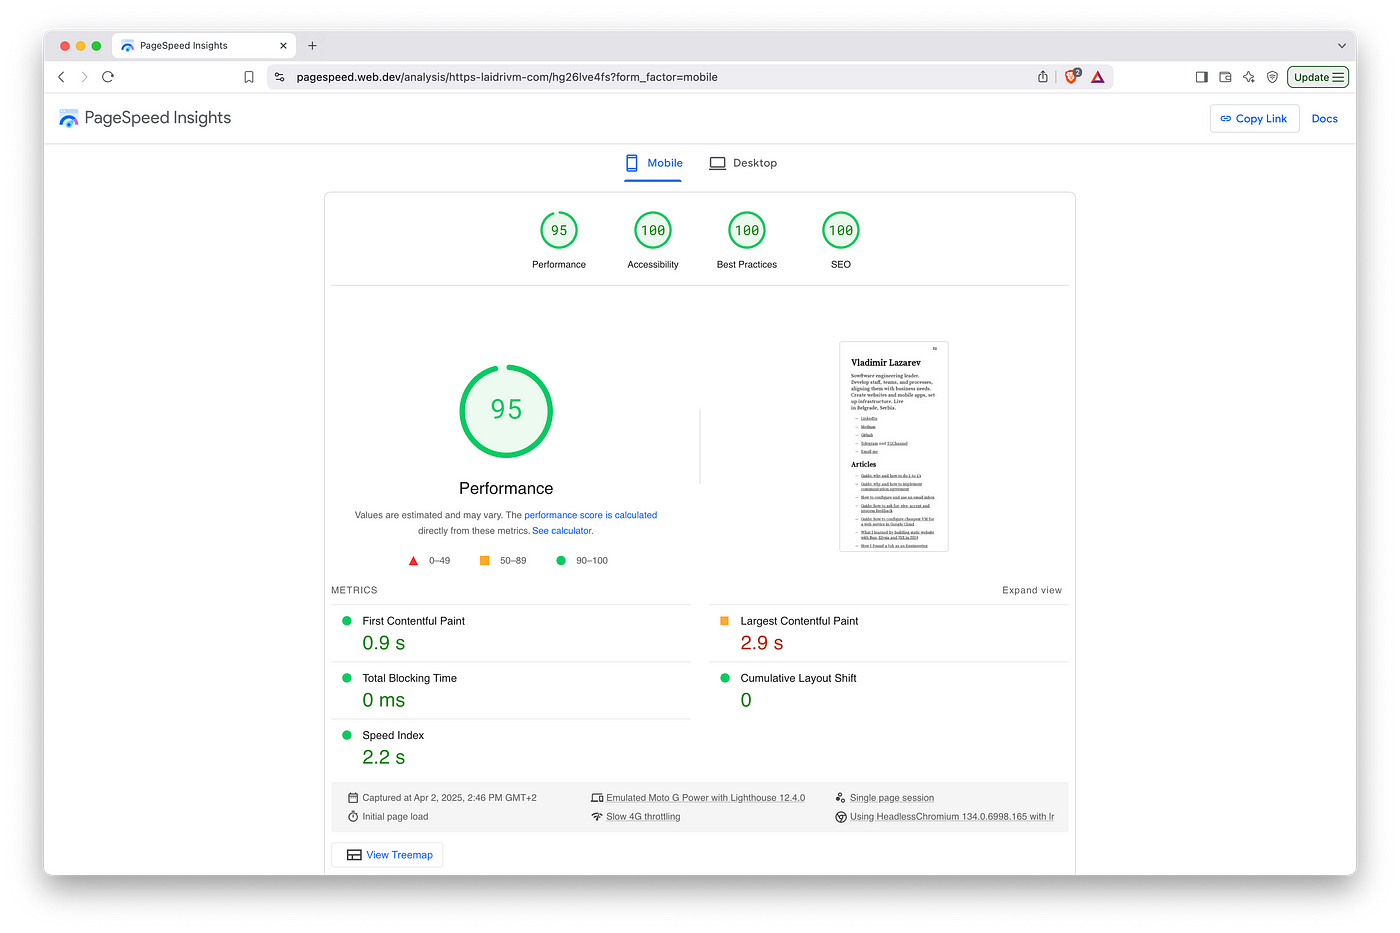
With the previous version, I had an issue of PageSpeed Insights failing by timeout to analyse any page of my site. And I, in turn, failed to google out what’s the reason behind it. Now it has just started to work even before submitting anything to GCS. No conclusions, just for you to know this might happen.
Typography
Typography in a broad sense is a set of language-specific rules that help format text using typesetting and layout. This nerds’ jam is applicable to the web to make the text look neat.
It’s clear that high-quality media will invest in typography much more than a personal website. At the same time, you should not completely ignore it — this will hurt the reader’s experience, and, as a result, the site’s traffic.
Start with the basics
These are the rules you can implement to make the text on your site instantly look better. Also, don’t hesitate to iteratively tune the exact parameters for some time. In this update, I adjusted the margins and heading sizes, especially in the mobile layout.
Fonts. Professional fonts mostly look better than system ones. There are various characteristics of the fonts: with and without serifs, monospaced, with support for ligatures and other features. For the site, I settled on free, nice to my eye and even open-sourced Source Serif for everything and Source Code Pro for code snippets.
For now I serve them directly from server, but will certanly move them to a CDN. There’s also always an option to pick the fonts and connect it from Google Fonts. Figma even published a list of pretty font pairs from there, you can trust their design expertise.
Ligatures. This is the property of the font to combine some sets of characters so that their parts do not overlap. I also like it visually. CSS rule text-rendering: optimizeLegibility.
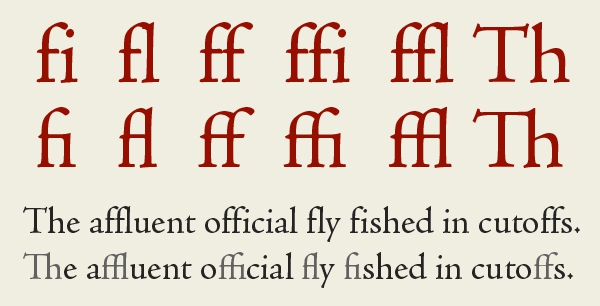
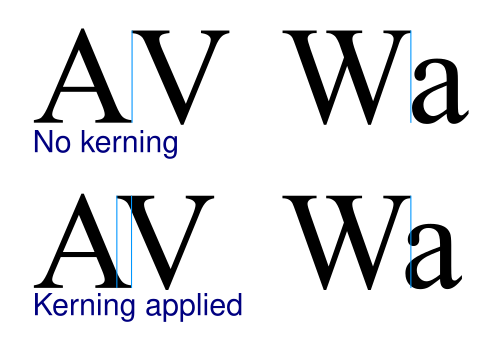
Kerning. This is also a font property to combine some character sets. This time, to adapt the distance between them. Mainly, to reduce it and avoid weird gaps. Imho, it looks better too. Turns on with the same CSS rule.
Font sizes. It sets the visual hierarchy: <h1> is bigger than <h2>, bigger than <p>. We read texts on the web from large monitors or large smartphone screens. Usually, we do this at some distance — at least a half-bent arm. It is worth choosing a size so that this distance does not have to be increased or decreased in order to view your site. I settled it this way:
css
body {
  font-size: 22px;
}

h1 {
  font-size: 52px;
}
h2 {
  font-size: 40px;
}
h3 {
  font-size: 32px;
}
.code-panel {
 font-size: 16px;
}
@media (max-width: 480px) {
  body {
    font-size: 16px;
  }

  h1 {
    font-size: 36px;
  }
  h2 {
    font-size: 28px;
  }
  h3 {
    font-size: 24px;
  }

  .code-panel {
    font-size: 12px;
  }
}
Line length. This is how many characters the block takes in width. For the main text, this is 50–80 characters on a desktop. I haven’t seen any precise recommendations for mobile. In my opinion, it’s great when there are about 32–44 characters.
abcdefghijklmnopqrstuvwxyzabcdefghijklmnopqrstuvwxyzabcdefghijklmnopq — 69 chars on a desktop.
abcdefghijklmnopqrstuvwxyzabcdefghijklmn — 40 chars on iPhone 13.
To compare, Medium has 66 on a desktop and 38 on the same phone.
You can achieve the desired length combining font size and side margins.
Text alignment. Is it the left or the right edge? Or is it centered? Is it justified? Are words hyphenated? I stopped on a left alignment and hyphenation. The ragged right edge looks quite dynamic, while hyphenation makes it more even.
Another combination that I think works well is justified alignment and hyphenation. Without hyphenation, the width between words starts jumping, making the text harder to read.
Medium has left alignment without hyphenations. It’s also neat, but the line length jumps more significantly if the text contains long words or links.
Paragraphs. My choice is paragraphs without a red line. In this case, I also had to increase the space between paragraphs. With a red line they usually leave the same distance as between lines of one paragraph. To activate the red line, you can use text-indent: 3%.
Headers. A simple heading is a large, uniform inscription in lowercase letters with a capital letter at the beginning and no period at the end. In English texts I also see each word starting with a capital except for prepositions.
I use only h1—h3headings for now: to name the page, a section and a subsection. I don’t use bold for them, because they have a large font and large indents. If I implement h5once, I will increase the font weight for it, especially on mobile.
Links. The default link style is blue and underlined. If the page has already been visited, it becomes purple. I think this highlighting is redundant. Yes, color coding separates visited and unvisited links. Still, I am ready to sacrifice this information and leave the links always the same color as the main text, only underlined. Underlining is not used in any other way, there is nothing to confuse it with.
In the case of hover, I add a background. I found this to be a good way to highlight any interactive elements — things will happen when you click it.
Line spaces. The default leading has a problem most of the times. If you have p and f letters on different lines, right under each other, the space between them will be less than the space between words on the line. It looks poor. Below I will try to explain it with the Inner and outer rule. I use line-height: 1.3;, but the exact value varies from the font and kerning.
Dive deeper
Captions for images. This is a common publications platform functionality I decided to support as well. Simple caption is traditionally places right under the illustration and has smaller font-size comparing to the main text. It’s alignment might also differ and depends on the image layout.

Image captions might be optional, if the illustration is clear itself or is described by a header or text nearby.
Lead paragraph. It is an introductory paragraph at the top of a page, usually summarises the content. The lead paragraph font size is a bit bigger than regular text, and used once per page.
css
body {
  font-family: 'SourceSerif4', sans-serif;
  font-size: 22px;
}

.lead {
  font-size: 26px;
}
Punctuation marks. Probably, the largest typography section. It covers rules setting quotation marks, hyphens and dashes, ellipses and question marks, etc. It is huge because some traditions vary from language to language. For example, in US English it’s usual to use double curly quotes at the outer level of quotation, and single curly quotes at the inner: “that’s what ‘the president’ said”. Meanwhile, quotes should always be straight in code sections.
Another common rule is to divide hyphens -, en dashes –, and em dashes —.
- Hyphens are used to break words in parts, to combine some compound words, like “sister-in-law”, and names: Oxlade-Chamberlain. It is also used in phrasal adjectives, like “twelve-member jury”.
- En dashes indicate a range of values, like “April 1–4”, or highlight a contrast, like “Republican–Democratic split”.
- Em dashes break sentences in parts.
Not to talk about minuses −, which are a part of other typography section, math signs.
There’s also a separate ellipses sign “…” which differs three dots, is used to indicate an omission in quoted material, and is not broken on separate stings.
Line breaks. They are set automatically depending on the alignment and justification, and may cause words to break either on some breakpoints. The shorter the lines are, the more actual becomes hyphenation, as there are less options to set a break point, causing weird breaks or column bounds overlaps.
I use hyphens in all the text blocs, but wrap last words of each paragraph in <span class=”no-hyphens”></span> to prevent it from breaking. In that case I also set o non-breaking space before it, to avoid last words lonely standing on a separate line.
css
body {
  hyphens: auto;
}

.no-hyphens {
  hyphens: none;
  white-space: nowrap;
}Spaces. There’s also a bunch of rules here. There should always be a single space between sentences and words. They should sometimes wrap punctuation symbols, but these rules also depends on language. I.e. in English there should be no spaces around em dash, while in Russian there should be.
Moreover, some of the spaces should be non-breaking: same width, yet preventing word wrapping adjacent to different lines. It’s usually put before numeric or alphabetic references, after honorifics and titles or trademark and copyright symbols, and in many more cases. The main thing, it helps to avoid awkward breaks.
I tried to follow some rules above by manually editing my texts. Now, I’m up to automate this process. Before we’ll move on to automation details, I want to discuss couple of approaches I consciously avoided.
Hanging punctuation. This approach is known in typography even since the Gutenberg Bible — yes, published in 1450s by the same fellow who invented the printing press.
The idea is to optically align the text at the border of the column: some characters will stick out in width, but will be perceived by the human eye as being on the same line. I have a left alignment on my site. This means I could try to apply hanging punctuation to the left edge of the text — the right one isn’t balanced as intended.
The problem is that it works fine on the web only with the first character of the block. If at some breakpoint the character is in the middle of the text, it won’t hang. Only if you’ll try to calculate it’s position in the line on the client, which, imho, is not worth the developer’s effort and computing resources. You can’t count on the hanging-punctuation property either — it only works in Safari, and even then, poorly.

Finally, in the classic version, not only punctuation marks are aligned, as is usually done on the web, but all the symbols. That’s something should be made a combination of font and browser features, not on the website level.
Caps. In typography, caps are designed to blend with the regular text. When you write an abbreviation, say, USA, and expect it to be nearly the same height as all the surrounding letters. Somebody also uses them for references or links. Caps look interesting, but I can’t see any good reason to implement them besides they did it somewhere.
That’s nearly it with typographic theory. We haven’t even discussed the spacing between characters, between words, factoids, aside blocks and much more! At the end of the article, I’ll give links to two of the best books I know that will help you learn typography on your own.
Main typographic rule. The last thing I can’t share. There are universal rules in typography. In my opinion, the main one is that the internal should be smaller than the external:
- The indents between characters should be smaller than the spaces between words
- The line spacing should be smaller than the distance between paragraphs
- The margins inside a block should be smaller than the margin to another block
That’s something you should always keep in mind. Breaking this rule ruins things. At best, the layout will be looking untidy. At worst, it will cause misunderstanding incidents, as our brain will match some elements, that were not supposed to be matched in a common sense.
Transform the text using Typograf
Not all typography can be implemented with CSS styles alone. You have to place correct punctuation marks, remove unnecessary spaces, add missing ones, sometimes non-breaking ones, convert the date format, and or change the markup of the document itself. Writing an engine for this is quite a task, so I decided to look for ready-made solutions.
I wanted to find a JS library that I could extend with my own rules. I was surprised that it was not that easy! I used ChatGPT, Claude and Perplexity — and here is what I found:
- Typograf—with presets of rules for English and Russian, the possibility to turn them on and off and to add your own rules and localisations. Works with plaintext and HTML — it can transform attributes or skip tags. Extensive documentation. It seemed the most powerful of all the options, so I chose it.
- retext—almost as great as Typograf, but it doesn’t work with cyrillics. Extends languages support via plugins, but I haven’t found any made by external contributors. So that might be a tricky task to create one.
- Richtypo—also great. If I hadn’t discovered it while diving deep into Typograf, I would probably have taken it. It additionally works with Markdown without external dependencies. The documentation isn’t as comprehensive, though.
- fly-typograf — does not allow adding new rules, has not been updated since 2022.
- SBOL Typograf— has a lot of native rules, even for phone formats or brand names. But it is also unexpandable and supports is only Russian.
- Smartypants — has not been updated for a couple of years, only English and no extension. Although it’s the plugin for marked came in handy later.
Well, as I picked the tool, I imtegrated it into the pipeline. As Typograf works with HTML, I’ll use it as a parameter value. According to the docs, it’s also required to mention the locale.
typescript
import Typograf from 'typograf'
const uiLanguage = 'en'
const html = '<h1>Hello -- "world"!</h1>'
const tp = new Typograf({ locale: uiLanguage === 'en' ? 'en-US' : 'ru' })
tp.execute(html)
console.log(html)//<h1>Hello — “world”!</h1>Not bad. Nearby in the docs there’s a list of
start— as I understand, HTML is parsed here, usingconsts/privateSeparateLabelto set apart entities.hide-safe-tags-ownhide-safe-tags-htmlhide-safe-tags-url— here you’re still able to transform the HTML attribute values, liketitleoralt.hide-safe-tags—here it deeply saves all the tags you’d like to avoid transforming. I.e. not making“”out of""insidecode.utfdefault— applying main typographical ruleshtml-entitiesshow-safe-tags-urlshow-safe-tags-htmlshow-safe-tags-ownend
There are also two rule categories — inner and main. Inner — to set up the stage itself. Main — the rest. And they are divided by locales: en, ru, common etc.
I followed the docs to enable the rules were missing — and disable those that seemed redundant.
typescript
tp.enableRule('common/space/delLeadingBlanks')
tp.enableRule('common/number/digitGrouping')
tp.enableRule('common/nbsp/afterNumber')
tp.enableRule('common/html/processingAttrs')

tp.disableRule('common/nbsp/nowrap')
tp.disableRule('common/nbsp/replaceNbsp')
At the same docs section there’s an example of setting up a rule. I compared how the amount of non-breaking spaces affected different breakpoints.
typescript
tp.setSetting('common/nbsp/afterShortWord', 'lengthShortWord', 3)Not to turn the page, I also tested a custom rule provided as an example.
typescript
Typograf.addRule({
    name: 'common/other/typographicSmiley',
    handler: function (text) {
        return text.replace(/:-\\)/g, ':—)')
    }
})
Looks good, but I found several pitfalls in practice. First, custom rules modify the class, not the instance. I got burned on this because I wanted to add a non-idempotent rule and moved the Typograf initialisation into a function that was called on each page.
Idempotency is a property of an operation in which new applications of the operation to the result does not change it. For example, the module of a number: |x| = |(|x|)|.
So i just flood the class with many identical functions. Despite the collision of names, they were all executed and completely broke the layout. I made a workaround.
typescript
const opts = {
  customRules: [
    {
      name: 'common/other/typographicSmiley',
      handler: function (text) {
        return text.replace(/:-\\)/g, ':—)')
      }
    }
  ]
}

if (opts.customRules) {
  for (const rule of opts.customRules) {
    if (!Typograf.getRule(rule.name)) {
      Typograf.addRule(rule)
    }
  }
}
I planned to add a very specific rule. There are tags that contain text. If there are several words in this text, then there should always be a non-breaking space before the last one. The word itself should be wrapped in <span>, which prohibits hyphenation. Punctuation marks that are adjacent to the word counts as parts of word.
All Typograf rules I saw were written using regular expressions. This is okay for simple cases, but even LLMs couldn’t help me here. I gave up on the
typescript
import {parseFragment, serialize} from 'parse5'
import type {ChildNode} from 'parse5'

function setNoHyphens(nodes: ChildNode): void {
  nodes.forEach(node => {
    if (node.nodeName === '#text') {
      if (!node.value.trim()) return
      // match the last word, capturing leading spaces if any
      let match = node.value.match(/(\\s+)(\\S+[\\w\\p{P}])$|(\\S+[\\w\\p{P}])$/u)
      if (match) {
        const spaces = match[1] || ''
        const word = match[2] || match[3]

        if (spaces) { // the last word is not the first
         node.value = node.value.slice(0, -match[0].length) + '\\u00A0'
        } else {
          node.value = node.value.slice(0, -match[0].length)
        }
        const spanElement = parseFragment(
          `<span class="no-hyphens">${word}</span>`
        ).childNodes[0]
        const parent = node.parentNode
        const index = parent.childNodes.indexOf(node)
        parent.childNodes.splice(index + 1, 0, spanElement)
      }
      // along the way, wrap links as well
      node.value = node.value.replace(
        /(https?:\\/\\/[^\\s]+)/g,
        '<span class="no-hyphens">$1</span>'
      )
    } else if (node.childNodes && !['code', 'pre'].includes(node.nodeName)) {
      setNoHyphens(node.childNodes)
    }
  })
}

const options = {
 customRules: [
      {
        name: 'common/other/lastWordNoHypens',
        handler: function (text, _settings, context) {
          if (context.isHTML) {
            const document = parseFragment(text)
            setNoHyphens(document.childNodes)
            return serialize(document)
          }
          return text
        },
        locale: 'common',
        queue: 'end',
        processingSeparateParts: false
      }
    ]
}
As I was writing this rule, I found out about rule setting and context.
json
{
  text: "<p>:-)</p>",
  isHTML: true,
  prefs: {
    locale: [ "en-US" ],
    lineEnding: "LF",
    live: false,
    ruleFilter: undefined,
    enableRule: undefined,
    disableRule: undefined,
    processingSeparateParts: undefined,
    htmlEntity: {
      type: "default",
      list: undefined,
      onlyInvisible: false,
    },
  },
  getData: [Function: getData],
  safeTags: SafeTags {
    groups: [ "own", "html", "url" ],
    hidden: {
      own: [Object ...],
      html: [Object ...],
      url: [Object ...],
    },
    counter: 2,
    tags: {
      own: [],
      html: [
        /<!--[^]*?-->/gi, /<!ENTITY[^]*?>/gi, /<!DOCTYPE[^]*?>/gi, /<\\?xml[^]*?\\?>/gi,
        /<!\\[CDATA\\[[^]*?\\]\\]>/gi, /<code(\\s[^>]*?)?>[^]*?<\\/code>/gi, /<kbd(\\s[^>]*?)?>[^]*?<\\/kbd>/gi,
        /<object(\\s[^>]*?)?>[^]*?<\\/object>/gi, /<pre(\\s[^>]*?)?>[^]*?<\\/pre>/gi,
        /<samp(\\s[^>]*?)?>[^]*?<\\/samp>/gi, /<script(\\s[^>]*?)?>[^]*?<\\/script>/gi,
        /<style(\\s[^>]*?)?>[^]*?<\\/style>/gi, /<var(\\s[^>]*?)?>[^]*?<\\/var>/gi
      ],
      url: [ /(https?|file|ftp):\\/\\/([a-zA-Z0-9/+-=%&:_.~?]+[a-zA-Z0-9#+]*)/g ],
    },
    add: [Function],
    show: [Function],
    hide: [Function],
    hideHTMLTags: [Function],
    getPrevLabel: [Function],
    getNextLabel: [Function],
    getTagByLabel: [Function],
    getTagInfo: [Function],
    pasteLabel: [Function],
    prepareRegExp: [Function],
    getPrevTagInfo: [Function],
    getNextTagInfo: [Function],
  },
}
From this context I use isHTML property to process only the parts of the document Typograf itself is defining as HTML. Further more, I explicitly specify which locale the rule is added to. As this one is universal, I added it to the common locale.
Using processingSeparateParts, I specified that I want to process the entire file. This is important because we need to understand the context of the entire block. Otherwise, in a situation like <p>Word1 <a>Word2</a> Word3</p>, the script will wrap all three words.
I also explicitly specified the queue when all other scripts have already processed. This makes it easier to control the result, but in theory it is possible to do it in an earlier queue not to duplicate tags to except.
Speaking of exceptions, here’s how to exclude tags from the main rules — then Typograf will hide them at the appropriate stages, and then return them to where they were.
typescript
tp.addSafeTag('<code>', '</code>')
tp.addSafeTag('<pre>', '</pre>')
Typograf also supports hanging punctuation. However, only in Russian texts: tp.enableRule('ru/optalign/*'). You also need to add some styles.
css
.typograf-oa-sp-lbracket
{
    margin-right: 0.3em;
}

.typograf-oa-lbracket,
.typograf-oa-n-lbracket
{
    margin-left: -0.3em;
}
.typograf-oa-comma
{
    margin-right: -0.2em;
}
.typograf-oa-comma-sp
{
    margin-left: 0.2em;
}
.typograf-oa-sp-lquote
{
    margin-right: 0.44em;
}
.typograf-oa-lquote,
.typograf-oa-n-lquote
{
    margin-left: -0.44em;
}
I’ll use hanging punctuation to raise one more concern about Typograf extensibility. Let’s say I want to make hanging typography for an English locale. Let’s open the code for the quotation mark rule.
typescript
export const quoteRule: TypografRule = {
    name,
    handler(text) {
        const quote = this.getSetting('common/punctuation/quote', 'ru') as DataQuote;
        const lquotes = '([' + quote.left[0] + (quote.left[1] || '') + '])';
        const reNewLine = new RegExp('(^|\\n\\n|' + privateLabel + ')(' + lquotes + ')', 'g');
        const reInside = new RegExp('([^\\n' + privateLabel + '])([ \\u00A0\\n])(' + lquotes + ')', 'gi');

        return text
            .replace(reNewLine, '$1<span class="typograf-oa-n-lquote">$2</span>')
            .replace(reInside, '$1<span class="typograf-oa-sp-lquote">$2</span><span class="typograf-oa-lquote">$3</span>');
    },
    disabled: true,
    htmlAttrs: false,
}
It is using privateLabel imported from consts.ts. Yet it’s not being imported in main.ts and the code owner is against exporting such guts. So, I’ll have to either fork or copy-paste non-exported stuff into my project.
Subjectively, extending typograf with custom rules turned out to be not as easy as I expected. It has limitations and a few non-obvious solutions.
I haven’t figured out all the capabilities of the tool yet — for example, there are onBeforeRule and onAfterRule hooks. But anyway, I think to give Richtypo a try for the next update — to compare and decide if I should use it instead. Maybe it’s easier to learn and to extend.

Caption images and highlight lead paragraphs using Marked
Above I showed the limitation with JSX rendering I run into using Marked. Here’s what else I learnt from the documentation (which’s quite comprehensive).
Marked provides several key methods:
parse: Full Markdown parsing (block-level)parseInline: Inline Markdown parsinglexer: Breaks down Markdown into tokensparser: Converts tokens to HTMLwalkTokens: Allows traversing and processing tokensuse: Extends and customizes parsing behaviorsetOptions: Configures parsing options
Extension mechanism allows to:
- Add custom renderers — the feature I used to modify headings and images display.
- Extend tokenizers.
- Add hooks — in theory, I can make typography transformations with such a hook.
- Modify parsing behaviour.
There’s quite a number of renderers split in two categories. Block-level renderer methods: space, code, blockquote, html, heading, hr, list, listitem, checkbox, paragpaph, table, tablerow, tablecell. The idea is, that inside of it might be any number of other block-level or inline tokens. Those are rendered with the second methods category: strong, em, codepan, br, del, link, image, text.
For me, the easiest way to extend renderer was to find the source code for the default one, i.e. paragraph, and then to write additional logic above. I did exactly it to add image captions. In original markdown format there’s no native support for such a feature. So I interpret this as a caption:
plaintext
*Without a network, you won’t be able to proceed with the following steps*But I couldn’t just modify em or img renderers. I need a context that they’re both related to — to define if they are a single block or not. I had to redefine paragraph renderer and update the way I render the image component.
typescript
const Image = ({src, alt, caption}: ImageProps): JSX.Element => {
  return (
    <div className="image-container">
      <div className="image-zoom-wrapper">
        <img src={src} alt={alt} />
      </div>
      {caption && <em>{caption}</em>}
    </div>
  )
}

...

let isFirstParagraph = true
marked.use({
 renderer: {
  paragraph({tokens}) {
      if (tokens[0].type === 'image') {
        const caption =
          tokens.length > 2 && tokens[2].type === 'em' ? tokens[2].text : ''
        return renderToString(
          <Image
            src={tokens[0].href}
            alt={tokens[0].text || tokens[0].title || ''}
            caption={caption}
          />
        )
      } else if (isFirstParagraph) {
        isFirstParagraph = false
        return `<div class="lead"><p>${this.parser.parseInline(tokens)}</p></div>\\n`
      }
      return `<p>${this.parser.parseInline(tokens)}</p>\\n`
    }
  }
})
This code also highlights first paragraph on a page as a lead paragraph. Meanwhile, there might be images not only inside paragraphs. For now I don’t support the captions in that case, just render them with wrappers.
typescript
marked.use({
  renderer: {
    image({text, href, title}) {
      return renderToString(<Image src={href} alt={text || title || ''} />)
    }
  }
})
One more thing I missed at first and it took me hours to debug. I simply imported Marked as mentioned in the default example import { marked } from 'marked' and then called marked.use(). In that case, Marked stores options and extensions in the global scope. Again, because of non-idempotent transformation, it ruined resulting HTML as the same rules were applied several times.
To avoid this, create a new instance from class to ensure options and extensions are locally scoped:
typescript
import { Marked } from 'marked'

const marked = new Marked([options, extension, ...])
Besides the scope mistake I made, I was surprised how simple it was to modify custom rendering for your needs. I’m very pleased of Marked choice for now.
Extension
The idea to use a Marked hook hooked me. I might had used it to call Typograf as a part of transiting markdown into HTML process. I checked what kind of hooks Marked has. Among them, postprocess was exactly what I needed. I also spotted marked-smartypants and markdown-it-typograf extensions and read their sources to cut implementation ideas.
I made a tiny plugin as well. I believe, it might incapsulate initialisation and the tricky moment with custom rules and the instance scope. Also, it will help Typograf users to know about Marked and vice versa.
I used marked-extension-template, but replaced Jest, Babel, Rollup and Semantic release with Bun and ESBuild, adjusting GitHub Actions workflows accordingly. I followed the template’s TODO section, moved the code to extension’s index.ts and updated the tests accordingly. The only interesting moment is postprocess hook usage, so that I can call marked.use(markedTypograf(options)).
typescript
import Typograf from 'typograf'

export function markedTypograf(opts = {}) {
  if (opts.customRules) {
    for (const rule of opts.customRules) {
      if (!Typograf.getRule(rule.name)) {
        Typograf.addRule(rule)
      }
    }
  }

  const tp = new Typograf(opts.typografOptions || { locale: 'en-US' })
  if (opts.typografSetup) {
    opts.typografSetup(tp)
  }

  return {
    hooks: {
      postprocess(html) {
        return tp.execute(html);
      }
    }
  }
}
Finally, I updated site’s code to use newly available package.
Fonts features
I’ve already told you about ligatures and kerning. But there are more font-related features: alternate figures, ordinals, fractions etc. Provided by worthy sources, fonts usually have downloadable specimen sheets, where you can check the features support. Most of them are activated with font-feature-settings property and the same @font-face
css
/* use small-cap alternate glyphs */
.small-caps {
  font-feature-settings: "smcp" on;
}

/* convert both upper and lowercase to small caps (affects punctuation also) */
.all-small-caps {
  font-feature-settings: "c2sc", "smcp";
}
/* use zeros with a slash through them to differentiate from "O" */
.nice-zero {
  font-feature-settings: "zero";
}
/* enable historical forms */
.historical {
  font-feature-settings: "hist";
}
/* enable common ligatures and kerning */
.ligatures-kerning {
  font-feature-settings:
    'liga' 1,
    'kern' 1;
}
/* enable tabular (monospaced) figures */
td.tabular {
  font-feature-settings: "tnum";
}
/* enable automatic fractions */
.fractions {
  font-feature-settings: "frac";
}
/* use the second available swash character */
.swash {
  font-feature-settings: "swsh" 2;
}
/* enable stylistic set 7 */
.fancy-style {
  font-family: Gabriola;
  font-feature-settings: "ss07";
}
You may check the details on MDN: for a property, a font face at rule — or check the CSS specs for font settings or font variations.
Debug a lot
The last thing I can’t avoid to share is this TypeSctipt wtf-moment. It maximally trolled me while debugging, even though the competition was tough — you might have spotted it by the few notes above.
This is how I initialised and called a function:
typescript
async function collectArticlesToUpdate(
  dirPath: string,
  remoteNodes: FileNode
)

...
const nodes = functionReturnsFileNodeType()
collectArticlesToUpdate(nodes, '')// instead of ('', nodes)
… and this type mismatch successfully passed lint and build stages and caused runtime errors, despite I had enabled strict TS mode. Excuse me, shouldn’t a customised JSON type instead of a string result into type error?!
What’s next
As I’ve promised, the links to typography online books: Matthew Butterick’s (EN, free) and Artyom Gorbunov’s (RU, paid).
Also there’s a blog and a course to get to know more about SEO: Detailed.
As for the project, I still have points to implement from the initial plans:
- Covers to the articles in the main page’s feed.
- Subscriptions and comments.
- Caches and serving static files from a CDN. It’ll require to adjust GitHub Actions accordingly.
- Multi-instance and multi-container modes.
- Tests.
Above that, I wrote out to:
- Redesign the rendering scheme.
- Set up Dependabot and it’s requests automerge. For sure it’ll require to implement tests first.
- Adaptive images.
- Validate Markdown files correctness in the article’s GitHub Action.
Sounds like a right fit for a couple of beer evenings.
If you found this article helpful, please show your support by sharing it with your friends or colleagues. This time there are some buttons to do it.
If you want to talk on managing engineering teams, designing systems, or improving your tech product, send an email or message me.
Feel free to connect with me on LinkedIn.
Peace!
Share:
Updated: