
Building a local-first web application with Bun, React, Tailwind CSS, PouchDB and CouchDB
This February I applied on a Portugal Startup-Visa with a password manager case. After 30 working days, the formal answer deadline, they recommend to push the authorities by showing the project updates.
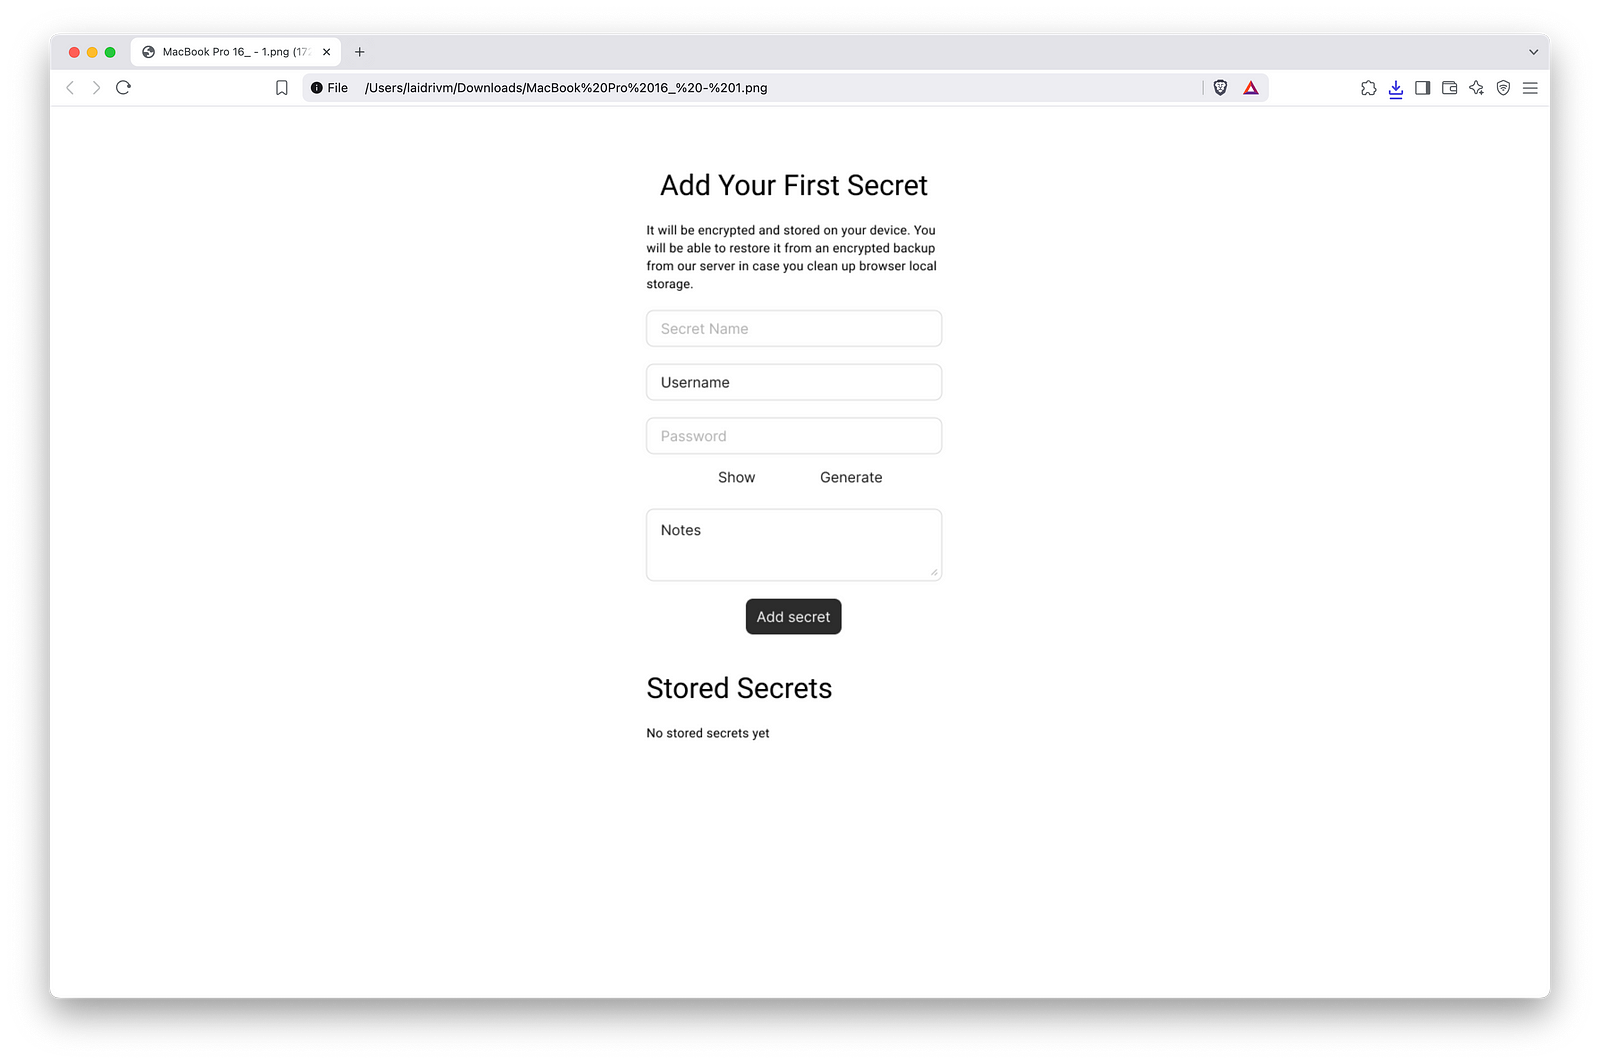
As such an update, I published the prototype and the source code. It’s not fully functional yet: you can unlock the app by refreshing the lock screen instead of entering the master password. Still, it’s enough to demonstrate the concept and the local-first approach:
- It saves everything locally and encrypts the passwords.
- It works fully offline after the very first page load, even if you close or refresh the tab.
- It syncs everything to the server when online even for anonyms.
In this article I’ll explain the basic concepts of local-first applications, discuss the stack I picked, show the systems design, explain some implementation moments and share the takeaways I made about the tools, the project and the approach itself.
What this local-first is
Local-first is a systems design approach in which data is primarily stored on the users’ devices and is synced seamlessly across devices and a server when connectivity is available.
The approach, as formulated, started to gain popularity since initial publications in 2019 like the one by Martin Kleppmann (author of the cult book with the boar) and colleagues.
It brings some benefits from a user’s perspective. They:
- can fully use the product without network connection or during server downtime;
- experience more responsiveness as data access is instantaneous;
- actually own and control their data as it is kept locally;
- real-time collaboration without central server bottlenecks.
There are several ways to apply this approach to products like productivity tools, creative applications or collaborative editors. In the original startup application I described this approach in the password manager context.I used local-first approach as a solution for data ownership and offline capabilities selling points. From the demo slides:
Password managers rely on cloud storage, exposing users to breaches, outages, and surveillance. Users with unreliable internet or heightened privacy concerns lack trustworthy, accessible solutions.
1.35B Individuals Affected by Breaches in 2024
According to Statista. 82% of cyberattacks in 2023 involved data stored in centralised clouds according to Secureframe.
85% Adults Ready to Do More to Protect Privacy
According to Exploding Topics. This shift to sovereign digital tools is driven by business alike according to User Centrics.
4 Cases of Required
No-network AccessTrips abroad, emergencies such as the recent electrical outage, regulatory requirements or risky industries like investigations.
As a developer, the main upside you may get is potential for reduced infrastructure expenses as the application relies less on constant server communication. However, you’ll face additional challenges:
- Conflict resolution when syncing several data sources.
- Client-side storage capacity limitations.
- Updating data formats across distributed devices.
- Keeping multiple copies of data consistent.
- Protecting data, especially local one.
- Initial data loading if there’s a significant amount to enable full functionality.
There’s a well-known akin approach named offline-first. As I've seen these terms used as full synonyms, formally there is some difference:
- The primary source of truth is server.
- Data is synced once post-offline.
- Offline mode is usually a temporary fallback.
- Locally stored data is considered a temporary caching proxy.
So, offline-first approach makes apps work without internet, while local-first — makes internet optional for the core user experience and is about data ownership and autonomy.
Let’s review an explicit list of components one could use to implement offline-first approach.
Client Components
Local database. Provides persistence, querying, and transaction support.
State Management. Systems to track local changes and maintain UI consistency.
Data format tools. Conflict-free Replicated Data Types (CRDTs), Operational Transforms (OTs), or immutable logs to automatically handle concurrent edits and resolve conflicts.
Encryption layer. For secure local storage and transmission.
Server Components
Backend databases. For syncing and backing up data keeping in mind shared or collaborative aspects.
Sync gateway. Accepts and merges data from multiple clients also resolving conflicts.
Authentication and Authorization. To control device access and user data sharing.
Sync Engine
Sync engine connects client and server to track changes and distribute them. It handles background sync, retries, deduplication, multi-device awareness, versioning and conflict resolution.
Community
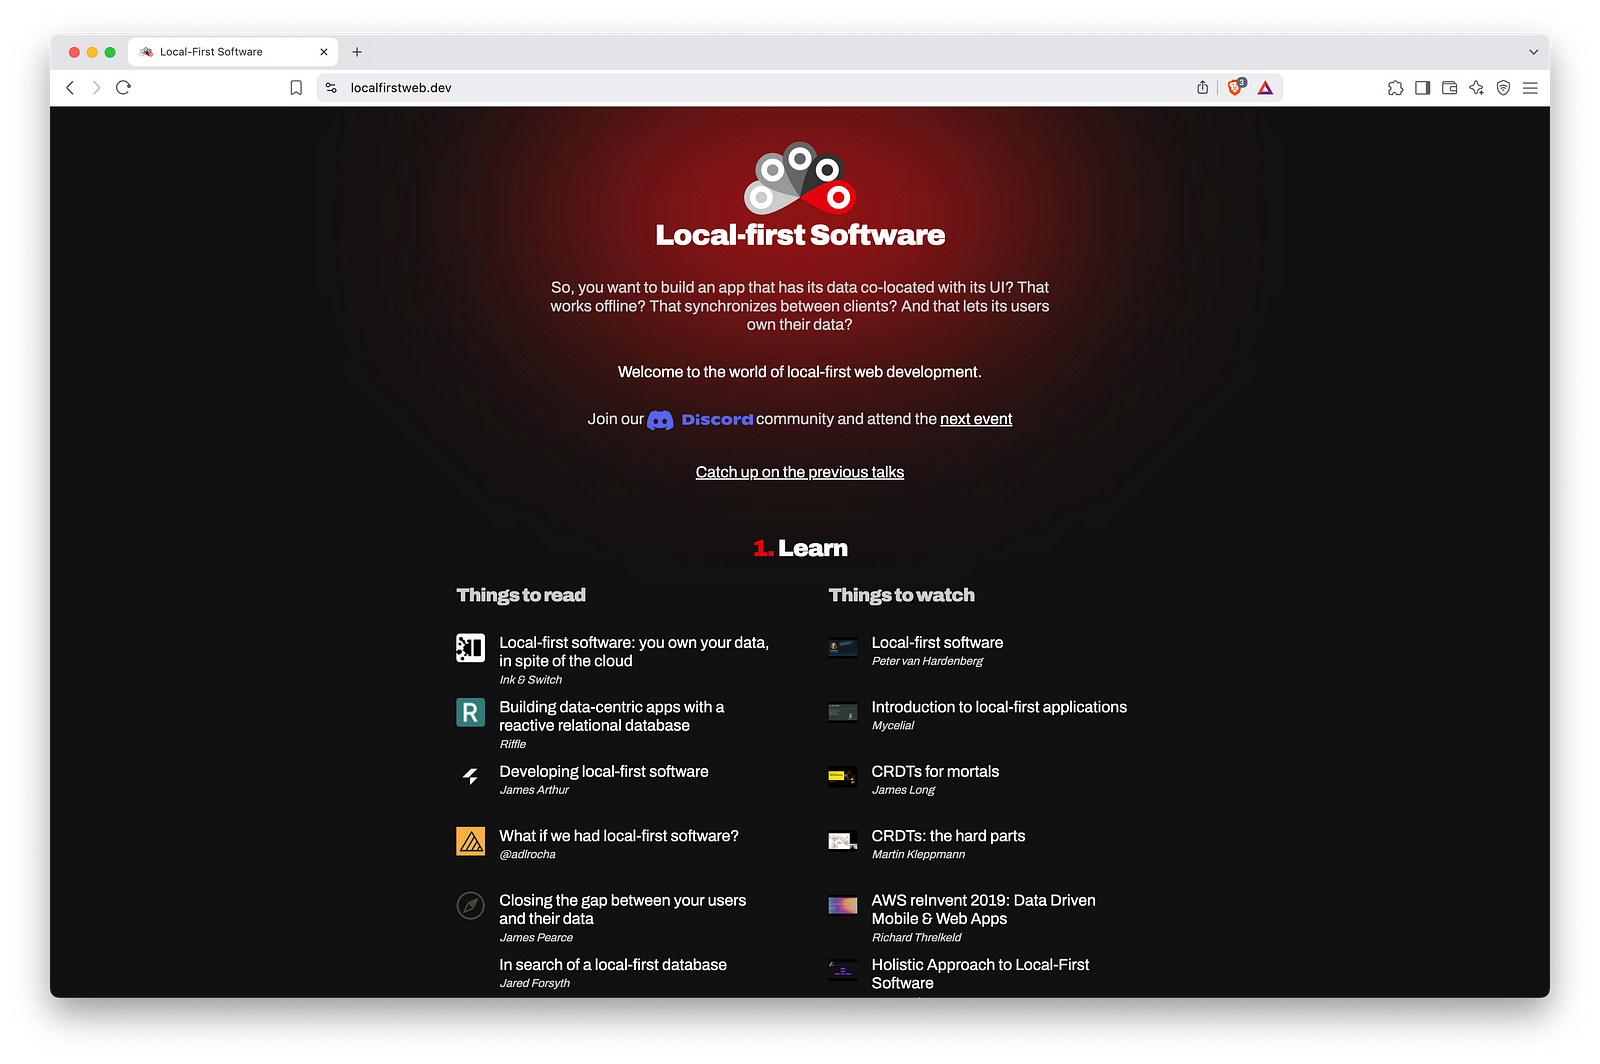
I guess, the main site related to the approach is localfirstweb.dev. There you can find articles and videos about the approach, join a Discord community of 3500 members, find information about past and upcoming events, know some minds to follow or apps to try.
Why I chose such a stack
Local-first tools databases
IndexedDB. A native browser storage used to keep larger amount of structured data than Web Storage (local and session storages). It’s quite a low-level API so it’s frequently used with a wrapper like Dexie, which adds transactions, queries and schema evolution. Even with a wrapper, you have to create a sync mechanism on your own. And it’s still more obvious, how to connect this one to a non-relational database, rather then to a relational one.
SQLite. A very well-known tool used in a browser through WASM binding. It might be used not only as an
PGlite. Runs PostgreSQL —compatible database in a browser via WebAssembly. Fits nicely for migrating toward PostgreSQL —based infra, but also doesn’t have any
Realm. An object-oriented database. A part of MongoDB ecosystem used as a client storage to sync the data to a server MongoDB instance. The main problem — it is deprecated with the end of life in September 2025.
PouchDB. An
RxDB. Brings reactive RxJS bindings. Even though you might avoid using RxJS and use it with React only, I skipped the DB for now. Though I’d like to discuss the tool a bit further.
On the one hand, you might create a server instance to sync the data with, use prebuilt plugins to sync the data with GraphQL, Firebase, Supabase, NATS, same CouchDB, Appwrite, use WebRTC for peer-to-peer replication, or write your own custom endpoints to proxy other server databases or storages. So this part is quite rich.
On the other hand, it only openly distributes the version which uses the local storage. These operations block the main thread and the data is limited to 5 MBs. It has free plugins for Dexie.js or SQLite, but with some unpleasant restrictions.
Replicache. Client-side database with push-pull sync to server. Though server-side must be implemented manually. And the code is closed source.
CRDT Solutions
Automerge. A library which brings CRDT —based local-first state management. Works with or without a central server. Though you have to deal with the lack of
Yjs. A CRDT framework for collaborative apps. It has no
Loro. State synchronization library built on CRDTs. More modern then Yjs or Automerge.
Sync Engines
Gun. Decentralized graph database for peer-to-peer applications. You may have a server as a super-peer. Has a
ElectricSQL. A platform based on Postgres, SQLite or PGlite, and CRDT sync. That would be my pick, if I’d chosen a relational database.
Logux. A framework to build your own custom sync engines. Uses log-based model. Can be extended by most tools from the list above which lack synchronisation mechanism. I consider using it later to better resolve conflicts in my app. Also I find it a good tool in case ElectricSQL is not suitable as a ready-made solution.
Other used tools
Bun. For me it became a
React. As well, more or less
Tailwind CSS with a Bun Plugin. The framework allows to layout a page and build the expected design using CSS class-names inside HTML. It brings responsiveness, theming, CSS variables, grids, transitions and more. I.e. you can write a component like <button className="flex items-center bg-blue-500 px-4 py-3 text-white hover:bg-blue-400" />, without writing any CSS like:
css
.custom-button {
  display: flex;
  align-items: center;
  background-color: #3b82f6;
  padding-left: 1rem;
  padding-right: 1rem;
  padding-top: 0.75rem;
  padding-bottom: 0.75rem;
  color: white;
}

.custom-button:hover {
  background-color: #60a5fa;
}
When built, the related built CSS file will be like:
css
.flex {
  display: flex;
}

.items-center {
  align-items: center;
}
.bg-blue-500 {
  background-color: #3b82f6;
}
.px-4 {
  padding-left: 1rem;
  padding-right: 1rem;
}
.py-3 {
  padding-top: 0.75rem;
  padding-bottom: 0.75rem;
}
.text-white {
  color: #ffffff;
}
.hover:bg-blue-400:hover {
  background-color: #60a5fa;
}
But they say for bigger project it’s more optimal and more maintainable comparing to classic CSS and a pre-processor. I decided to give it a try as for prototype you can just write less code. And do it faster, if you know the bindings or use LLMs.
Cloudflare. This time I just set DNS rules for a sub-domain there, as I use it for the main site as well.
Hetzner. The best cost-reliability virtual machines provider as for me.
NGINX. I use it to set routing rules for the main domain and for the sub-domain to host both my blog and the prototype on the same machine. It also provides easier rate-limiting configuration comparing to bare Bun.
Let’s Encrypt. Offers free auto-renewed trusted certificates. Still, I donate and encourage you to as well.
Docker. The easiest way to run CouchDB is to use an official image. It’s also a standard tool for app isolation and a better DevEx.
Docker Compose. To start the balancer, the app and the database with a single command.
Prettier with a Tailwind Plugin and ESLint. To format and lint the code on each dev run.
TypeScript. This time mostly because it comes along with the other tooling.
Normalize CSS. I has no time to compare it with Tailwind’s Preflight. Probably, if I’d use the latter, it would be redundant. I think I’ll get rid of it in the next iteration.
uuidjs. I wanted to use UUID v7 for ID’s as it brings better indexing and time sortability. There’s no point to implement the standard myself so I used the most obvious tool.
Tools yet to be used
Finally, about the tools I plan to use for sure, but haven’t include into the project yet.
Preact. To write the frontend using the same React API but to have a more optimal bundle. I didn’t want to tinker with it right away as I met some unexpected behaviour using Preact for SSG developing my blog.
Hono. As there will be more endpoints, I’ll have to write more boilerplate without a web server development framework. Among shiny ones, I already tried Elysia, but yet it looks too raw for anything that could outgrow a personal project status. Hono offers middlewares, routing, request validation, is also highly-performant and looks more reliable. That’ll be my next shot.
Vite. The reason is behind Bun’s bundler limitations. Also, after picking up Hono, I’d probably have to build the dev environment of the project explicitly instead of relying solely on Bun’s magic. Vite’s fast, supports Hot Module Replacement and the frameworks I use.
Google’s Workbox. This version’s service worker was mostly written by Claude. It has some boilerplate and is not so obvious. I believe I’ll try this library to
How the system is designed
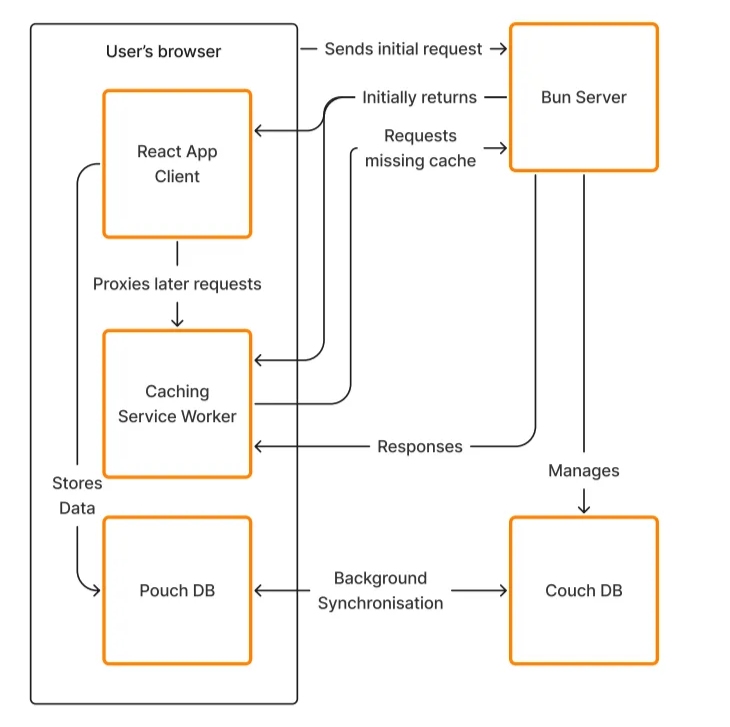
I tried to keep the simplest possible architecture for the prototype. Bun server initially serves everything. Then, a service worker is registered and starts to intercept all the requests, responding itself from caches or readdressing it to server if missed or excepted. All the client data is stored in PouchDB. When connected to network, the app establishes a background data sync with CouchDB instance on a server.
That’s pretty it. As I rely on a default “last write wins” conflict resolution algorithm, I don’t use any CRDT library or build a sync engine. I also use a “database per user” method and rely on
What are the implementation highlights
User Interface
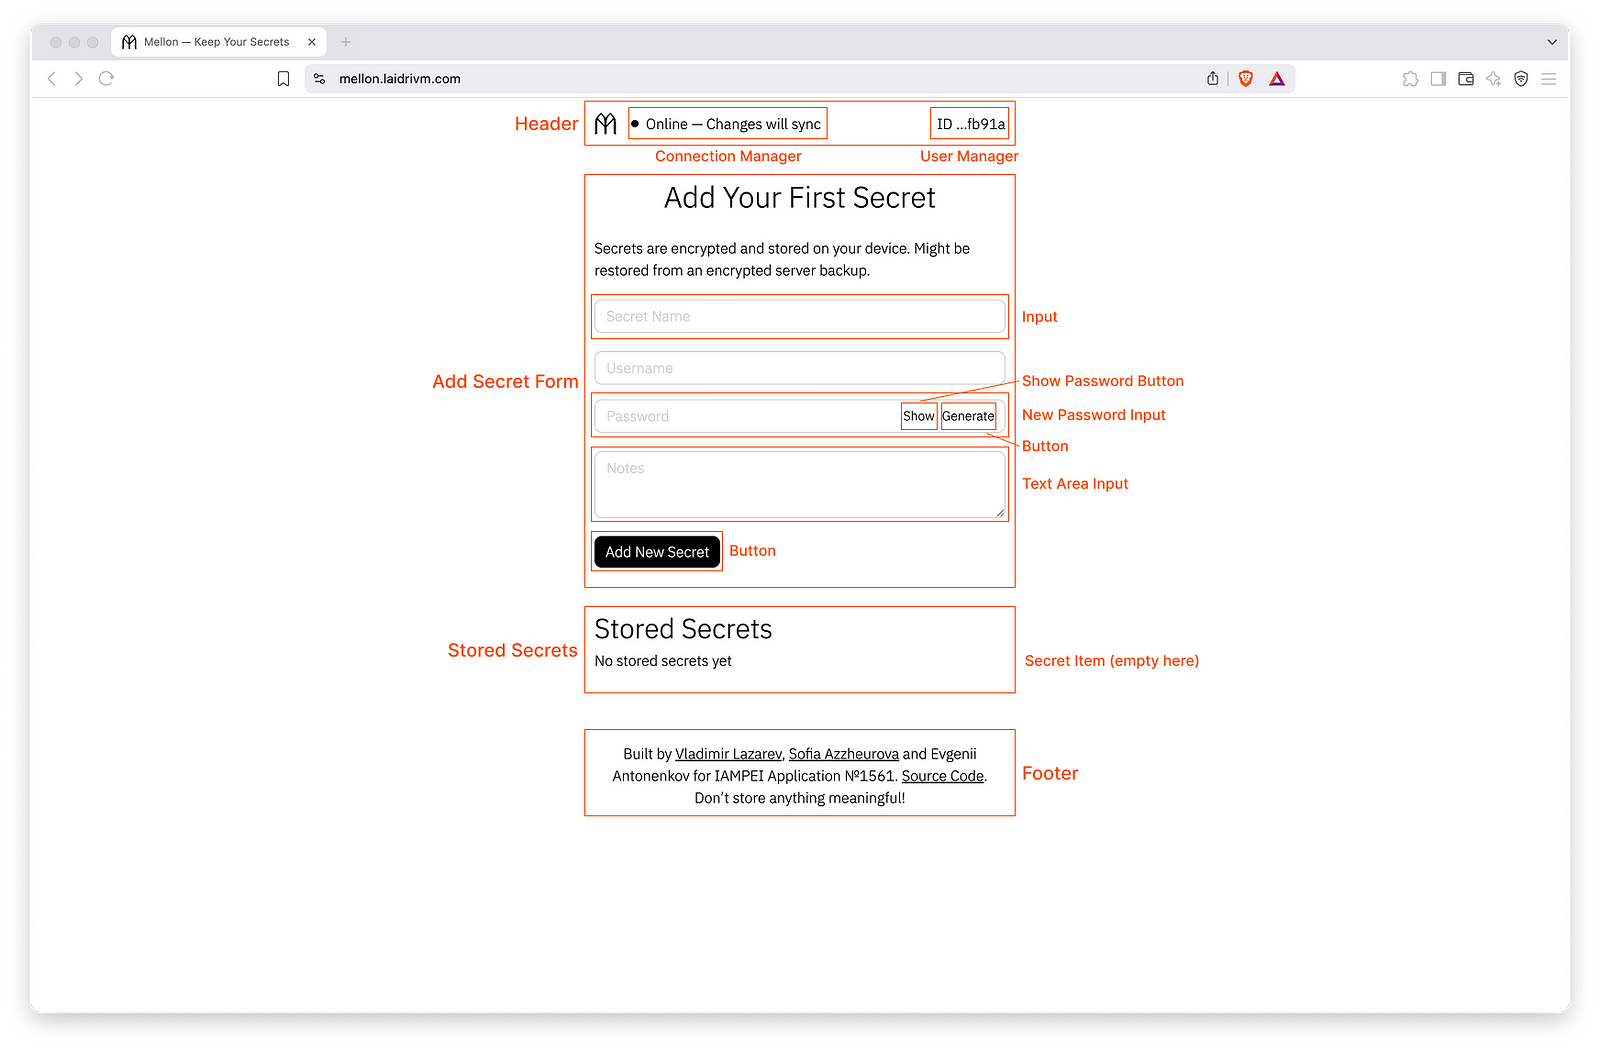
Now to nested component structure. The App component loads secrets, master password and email, keeps the onboarding state, controls activity to trigger a lock. Inside it there are:
- Header
- Footer
- Layout (Main)
- AddSecretForm
- StoredSecrets
- MasterPasswordForm
- UnlockForm
- SignUpForm
Inside the Header component there are:
- ConnectionManager — tracks network and database connections, triggers synchronisation establishing on status changes, retries a connection.
- UserManager — handles identity states: missing ID, anonymous ID, signed up ID. Requests new ID and initialises a corresponding DB if missing.
And inside SignUpForm — SecretItem.
The are also a bunch of shared components:
- Input
- InputNewPassword
- InputTextArea
- Button
- ButtonShowPassword
React client code is pretty simple, yet there some things I want to highlight.
Native form handling
There are lots of packages for React claiming to solve forms. But for me they looked an overkill this time. I just did it the native way:
tsx
export default function SignUpForm({
  addEmail
}: {
  addEmail: (email: string) => void
}): ReactNode {
  const [emailInput, setEmailInput] = React.useState('')
  function handleEmail(event): void {
    event.preventDefault()
    addEmail(emailInput)
  }
  return (
    <div className='space-y-4'>
      <h1 className='text-center text-xl'>Sign Up</h1>
      <p className='text-md leading-6'>
        It will allow you to share secrets across devices and enable two-factor
        authorisation.
      </p>
      <form className='space-y-4' onSubmit={handleEmail}>
        <Input name='Email' value={emailInput} setValue={setEmailInput} />
        <Button>Sign Up</Button>
      </form>
    </div>
  )
}
I use the synthetic event
tsx
export default function Input({
  name,
  value,
  setValue
}: {
  name: string
  value: string
  setValue: (value: string) => void
}): ReactNode {
  return (
    <div className='pt-1'>
      <input
        className='w-full rounded-lg border border-gray-300 px-3 py-2 placeholder:text-gray-300'
        placeholder={name}
        value={value}
        onChange={(event) => setValue(event.target.value)}
      />
    </div>
  )
}
I use data binding and a controlled input to display changes in the input.
React 19 introduced Actions, which might also be used to solve forms. The problem is, they only give us access to the form data on submit. If we want to do something with the data before submitting the form, we’ll need to store it in state and use a controlled input.
Using Navigator: onLine property
The other thing I want to highlight is the network detection inside the ConnectionManager component:
tsx
function useOnlineStatus(): boolean {
  const [isOnline, setIsOnline] = React.useState<boolean>(navigator.onLine)
  React.useEffect(() => {
    const handleOnline = () => setIsOnline(true)
    const handleOffline = () => setIsOnline(false)
    window.addEventListener('online', handleOnline)
    window.addEventListener('offline', handleOffline)
    return () => {
      window.removeEventListener('online', handleOnline)
      window.removeEventListener('offline', handleOffline)
    }
  }, [])
  return isOnline
}
export default function ConnectionManager({
  connectionState,
  setConnectionState
}: {
  connectionState: ConnectionState
  setConnectionState: (connectionState: ConnectionState) => void
}): JSX.Element {
  const isOnline = useOnlineStatus()

  const checkConnection = React.useCallback(async () => {
    if (!isOnline) {
      setConnectionState('offline')
      return
    }
   // The rest code
 }, [isOnline])
 // The rest code
}
Bun fullstack setup
The last interesting thing in how the frontend currently work, nevertheless it was a part of a template. First, the index page is imported and served:
ts
import {serve} from 'bun'
import index from './index.html'

const server = serve({
  port: process.env.PORT,
  routes: {
    // The other roots
    '/': index
  },
  development: process.env.NODE_ENV !== 'production'
})
The index.html itself includes initial markup and imports the script directly from a .tsx file:
html
<!doctype html>
<html lang="en">
  <head>
    <meta charset="UTF-8" />
    <meta name="viewport" content="width=device-width, initial-scale=1.0" />
    <link rel="icon" type="image/svg+xml" href="./logo.svg" />
    <title>Mellon — Keep Your Secrets</title>
  </head>
  <body>
    <div id="root"></div>
    <script type="module" src="./frontend.tsx"></script>
  </body>
</html>
In the frontend.tsx in turn the classical React initialisation is made: finding a root component and rendering the app itself inside.
tsx
import {createRoot} from 'react-dom/client'
import React from 'react'
import App from './components/App.tsx'
const rootElement = document.getElementById('root')
if (!rootElement) {
throw new Error('Root element not found in the document')
}
const app = <App />
if (import.meta.hot) {
// With hot module reloading, `import.meta.hot.data` is persisted.
const root = (import.meta.hot.data.root ??= createRoot(rootElement))
root.render(app)
} else {
// The hot module reloading API is not available in production.
createRoot(rootElement).render(app)
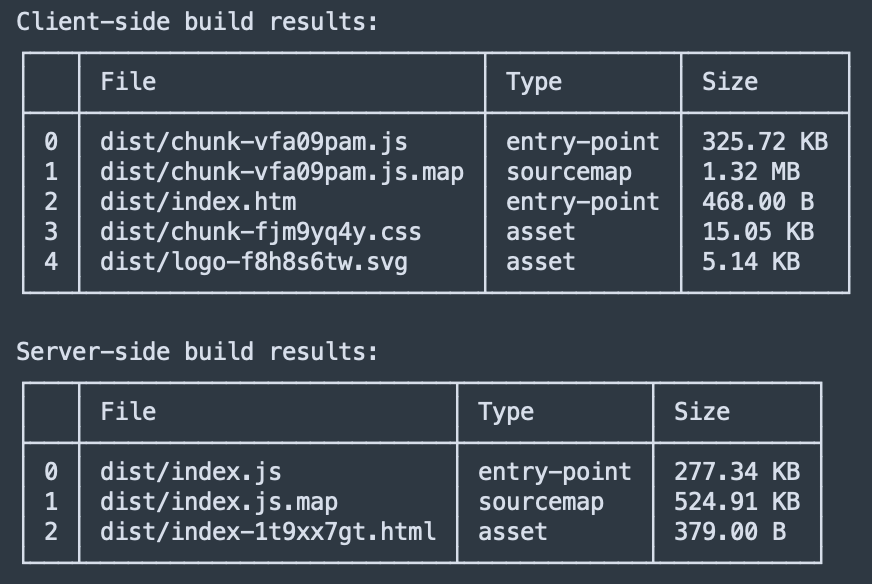
}That stuff was great for development, but it couldn’t yet be built for production. The closest result writing custom Bun Bundler scripts — were two index.html files: the one with correctly set assets and the other that was actually served by server.
Caching service worker
Service worker is a proxy between a web application, a browser, and a network. They can persist beyond the page that created them, run only when needed and use browser’s Cache API to store resources.
In my design it’s a crucial element, as it enables the App to work and reload fully offline since the initial page load. Not to build the service worker from TS, I wrote it in JS for now. I implemented cache then network strategy.
First, I set a bunch of constants. I need a cache name to invalidate in on version bump. Ideally, it should be set as a pre-commit hook along with a version inside package.json.
js
const CACHE_NAME = 'mellon-cache-v2'
const STATIC_URLS_TO_CACHE = ['/', '/service-worker.js']
const NEVER_CACHE = ['/api/generate-uuid']
Part of the assets are bundled, built and served by Bun. Again, magically, as nothing of it was part of building or server code. Asset names include dynamic hashing, so I need patterns to cache them.
js
const DYNAMIC_CACHE_PATTERNS = [
  {urlPattern: '/_bun/asset/', cacheName: 'bun-assets'},
  {urlPattern: '/_bun/client/', cacheName: 'bun-client'},
  {urlPattern: 'fonts.googleapis.com', cacheName: 'google-fonts-css'},
  {urlPattern: 'fonts.gstatic.com', cacheName: 'google-fonts-assets'}
]

function getCacheNameForRequest(url) {
  if (typeof url === 'object' && url.url) {
    url = url.url
  }
  for (const pattern of DYNAMIC_CACHE_PATTERNS) {
    if (url.includes(pattern.urlPattern)) {
      return pattern.cacheName
    }
  }
  return CACHE_NAME
}
Next thing I want to highlight, is the service worker registration and initialisation process. We need to check if service workers are supported by the browser. If so, register the service worker. If a waiting service worker is detected (indicating an update), send a skipWaiting message to activate it immediately. From frontend.tsx:
js
if ('serviceWorker' in navigator) {
  navigator.serviceWorker
    .register('/service-worker.js')
    .then((registration) => {
      console.log('Service Worker registered with scope:', registration.scope)
      // Force update if there's a new service worker
      if (registration.waiting) {
        registration.waiting.postMessage('skipWaiting')
      }
    })
    .catch((error) => {
      console.error('Service Worker registration failed:', error)
    })
}
When installing the service worker, we open a cache name from the constants and pre-cache resources with static paths. From service-worker.js:
js
self.addEventListener('install', (event) => {
  event.waitUntil(
    caches
      .open(CACHE_NAME)
      .then((cache) => cache.addAll(STATIC_URLS_TO_CACHE))
      .then(() => self.skipWaiting()) // Activate immediately
  )
})
It calls skipWaiting() to activate immediately without waiting for existing pages to close. We also need to handle the skipWaiting message we might receive from the page to activate an updated service worker:
js
self.addEventListener('message', (event) => {
  // Handle "skipWaiting" message
  if (event.data === 'skipWaiting') {
    self.skipWaiting()
  }
})
When activating the service worker, it cleans up old caches, calls self.clients.claim() to take control of all open pages and notifies that it's now active.
js
self.addEventListener('activate', (event) => {
  const cacheWhitelist = [
    CACHE_NAME,
    ...DYNAMIC_CACHE_PATTERNS.map((pattern) => pattern.cacheName)
  ]

  event.waitUntil(
    Promise.all([
      // Clean up old caches but keep the dynamic ones
      caches.keys().then((cacheNames) => {
        return Promise.all(
          cacheNames.map((cacheName) => {
            if (cacheWhitelist.indexOf(cacheName) === -1) {
              return caches.delete(cacheName)
            }
          })
        )
      }),
      // Take control of all clients immediately
      self.clients.claim()
    ])
  )
  // Notify all clients that the service worker is active
  self.clients.matchAll().then((clients) => {
    clients.forEach((client) => {
      client.postMessage({type: 'SW_ACTIVATED'})
    })
  })
})
As we used a SW_ACTIVATED message here, we should register a related listener back in the frontend.tsx:
js
if ('serviceWorker' in navigator) {
  // Service worker registration

  navigator.serviceWorker.addEventListener('message', (event) => {
    if (event.data && event.data.type === 'SW_ACTIVATED') {
      console.log('Service Worker activated and ready to cache resources')
      // Cache resources when service worker is active
      cachePageResources()
    }
  })
}
This cachePageResources function won’t be an easy one. The frontend has to gather all the resources already loaded by the page — as the service worker is not the first thing loaded. Otherwise, these resources won’t be cached until the page is refreshed. That’ll ruin the expectations that the app is offline-first.
Captured resources should be sent to the service worker who actually caches them:
js
function cachePageResources() {
  if (!navigator.serviceWorker.controller) {
    // Service worker not yet controlling page, try again in a moment
    setTimeout(cachePageResources, 100)
    return
  }

  // Collect all resources used by the current page
  const resources = [
    // The current page URL
    window.location.href,
    // CSS files
    ...Array.from(document.querySelectorAll('link[rel="stylesheet"]')).map(
      (link) => link.href
    ),
    // Scripts
    ...Array.from(document.querySelectorAll('script[src]')).map(
      (script) => script.src
    ),
    // Images
    ...Array.from(document.querySelectorAll('img[src]'))
      .map((img) => img.src)
      .filter((src) => src && src.startsWith('http')),
    // Preloaded resources
    ...Array.from(document.querySelectorAll('link[rel="preload"]')).map(
      (link) => link.href
    ),
    // Font stylesheets specifically (often missed)
    ...Array.from(
      document.querySelectorAll('link[rel="stylesheet"][href*="fonts"]')
    ).map((link) => link.href)
  ].filter(Boolean) // Remove null/undefined entries
  // Check the network requests that have been made
  if (performance && performance.getEntriesByType) {
    const networkResources = performance
      .getEntriesByType('resource')
      .map((entry) => entry.name)
      .filter(
        (url) =>
          url.includes('/_bun/') ||
          url.includes('fonts.googleapis.com') ||
          url.includes('fonts.gstatic.com') ||
          url.endsWith('.svg') ||
          url.endsWith('.css') ||
          url.endsWith('.js')
      )
    resources.push(...networkResources)
  }
  // Remove duplicates
  const uniqueResources = [...new Set(resources)]
  // Send the resources to the service worker for caching
  if (navigator.serviceWorker.controller && uniqueResources.length > 0) {
    //console.log('Sending resources to cache:', uniqueResources);
    // Use MessageChannel for reliable communication
    const messageChannel = new MessageChannel()
    messageChannel.port1.onmessage = (event) => {
      if (event.data && event.data.success) {
        console.log('Service worker acknowledged asset caching request')
      }
    }
    navigator.serviceWorker.controller.postMessage(
      {
        type: 'CACHE_ASSETS',
        assets: uniqueResources
      },
      [messageChannel.port2]
    )
  }
}
In fact, we might want to use this function not only when we handle the SW_ACTIVATED message:
js
if ('serviceWorker' in navigator) {
  // Service worker registration

  // SW_ACTIVATED message listener

  if (navigator.serviceWorker.controller) {
    window.addEventListener('load', cachePageResources)
  } else {
    // If no controller yet, register the callback for later
    navigator.serviceWorker.addEventListener('controllerchange', () => {
      cachePageResources()
    })
  }
}
// Additionally, cache resources when page load completes to catch resources loaded later
window.addEventListener('load', () => {
  setTimeout(cachePageResources, 1000)
})
Now, that we receive messages with lists of assets, we should process them on a service worker side through its message handler:
js
self.addEventListener('message', (event) => {
  // Handle "skipWaiting" message

  if (
    event.data &&
    event.data.type === 'CACHE_ASSETS' &&
    Array.isArray(event.data.assets)
  ) {
    const assets = event.data.assets
    // Process assets in batches to avoid overwhelming the browser
    const batchSize = 5
    const assetBatches = []
    // Split into batches
    for (let i = 0; i < assets.length; i += batchSize) {
      assetBatches.push(assets.slice(i, i + batchSize))
    }
    // Process each batch sequentially
    event.waitUntil(
      (async () => {
        for (const batch of assetBatches) {
          await Promise.all(
            batch.map(async (assetUrl) => {
              try {
                const cacheName = getCacheNameForRequest(assetUrl)
                const cache = await caches.open(cacheName)
                // Check if already cached
                const isCached = await cache.match(assetUrl)
                if (!isCached) {
                  const response = await fetch(assetUrl, {
                    credentials: 'same-origin'
                  })
                  if (response && response.status === 200) {
                    return cache.put(assetUrl, response)
                  }
                }
              } catch (error) {
                console.error(
                  '[ServiceWorker] Failed to cache:',
                  assetUrl,
                  error
                )
              }
            })
          )
        }
      })()
    )
  }
})
Databases and synchronisation
I use pouchdb-browser version — as I actually run it only in a browser environment and that’s what the authors recommend. This preset exports bare minimum of plugins required to work in a browser. It might be extended by adapters (i.e. to run PouchDB over SQLite instead of IndexedDB), official plugins, or third-party plugins.
Let’s take a closer look on it’s initialisation:
tsx
import PouchDB from 'pouchdb-browser'
import {DbName} from '../types'

export const localSecretsDB = new PouchDB(DbName.SECRETS)
export const localUserDB = new PouchDB(DbName.USER)
… and a usage example written according to the data update recommendations:
tsx
export async function updateSecret(
  id: string,
  updates: Partial<Secret>
): Promise<ServiceResponse> {
  try {
    if (!validateId(id)) {
      return {
        success: false,
        message: 'Invalid secret ID'
      }
    }

    const current = await localSecretsDB.get(id)
    const updatedSecret = {
      ...current,
      ...updates,
      updatedAt: new Date().toISOString()
    }
    if (updates.password) {
      const encryptionKey = await getEncryptionKey()
      updatedSecret.password = await encryptField(
        updates.password,
        encryptionKey
      )
    }
    const result = await localSecretsDB.put(updatedSecret)
    return {
      success: true,
      data: result
    }
  } catch (error) {
    console.error('Error updating secret:', error)
    return {
      success: false,
      error: error instanceof Error ? error.message : String(error)
    }
  }
}
Now we need to setup CouchDB on a server. I used a part of the official guide to do it with a Docker and create the missing stuff manually:
bash
docker run -d --name couchdb -p 5984:5984 -e COUCHDB_USER=admin -e COUCHDB_PASSWORD=password couchdb:latest
docker exec couchdb curl -X PUT <http://admin:password@localhost:5984/_users>
docker exec couchdb curl -X PUT <http://admin:password@localhost:5984/_node/nonode@nohost/_config/httpd/enable_cors> -d '"true"'
docker exec couchdb curl -X PUT <http://admin:password@localhost:5984/_node/nonode@nohost/_config/cors/origins> -d '"*"'
docker exec couchdb curl -X PUT <http://admin:password@localhost:5984/_node/nonode@nohost/_config/cors/credentials> -d '"true"'
docker restart couchdb
Time to connect to it from the server. The documented example is using the CommonJS syntax. Here’s how it looks with the ES import:
tsx
import nano from 'nano'

const COUCHDB_URL = process.env.COUCH_URL
const nanodb = nano(COUCHDB_URL)
It might throw an error:
plaintext
Supplying authentication credentials in the URL e.g. <http://admin:mypassword@localhost:5984> is deprecated. Use nano.auth instead.… but it still works actually. Looks like it might be a TODO. So I moved forward implementing a “one database per user” method:
tsx
export async function createUserRelatedCouchDb(uuid) {
  const dbName = `userdb-${uuid}`

  try {
    await nanodb.db.create(dbName)
    const securityDoc = {
      admins: {names: [], roles: []},
      members: {names: [uuid], roles: []}
    }
    const securityResponse = await nanodb.request({
      db: dbName,
      path: '_security',
      method: 'PUT',
      body: securityDoc
    })
    if (securityResponse.ok) {
      return {success: true, db: dbName, message: 'User created successfully'}
    } else {
      return {
        success: false,
        db: dbName,
        message: `Could not set security for ${dbName}`
      }
    }
  } catch (error) {
    console.error('Error creating database:', error)
    return {
      success: false,
      db: dbName,
      message: 'User created but failed to create database'
    }
  }
}
Now that we’re doing something with the DB on a server side, let’s create a sync from a client’s side. First, we’ll init the remote DB:
tsx
export async function initializeRemoteDb(
  uuid: string,
  password: string,
  dbName: string
): Promise<PouchDB.Database | null> {
  try {
    // Validate inputs to prevent injection
    if (!isValidDbCredentials(uuid, password, dbName)) {
      console.error('Invalid database credentials')
      return null
    }

    const couchDbHost = document.location.hostname
    const protocol = document.location.protocol
    const remoteDbUrl = `${protocol}//${uuid}:${password}@${couchDbHost}:5984/${dbName}`
    const remoteDB = new PouchDB(remoteDbUrl, {skip_setup: true})
    await remoteDB.info()
    startLiveSync(remoteDB)
    console.log('Remote database connection established')
    return remoteDB
  } catch (error) {
    console.error('Error connecting to remote database:', error)
    return null
  }
}
… and it also throws an error, in browser console this time:

I don’t like that await remoteDB.info() returns 404 if it tries to establish the connection before the corresponding DB becomes fully functional on a server — as it is called shortly after the DB is created. Yet I dunno how to solve it without trying to connect after a small timeout.
I also tried to make better authentication at first, like this:
tsx
import PouchDBAuthentication from 'pouchdb-authentication'

PouchDB.plugin(PouchDBAuthentication)
export async function connectToRemoteDb(uuid, password, dbName) {
  try {
    const couchDbBaseUrl = process.env.COUCHDB_PUBLIC_URL || '<http://localhost:5984>'

    const remoteDbUrl = `${couchDbBaseUrl}/${dbName}`
    const remoteDb = new PouchDB(remoteDbUrl, {
      skip_setup: true  // Don't try to create the database
    })

    // Authenticate with the server
    await remoteDb.logIn(uuid, password)

    // Store the remote DB in window for global access if needed
    window.remoteDb = remoteDb

    console.log('Remote database connection established')
    return remoteDb
  } catch (error) {
    console.error('Error connecting to remote database:', error)
    return null
  }
}
… but the plugin is not working in a browser context. It relies on the API not available in such an environment. So that’s something I still have to work around.
Finally, I established the sync:
tsx
export function startLiveSync(
  remoteDB: PouchDB.Database
): PouchDB.Replication.Sync<object> {
  // Cancel existing sync if running
  if (syncHandler) {
    syncHandler.cancel()
  }

  // Configure and start bidirectional sync
  syncHandler = localSecretsDB
    .sync(remoteDB, {
      live: true,
      retry: true,
      heartbeat: 30000,
      back_off_function: (delay) =>
        delay === 0 ? 1000 : Math.min(delay * 3, 60000)
    })
    .on('change', (change) => {
      console.log('Sync change:', change)
    })
    .on('paused', () => {
      console.log('Sync paused')
    })
    .on('active', () => {
      console.log('Sync active')
    })
    .on('denied', (err) => {
      console.error('Sync denied:', err)
    })
    .on('complete', () => {
      console.log('Sync completed')
    })
    .on('error', (err) => {
      console.error('Sync error:', err)
    })
  return syncHandler
}
Production setup
I haven’t made a production bundling yet because of the Bun fullstack setup and its build unreadiness in version 1.2.10. So, the closest thing I achieved for now is --production flag for dependency installation inside a Dockerfile:
docker
# Start with the official Bun image
FROM oven/bun:latest AS base

# Set working directory
WORKDIR /app

# Copy package.json and bun.lockb (if exists)
COPY package*.json bun.lockb* ./

# Install dependencies
RUN bun install --frozen-lockfile --production

# Copy the rest of the application
COPY . .

# Expose the port your app runs on
EXPOSE 3000

# Command to run in production mode
CMD ["bun", "run", "start"]
To run it in a container locally, it’s enough to:
bash
docker build . -t mellon
docker run -d \\
  --name mellon-app \\
  -p 3000:3000 \\
  -v ./.env:/app/.env \\
  mellon
The only thing not to forget is to run CouchDB first.
I also updated my VM infrastructure. First, I configured NGINX:
nginx
server {
    listen 80;
    server_name laidrivm.com www.laidrivm.com mellon.laidrivm.com;
    # Redirect all HTTP requests to HTTPS
    return 301 https://$host$request_uri;
}
server {
    listen 443 ssl;
    server_name laidrivm.com www.laidrivm.com;
    ssl_certificate /etc/letsencrypt/live/laidrivm.com/fullchain.pem;
    ssl_certificate_key /etc/letsencrypt/live/laidrivm.com/privkey.pem;
    ssl_protocols TLSv1.2 TLSv1.3;
    ssl_prefer_server_ciphers on;
    ssl_ciphers 'ECDHE-ECDSA-AES128-GCM-SHA256:ECDHE-RSA-AES128-GCM-SHA256:ECDHE-ECDSA-AES256-GCM-SHA384:ECDHE-RSA-AES256-GCM-SHA384:ECDHE-ECDSA-CHACHA20-POLY1305:ECDHE-RSA-CHACHA20-POLY1305:DHE-RSA-AES128-GCM-SHA256:DHE-RSA-AES256-GCM-SHA384';
    ssl_session_timeout 1d;
    ssl_session_cache shared:SSL:10m;
    location / {
        proxy_pass <https://blog:3000>;
        proxy_set_header Host $host;
        proxy_set_header X-Real-IP $remote_addr;
        proxy_set_header X-Forwarded-For $proxy_add_x_forwarded_for;
        proxy_set_header X-Forwarded-Proto $scheme;
    }
}
server {
    listen 443 ssl;
    server_name mellon.laidrivm.com;
    # More or less same setup
}
# Separate server block for CouchDB on port 5984
server {
    listen 5984 ssl;
    server_name mellon.laidrivm.com;
    # More or less same setup
    location / {
        # More or less same setup
        # Additional headers for CouchDB
        proxy_http_version 1.1;
        proxy_set_header Connection "Keep-Alive";
        proxy_set_header Proxy-Connection "Keep-Alive";
    }
}
I use new SSL certificates here. I issued them with the certbot:
bash
sudo certbot certonly --standalone -d mellon.laidrivm.comThen I’ve set up Docker Compose for both App and DB…
yaml
services:
  mellon-app:
    image: your_resigtry_adress/mellon:latest
    container_name: mellon-app
    volumes:
      -./.env:/app/.env
    depends_on:
      - mellon-couchdb
    networks:
      - web-network
    restart: always

  mellon-couchdb:
    image: couchdb:latest
    container_name: mellon-couchdb
    environment:
      - COUCHDB_USER=your_admin_name
      - COUCHDB_PASSWORD=your_admin_password
      - COUCHDB_BIND_ADDRESS=0.0.0.0
      - COUCHDB_SECRET=your_secret_here
      - NODENAME=mellon-couchdb
    volumes:
      - couchdb-data:/opt/couchdb/data
      - ./local.ini:/opt/couchdb/etc/local.d/local.ini
    networks:
      - web-network
    restart: always
volumes:
  couchdb-data:
networks:
  web-network:
    external: true
… and for NGINX:
yaml
services:
  nginx:
    image: nginx:alpine
    container_name: nginx-proxy
    ports:
      - "80:80"
      - "443:443"
      - "5984:5984"
    volumes:
      - ./conf.d:/etc/nginx/conf.d
      - ./logs:/var/log/nginx
      - /etc/letsencrypt:/etc/letsencrypt:ro
    restart: always
    networks:
      - web-network

networks:
  web-network:
    external: true
What conclusions I made
There are some brief ones:
- Making offline-first website is tricky because of a complex service worker you have to create.
- Bun is still great, but for a full-stack project you have to use an external builder.
- Adding Hono or any other framework to the Bun and React full-stack template setup is not easy. It relies heavily on Bun magic and I postponed this idea after couple of hours trying. The more code relies on something Bun-specific, like prop-punning, the more painful it might get to vary a stack even still basing on Bun.
- Tailwind CSS is really great for prototyping and has bright documentation helpful to solve my issues fast.
- Similar to other build tools, Bun does not typecheck the files — just transpiles them. So don’t forget to set up TypeScript manually as a part of your build pipeline to get any profit from it.
And there’s a long story for database. PouchDB and CouchDB are quite neat tools to use. Both are well-documented. Despite feeling outdated, they are simple and behave as expected. Sadly, PouchDB only received two updates during the last couple of years. So, despite their greatness to test the local-first approach, it might be worth trying other tools for a modern project.
I haven’t decided what do next with it. On the one hand, I’d like to keep the document-oriented model. On the other hand, seems like there’s no outstandingly good (akin to PGlite + Postgres + possibly ElectricSQL) solution yet:
- The closest tool, RxJS, requires $60 a month, or writing custom wrappers, or using non-optimal workarounds.
- Dexie.js requires writing custom syncs and still provides a bit low level API.
- A lot of good looking at the first glance tools like Acebase, CamaDB or SylvieJS, are more or less abandoned. And they also require writing custom syncs.
- Browsing the Database of Databases site, I found GoatDB. But it focuses on Deno environment, mentioning Node.js support as experimental one — meaning the same for Bun.
- I also found SignalDB both on DB of DBs and
Lo-Fi Dev. It looks quite promising, but is relatively new and also maintained by a single person.
What’s next
Advancing the concepts
One of the concepts of the prototype, that it might be freely used by anonymous users. When such a user clears site data, the local PouchDB database gets wiped out. I believe, the best possible approach here for non-signed-up users is browser fingerprinting. I already create a unique identifier for the anonymous users, but I’ll need to fill in corresponding info based on their characteristics and store it in _users server database.
Still I’m bothered that besides anonymous data restore option, fingerprinting has privacy implications and may be affected by browser anti-fingerprinting measures. Also it might lead to identity collisions and doesn’t work when something changes significantly in user’s setup between a wipe and a restore attempt.
Another concept is that data never has to leave the user’s device unless the user chooses to sync it. Currently the sync is always on and it happens whenever user’s connected to the network and the server DB is up. I believe that should be configurable: either in account settings or as an additional onboarding step — where users explicitly choose to sync their data.
The third concept that might be introduced is P2P data transfer. It might be useful both for individual users and for multiple users sharing secrets. There’s quite a bunch of tools for that: already mentioned Gun, DXOS, NextGraph, SyncedStore or trystero. But I’ll still have to research these instruments and how they align with the rest of the stack and the project goals.
Improving the prototype
Most of the improvements of the current prototype itself are related to authorisation and authentication mechanisms. First, I’d like to move to nano.auth instead of passing CouchDB params in the URL. Second, I need to implement same approach for PouchDB. Third, currently the server DB endpoint is just publicly available as is. It’s preferable to implement endpoints to sync the data while proxying the database.
Moving towards a real product
I chose to apply to the startup visa with a password manager, because it better fit the application criteria. Meanwhile, I was also thinking of creating my own password manager to use it instead of Bitwarden, because the latter is heavy, feels outdated (despite recent UI updates) and has other downsides when you use it for years. It’s also not offline-first and lacks some other features a modern password manager might have.
This prototype has a good chance of becoming a working product, cause there’s not that many features left from a minimal set:
- Actual user registration.
- Safe key transfer across devices.
- Master password recovery. I’m thinking about Shamir’s Secret Sharing — a 12 word mnemonic popular among crypto wallets.
- Update and delete secrets
- Solve the problem with a lock screen. Because if it relies on a state stored in a local DB, it might be hacked. If it relies on a server state, the app won’t be local-first. Possible solution is to encrypt entire local DB with master password — and decrypt everything back on a correct enter. Sounds computationally intensive, though.
- Add more data validations and make user-friendly error handling.
And, of course, I’d better apply on a security audit after.
If you found this article helpful, please show your support by sharing it with your friends or colleagues.
If you want to talk on managing engineering teams, designing systems, or improving your tech product, send an email or message me.
Feel free to connect with me on LinkedIn.
Peace!
Share:
Updated: