Guide: how to configure cheapest VM for a web service in Google Cloud
Deploying a web service on Google Cloud can be costly and complex. In this guide, I’ll walk you through configuring the cheapest virtual machine for a simple application. From creating a network to setting up a static IP and load balancer, follow these steps to get your service up and running efficiently.
I’ve recently needed to deploy a Node.js application to use its endpoint as a webhook. I couldn’t simply access it by IP, so to avoid dealing with dynamic DNS, a static IP was needed. The company for which I developed this application already had another virtual machine on Google Cloud. So, to avoid adding complexity and multiple providers, I decided to set up a new VM there too.
For those who have faced a similar context, I share this guide. It will help to choose the most cost-effective option among suitable ones and configure it for hosting a web application. I believe it would be helpful as far as VMs on Google Cloud are much more expensive than on other providers, and the configurations are more complex.
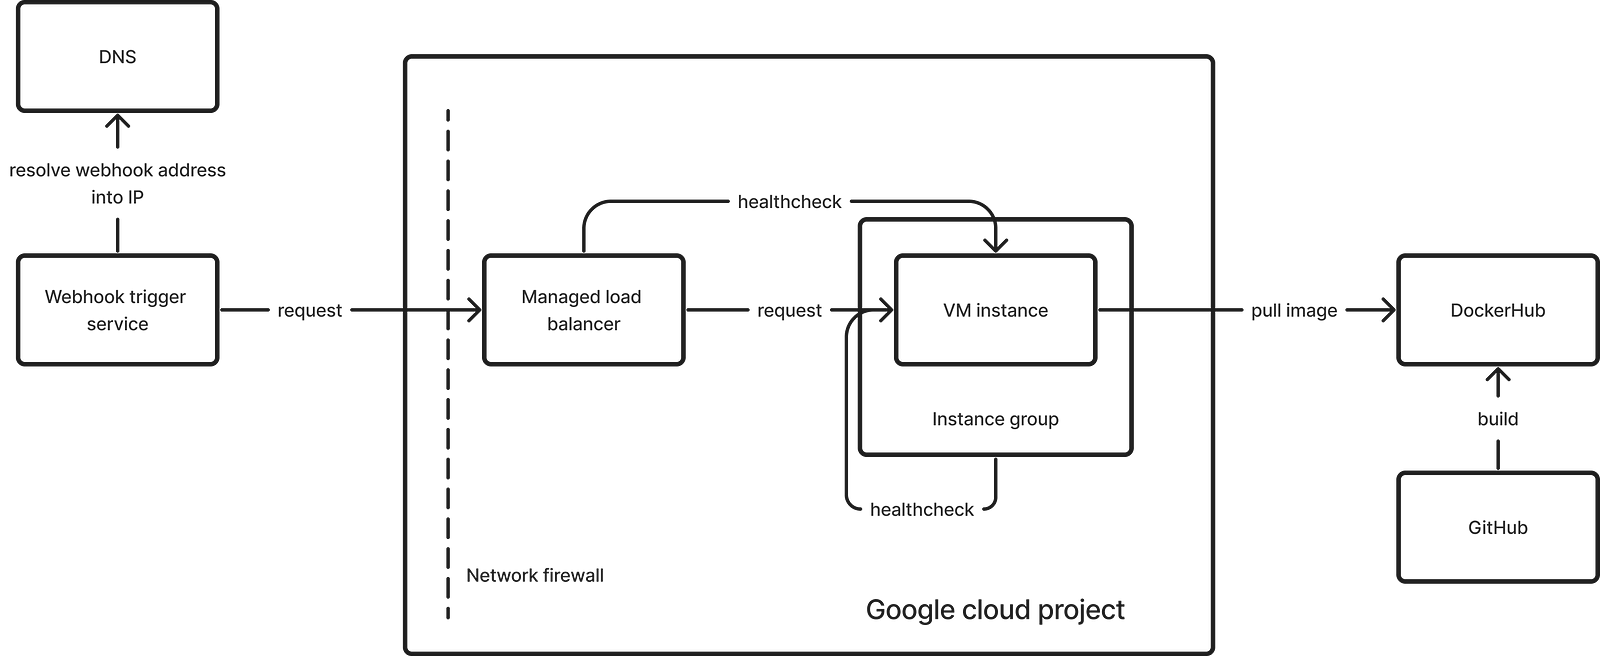
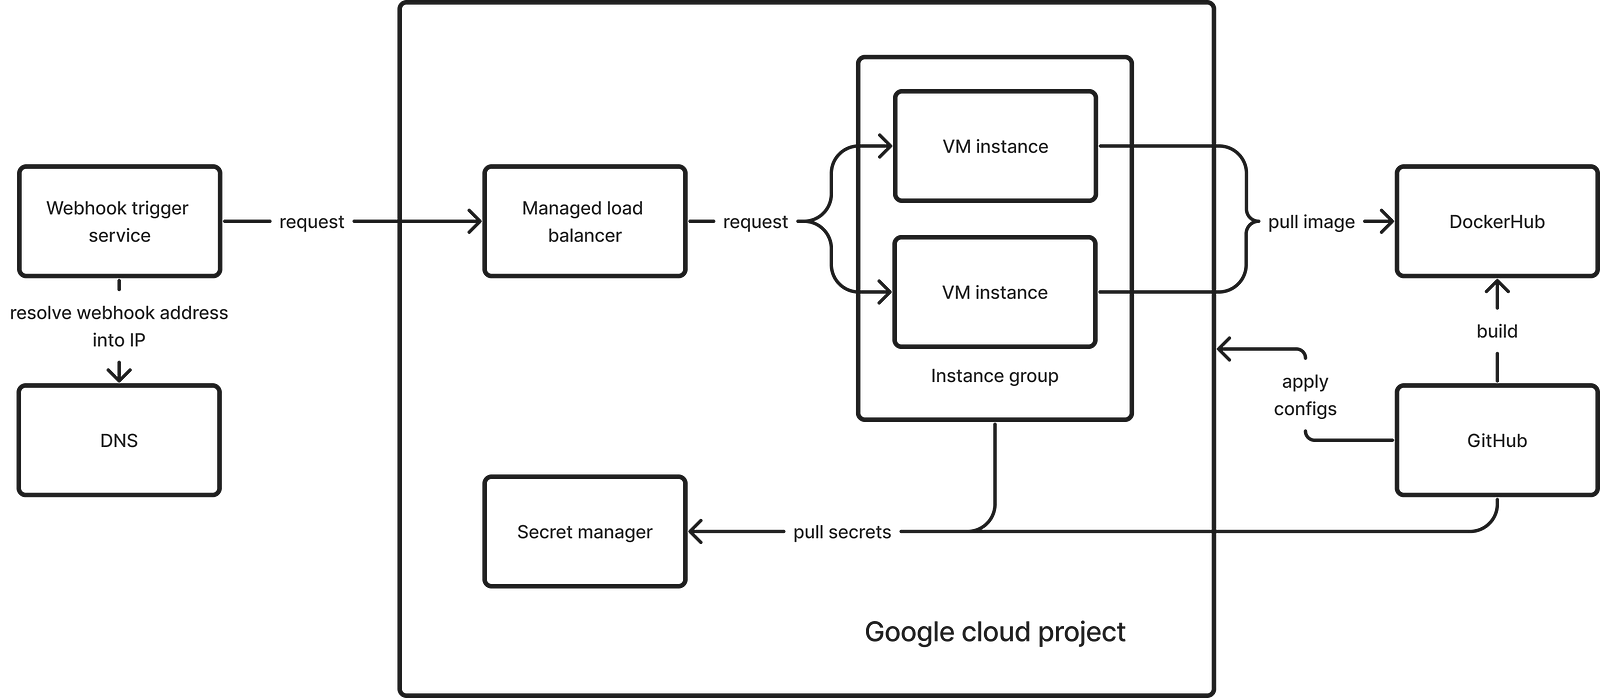
First, I’ll briefly describe the infrastructure solution, and then I’ll go into more details about the steps I took in the cloud console:
- Create a network.
- Create an instance template.
- Set up health checks.
- Create an instance group using this template.
- Create a managed load balancer.
- Promote the load balancer’s IP to static.
- Optional: review the firewall settings.
- Optional: set up alerts.
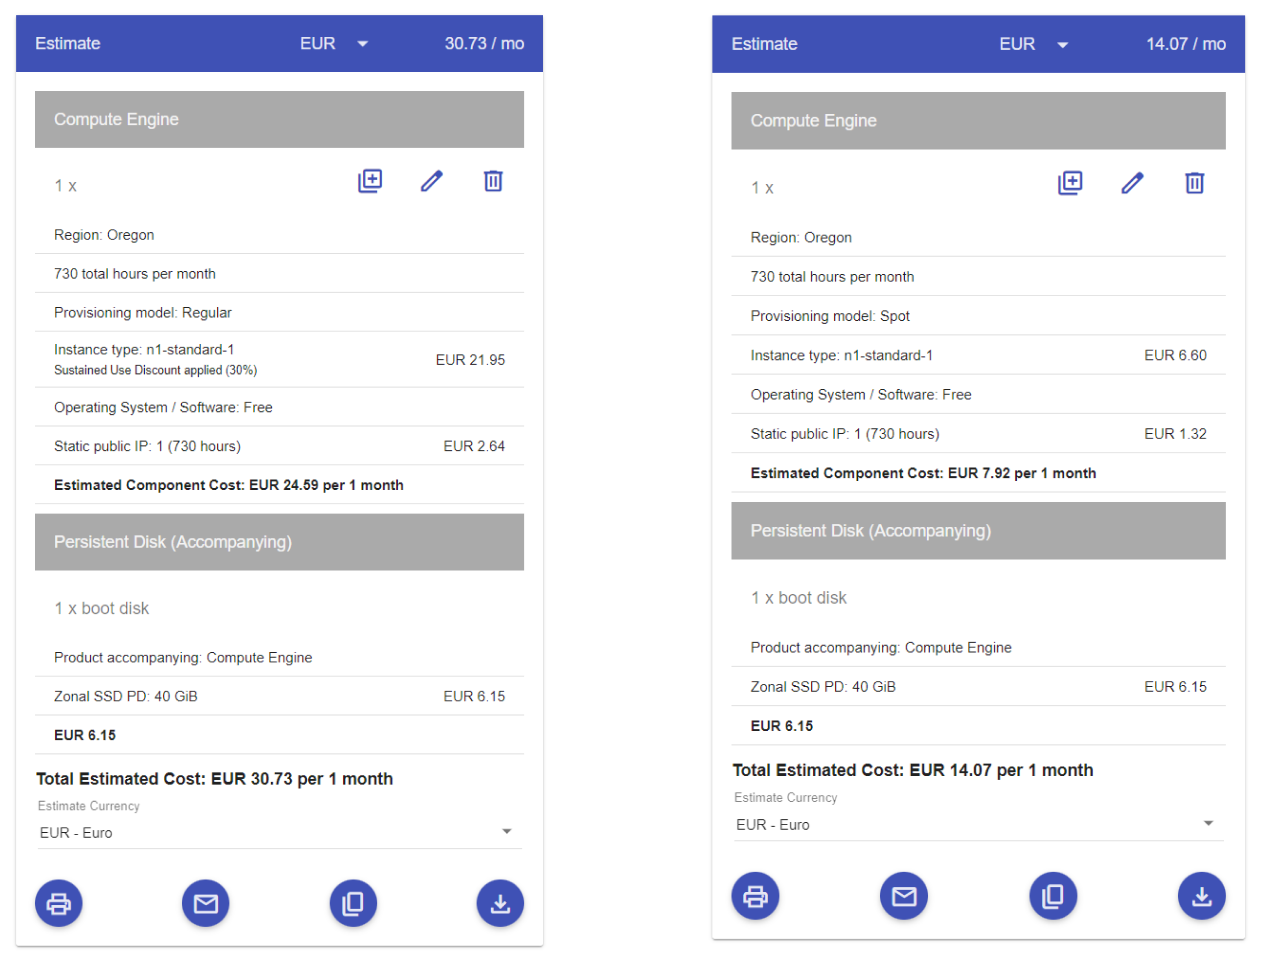
Regular VMs exist continuously. We create, configure, and leave them running. The service provider guarantees low downtime and, when possible, notifies in advance about situations that could lead to troubles. Such VMs on Google Cloud are surprisingly expensive, so let’s also consider another type — preemptible.
Preemptible VMs differ in that they can be rebooted or recreated at any moment. Google promises not to do this more than once a day and, in exchange, offers a significant discount — e.g., $7 per month instead of $21. In the Google Cloud Console, this type is referred to as Spot VM. Due to the cost, we’ll focus on this type.
We need to deal with the restart and recreation of VMs. Restarting is not as critical when it comes to stateless applications. In my case, I also can afford a small downtime and not process a request that arrives during the restart. Therefore, I don’t need to deal with replication, saving and synchronizing intermediate processing results, graceful shutdown, and other techniques that enhance fault tolerance.
To handle the situation of recreation, we need to automatically boot the VM and execute scripts that initialize the application. In Google Cloud, this can be achieved using an Instance Group, which can automatically scale the number of instances. Additionally, in the Instance Template used by the instance group to create new instances, where startup scripts can be specified.
Google also releases a static IP if it was assigned to a deleted VM. To bypass this issue, we’ll use a Managed Load Balancer since the current load falls into the free tier.
Now let’s move on to the specific steps.
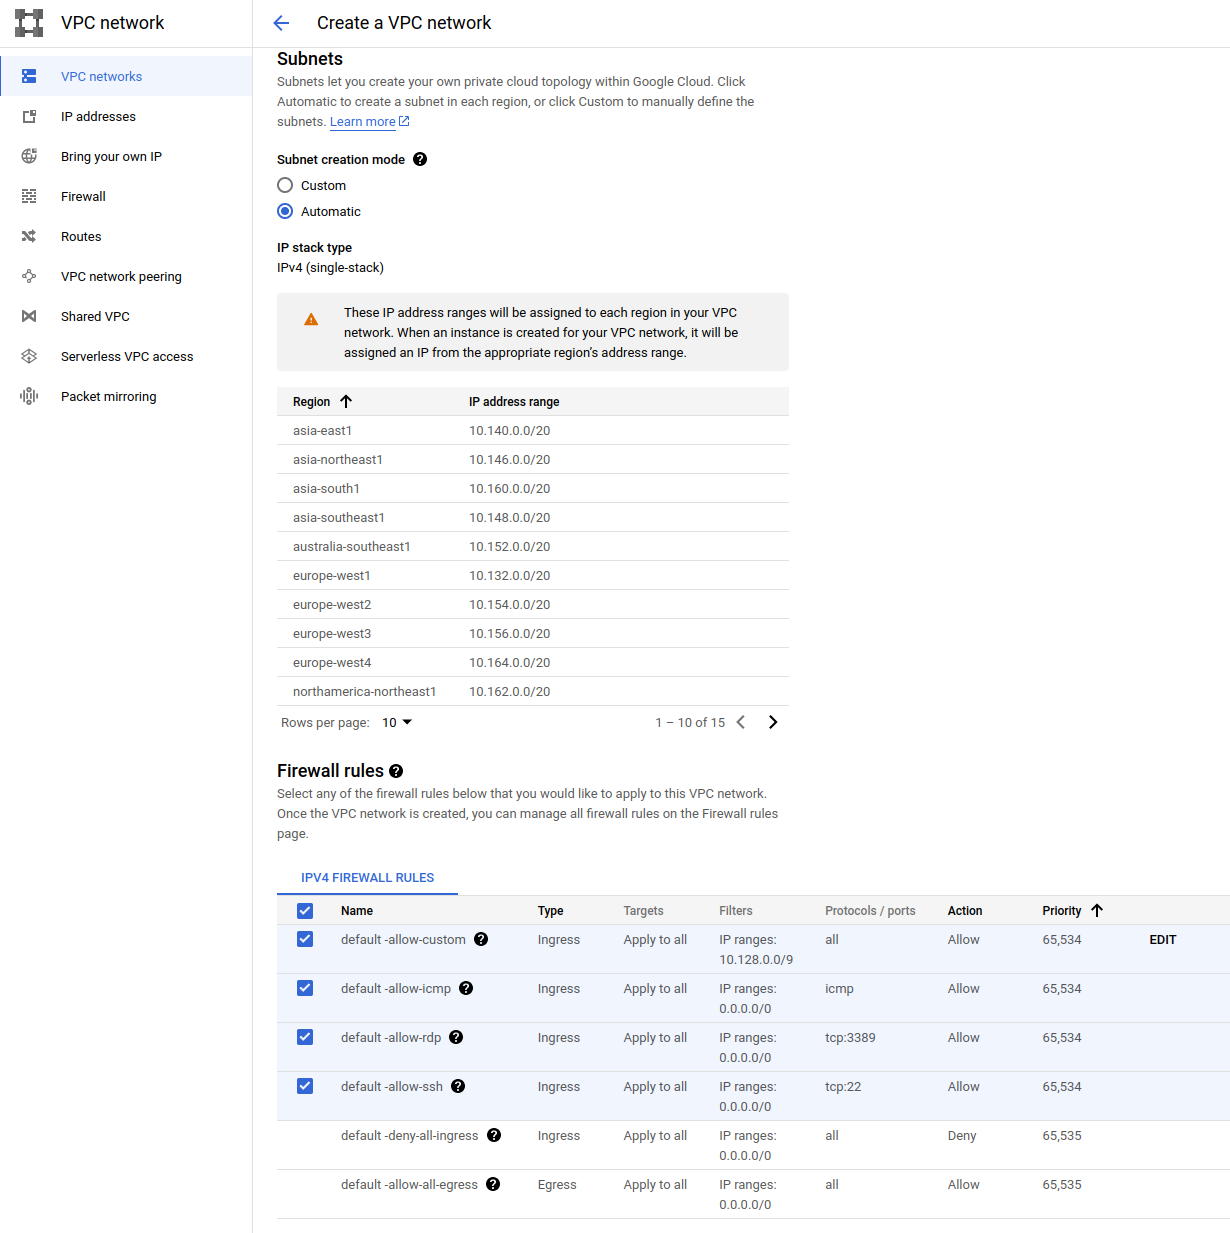
Navigate to VPC Network → VPC Networks → Create VPC Network. Choose the network name, it is OK to use “default” for the first network, enable automatic subnet creation mode, and include all suggested firewall rules.
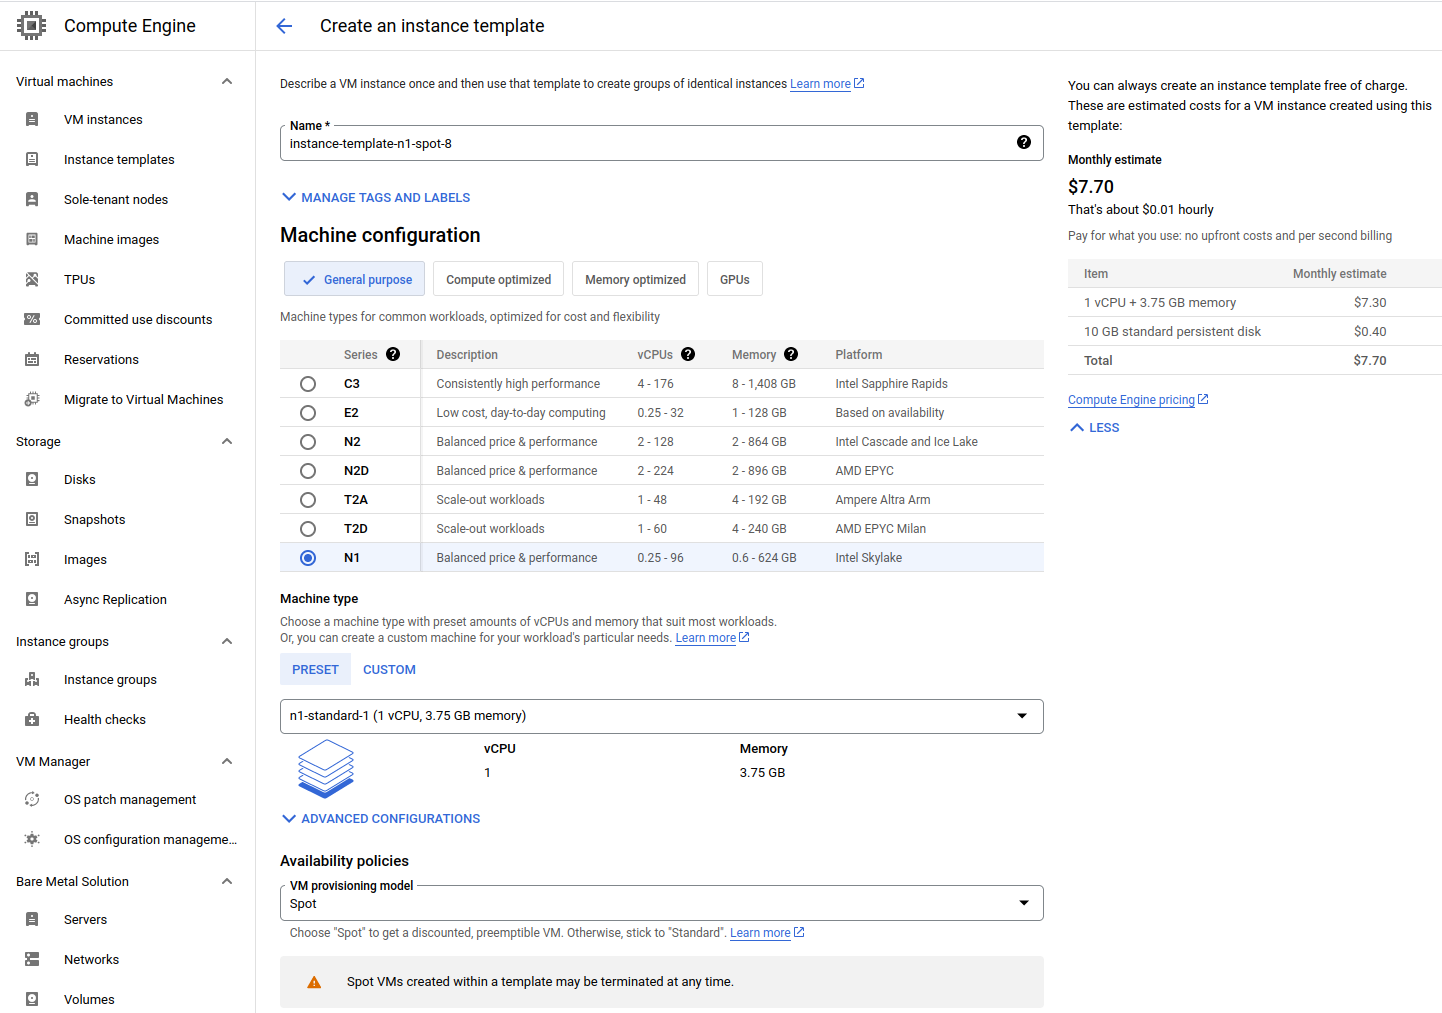
Go to Compute Engine → Instance Templates → Create an instance template.
Select the characteristics of the VM. My Node.js application, which I plan to deploy within a Docker container, is going to have a few requests per hour and isn’t highly computationally intensive. Additionally, I still want to reduce costs, so I choose n1-standard-1 from the General Purpose list and select the spot provisioning model.
Surprisingly, n1 is the best tier in terms of the vCPU-RAM-Cost balance. The situation is not so good with e2, which is positioned for lightweight computations. If the presets from n1 don’t fit your requirements, you can specify a custom resource VM there. The cost for these resources will not differ from the standard presets.
You can also compare costs in the documentation and pricing calculator. Here I’ll note once again that, in general, I don’t recommend renting VMs in Google Cloud because of their cost:
Now, let’s return to the instance group settings. If you choose VM similar to n2-starndart-2 or more powerful, enable the confidential VM service. Otherwise, I believe this feature doesn’t worth such an upgrade — so just move on.
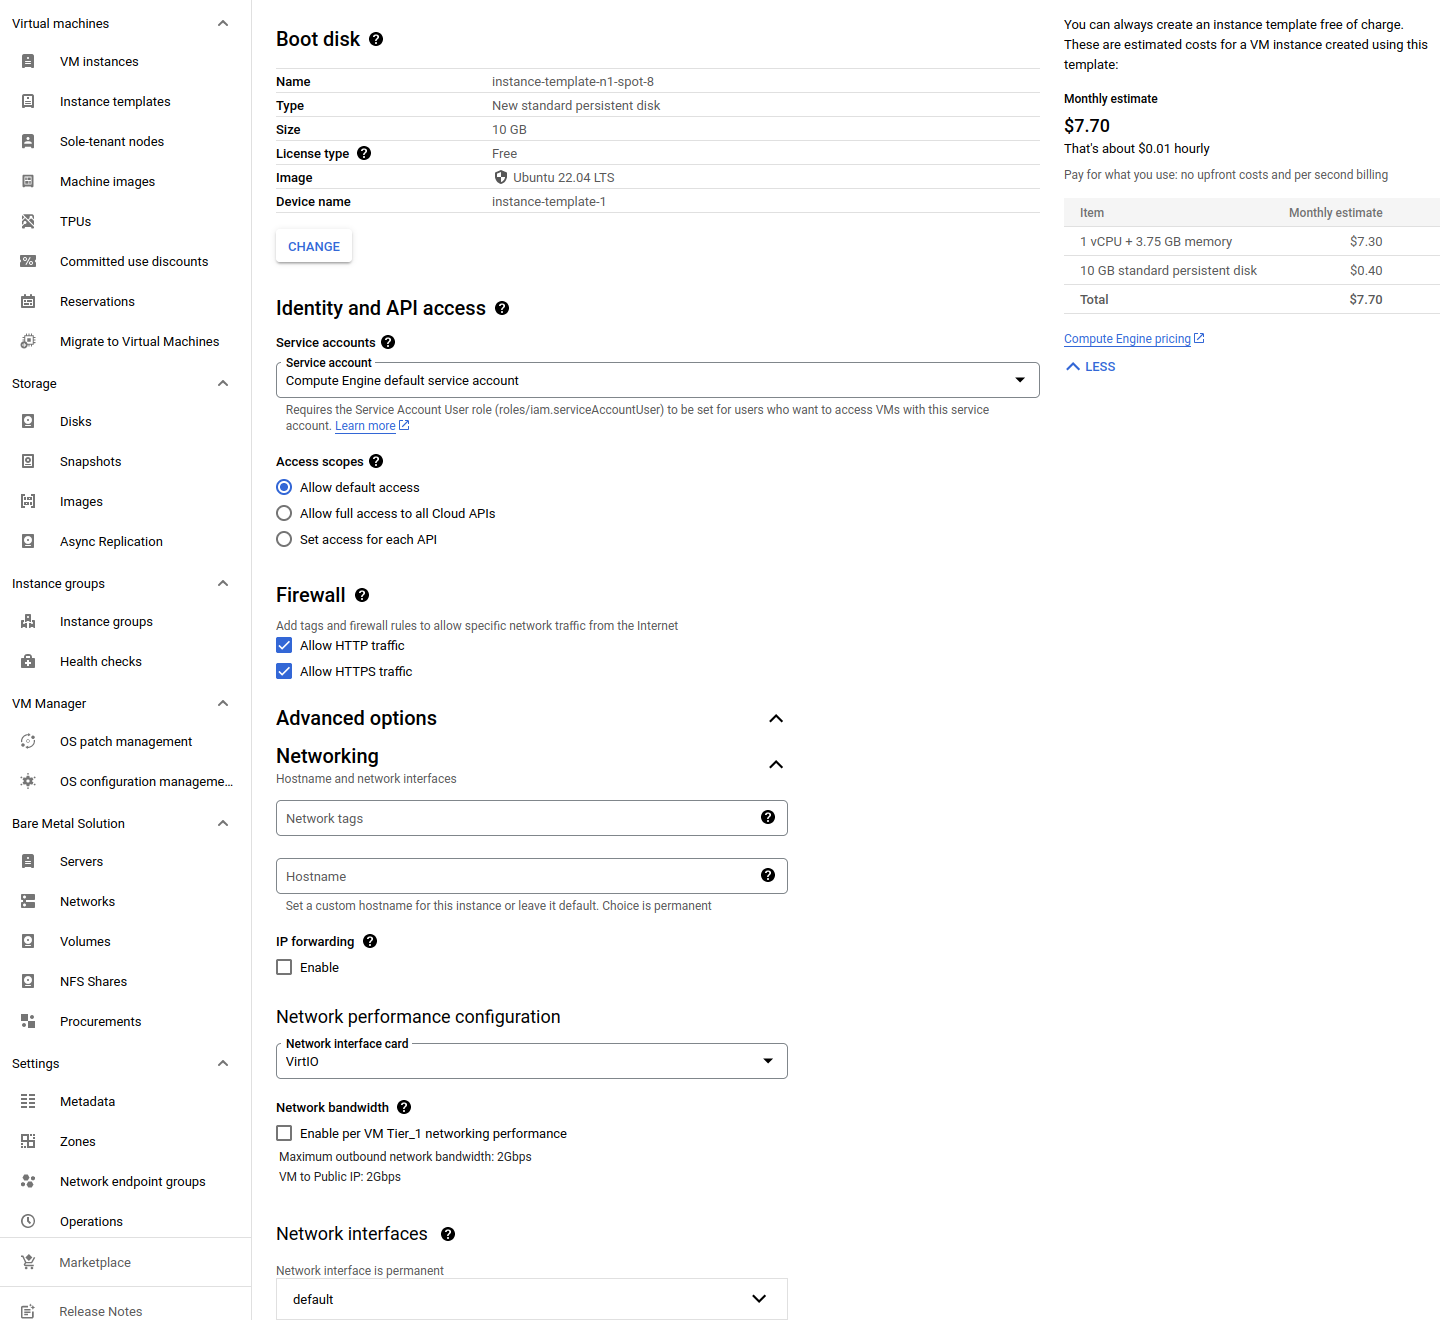
Then, set up the boot disk. I chose the cheapest standard disk with the minimum allowable size of 10 gigabytes. For the image, I selected the familiar Ubuntu OS with the latest stable version 22.04 LTS x86/64.
In the firewall settings, it’s crucial to allow both HTTPS and HTTP traffic. You can adjust this later if needed.
Move on to advanced options. Under networking section, choose the VirtIO interface card. Choose the network interface — if you’ve created it earlier, it should be on the list. Next to the management section, the startup scripts are of interest here. Write some Bash code to be run. Here’s my example:
bash
sudo apt update
sudo apt install -y apt-transport-https ca-certificates curl software-properties-common
sudo curl -fsSL https://download.docker.com/linux/ubuntu/gpg | sudo gpg --dearmor -o /usr/share/keyrings/docker-archive-keyring.gpg
echo "deb [arch=amd64 signed-by=/usr/share/keyrings/docker-archive-keyring.gpg] https://download.docker.com/linux/ubuntu $(lsb_release -cs) stable" | sudo tee /etc/apt/sources.list.d/docker.list > /dev/null
sudo apt update
sudo apt install -y docker-ce docker-ce-cli containerd.io
sudo usermod -aG docker $USER
sudo systemctl enable docker
sudo systemctl start docker
echo "Docker has been installed and started"
sudo docker pull user/repository:latest
sudo docker run -e ENV_VARIABLE=env_value \
  -p 80:3000 \
  --name container_name -d user/repository:latest
There’s nothing particularly unique here: I update packages, install Docker using a fairly common method, pull an image from Docker Hub, and start a container. In my case it’s not nescessary to set up SSL encryption from the start. Also, I’ll have an external load balancer, so I don’t need to set up my own. That’s why I’m just mapping port 80 of the machine, which corresponds to HTTP requests, to port 3000 inside the container where my application is listening.
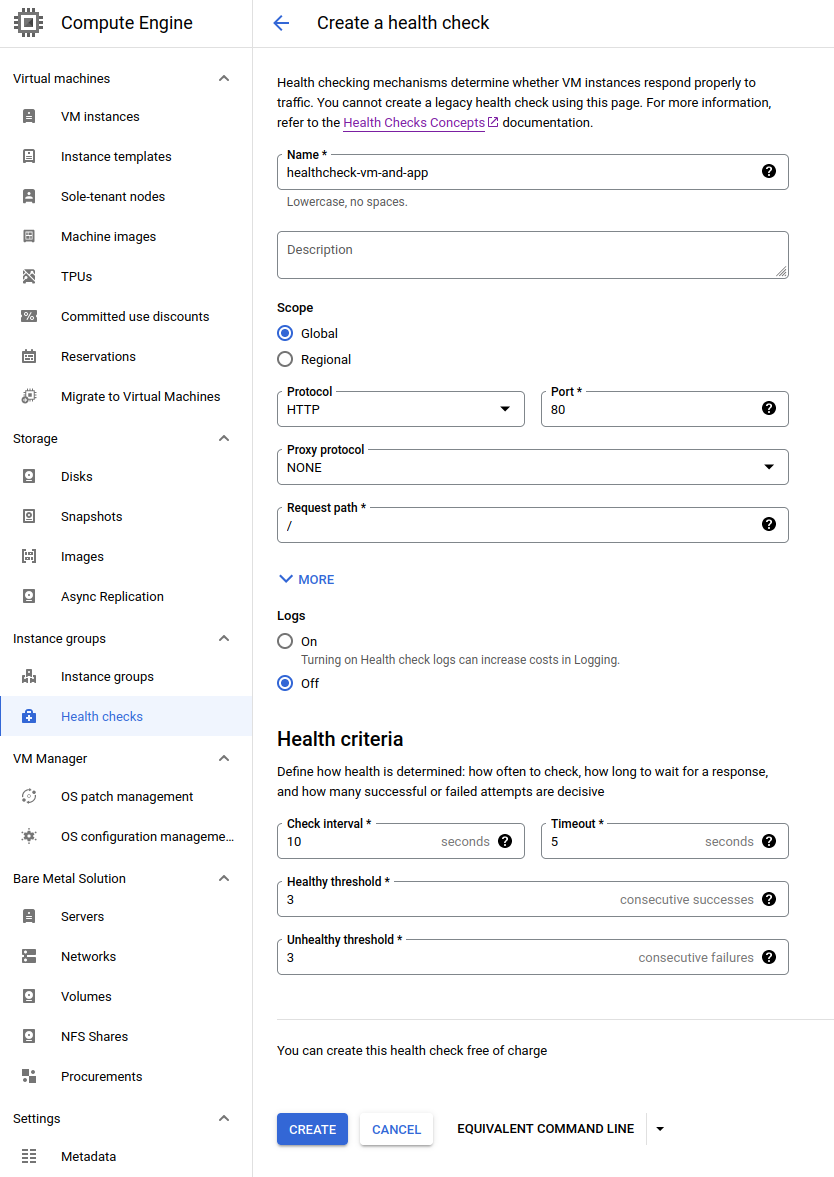
Open Compute Engine → Health checks → Create a health check.
Without a configured health check, you won’t be able to set up a managed load balancer. However, configuring a health check for your application is generally beneficial. For example, if the application goes down, the virtual machine could be automatically restarted.
In my application, the health check endpoint is available directly at the route / and responds with a 200 status code and a “healthy” in body. Therefore, I change the protocol to HTTP and leave the path as is. In the health criteria, I adjust the check interval to 10 seconds, and I also set the healthy and unhealthy thresholds to 3 results. These are recommendations from Google Cloud itself for a case using a health check for load balancing.
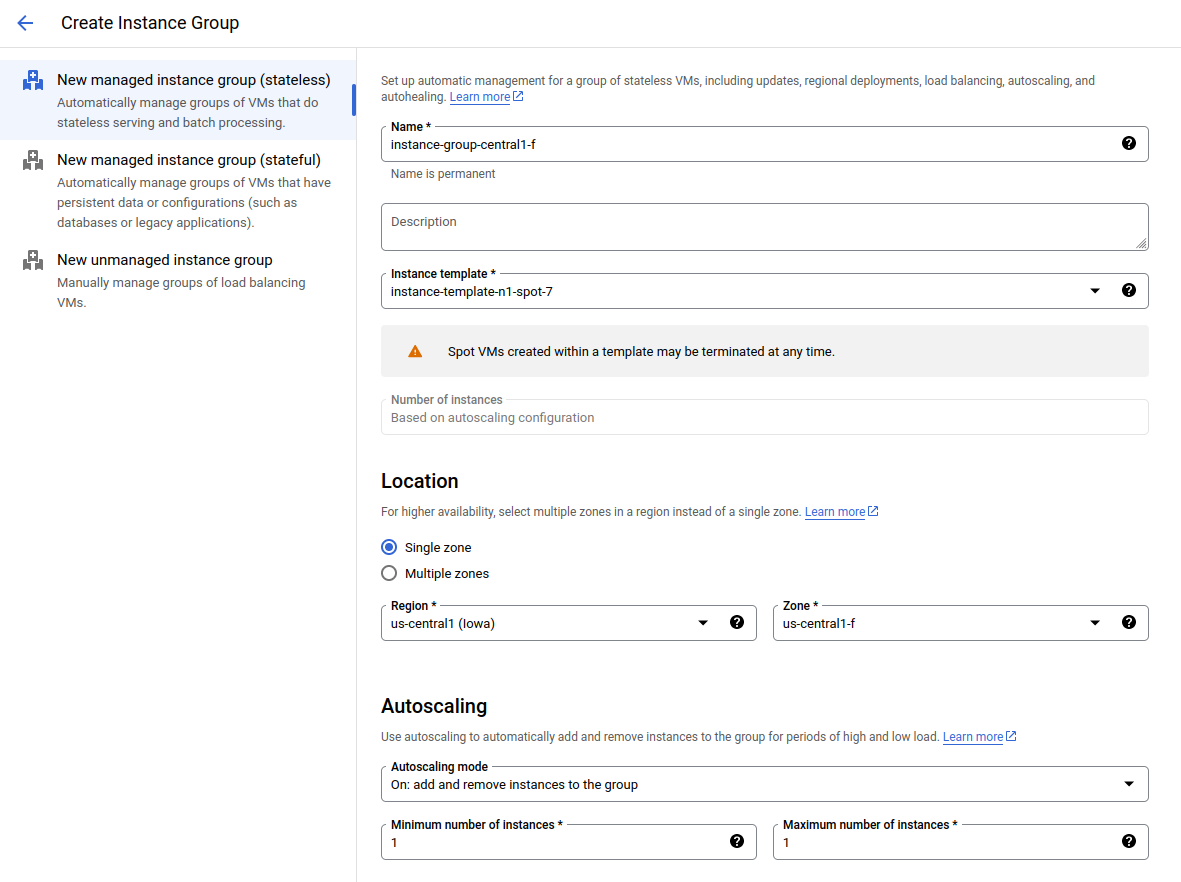
Continue to Compute Engine → Instance Group → Create instance group.
Choose the instance group template you created earlier. If necessary, change the zone — I usually choose the latest one. Set autoscaling from 1 to 1 instance. This will allow a new virtual machine to be spun up in case the previous one is terminated. You can leave the autoscaling signal unchanged because this rule will rely on the presence of a virtual machine as a whole. If needed, adjust the initialization period — I’ve increased it to 300 seconds just in case.
In the autohealing section, specify the health check you created earlier. Also, if necessary, increase the delay before it starts checking the virtual machine.
In the “Updates during VM instance repair” section, choose to update the instance configuration. This will allow the instance to pull updated configuration versions from the group and template settings.
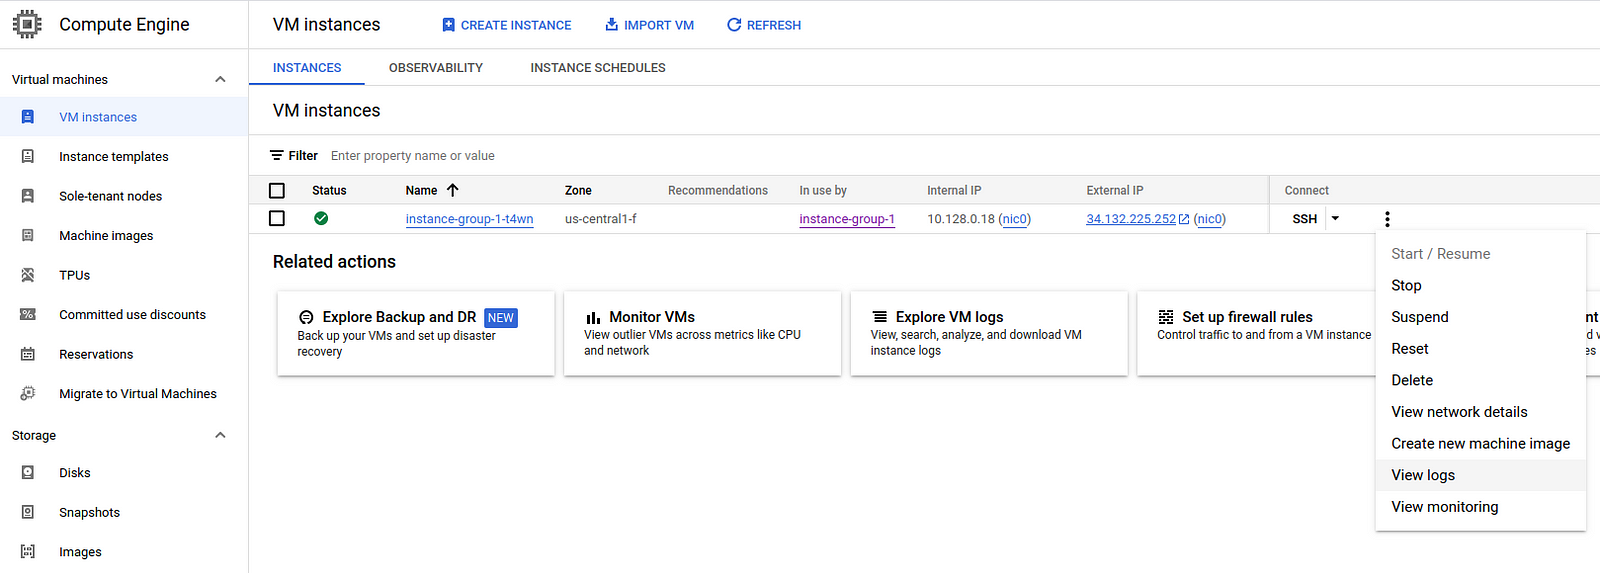
After completing this, a VM should be automatically created, and your application will be deployed on it according to the scripts. You can check this by going to Compute Engine → VM Instances and connecting to the virtual machine via SSH.
If something isn’t working, it’s worth revisiting the steps above and taking time for debugging before going further. If the health check doesn’t work correctly, the balancer will continuously return “no healthy upstream”.
Don’t hesitate to create new entities and delete old ones if you’re having trouble editing already created resources. In Google Cloud, there are quite a few user interface limitations.

Now, navigate to Network Services → Load Balancing → Create a load balancer. Choose the “start configuration” for the Application Load Balancer. Keep the default values for the radio buttons and click “Continue”. Choose a frontend name — the other settings are suitable for accepting HTTP requests. Move on to the backend section.
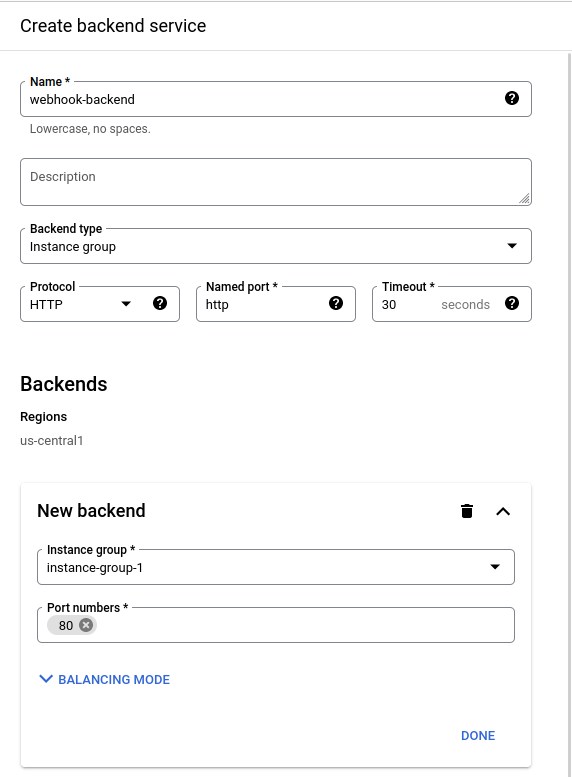
In the list of backends, choose to create a new backend. Change the type to “instance group” and select the instance group you created earlier. Scroll down the form and choose the created health check.
For routing rules, leave it as a “simple host and path rule.” Proceed and create the load balancer.
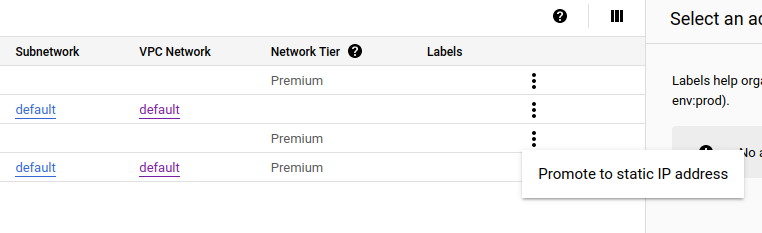
Finally, go to VPC Network → IP Addresses. There, find the IP address with a “Forwarding rule …” description — this is the load balancer. Click on the three dots and select “promote to static IP address.”
To make everything work, you only need to update the DNS record. The remaining two steps below are optional, but I’ll dive into them as well, because they are about good and easy to implement approaches.
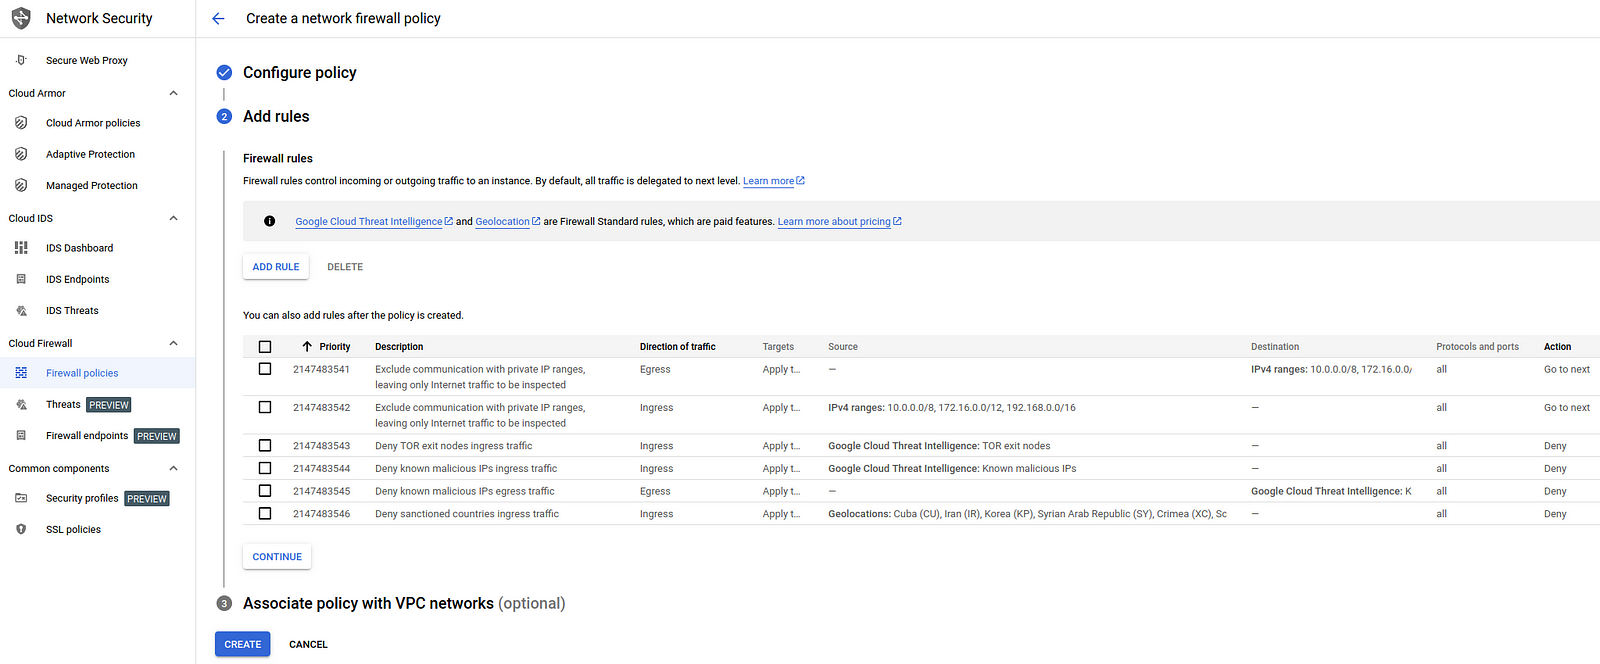
Open Network Security → Firewall policies.
Firewall settings might have caused me the most inconvenience on the current project (aside from my own mistakes lol), so it’s useful to know where they are and what they look like.
You can add or modify rules that have already been set. For example, instead of applying rules by tags, you can apply them to all instances or vice versa.
You can also create a new policy. Interesting rules are suggested, such as blocking known malicious IPs using Google Cloud Threat Intelligence. Some other options, like blocking sanctioned countries are not so useful. As far as I know, projects hosted in Google Cloud won’t be accessible from under-sanctioned IPs even without turning on this policy.
Setting up alerts can be a good practice, especially when you have preemptible VMs in your infrastructure. So, go to Monitoring → Alerting.
To begin with, you should configure the recipients of the notification. You can do this by clicking on edit notification channels. Google Cloud supports various channels, including email, SMS, Slack, PagerDuty, its own Pub/Sub, and custom webhooks.
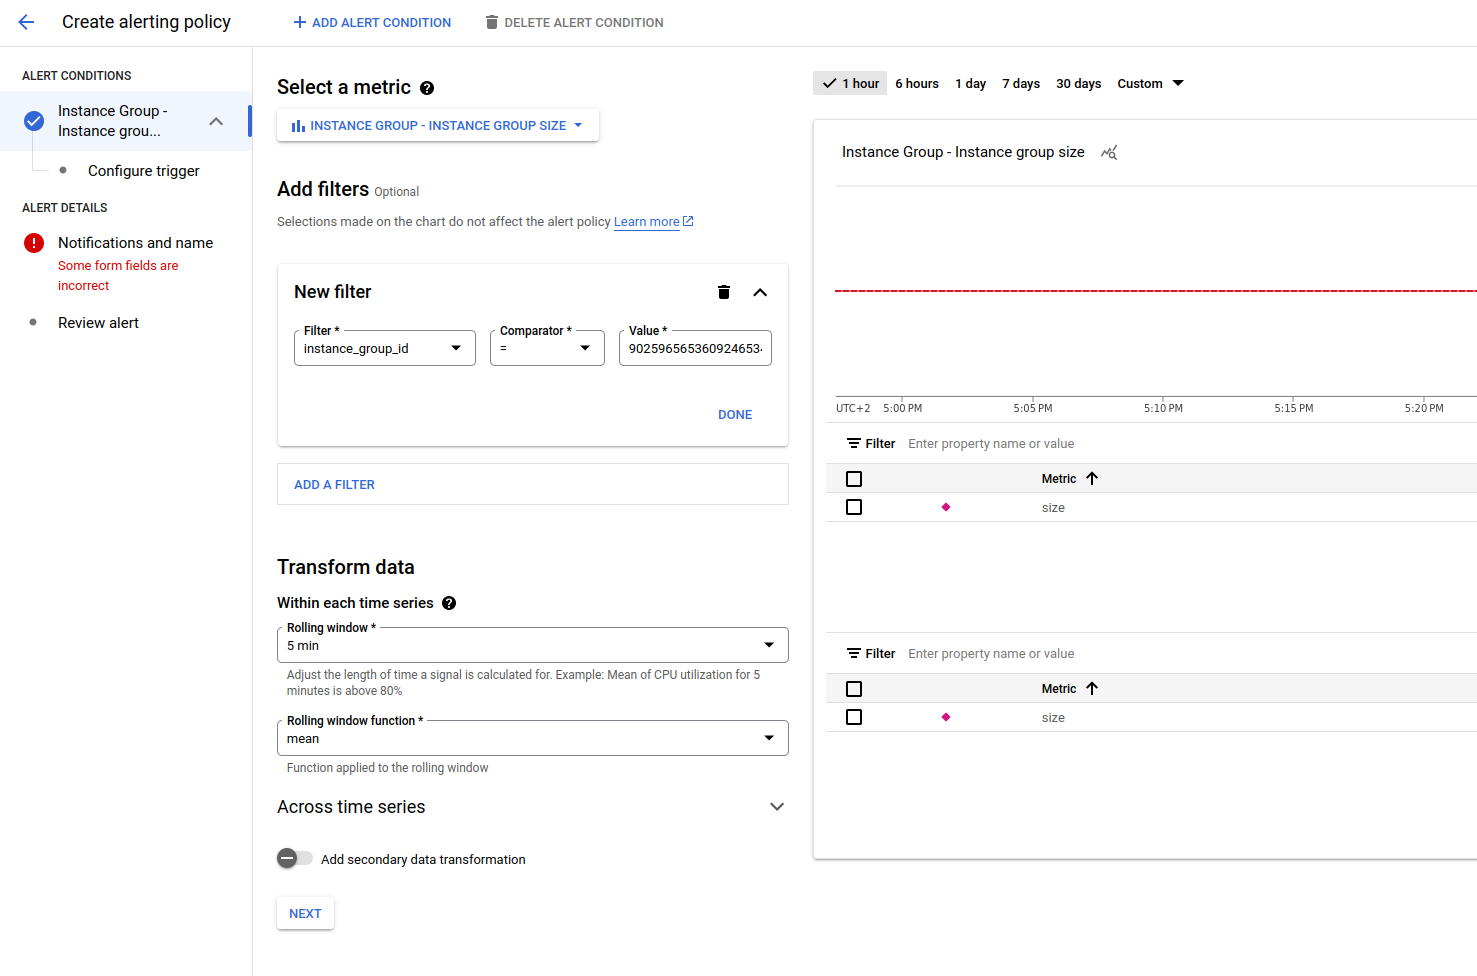
I set up a basic alert that triggers on VM deletion and creation. This way, if the webhook doesn’t work, I can understand this from the email notification and know when to retry an attempt.
Now that’s it. But there are still things to improve in the current configuration. Here’s a list of further steps you might be interested in:
- Set up SSL encryption.
- Connect a secrets manager and configure syncing environment variables from there.
- Add a second virtual machine and implement request replication if it was processed on a preempted VM.
- Consider the “infrastructure as code” approach: set up Ansible, Terraform, or a more lightweight tool to manage infrastructure using declarative configurations stored on GitHub in a repository adjacent to the project’s code.
I have a question left to you, my dear reader. Have you ever used Google Cloud before? What tasks have you solved with it?
If you found this article helpful, please show your support by clapping, sharing it with your friends or colleagues, and subscribing to receive notifications for my new posts.
If you want to talk on managing engineering teams or departments, designing systems, or improving your technical product, email me at laidrivm@gmail.com or message me on https://t.me/laidrivm.
Feel free to connect with me on LinkedIn at https://www.linkedin.com/in/vladimir-lazarev/.
Peace!